What's new
Issues addressed in this release
| DevOps Work Item | 15954 | ||||
| Category | Users | ||||
| Summary | Unable to delete a user record from Asta Vision. | ||||
| Description |
A user reported that when they attempted to delete a specific user record from Asta Vision, the following error occurred:
An error occurred while processing your request. Error Detail: An error occurred while saving the entity changes. See the inner exception for details. |
||||
| Resolution |
The user record in question was assigned to a project against which 'Subscribed' had been selected in the Subscribed to emails field; this setting caused the user record deletion to fail.
It is now possible to delete users in this situation.
More information on deleting users
|
||||
| DevOps Work Item | 16206 | ||||
| Category | Creating projects | ||||
| Summary | Unable to create projects in Asta Vision when no project-level, enumeration-type, user-defined field exists. | ||||
| Description |
A customer reported that when they attempted to create projects in Asta Vision, the following error occurred:
Object reference not set to an instance of an object. |
||||
| Resolution |
Investigation showed that in order to create projects, a project-level, enumeration-type, user-defined field needed to exist; no such fields existed in this instance of Asta Vision.
It is now possible to create projects in instances of Asta Vision in which no project-level, enumeration-type, user-defined fields exist.
More information on creating projects
|
||||
| DevOps Work Item | 16207 | ||||
| Category | Creating projects | ||||
| Summary | Unable to create projects within the Asta Vision web app when the web browser language is set to something other than 'English'. | ||||
| Description |
A number of users reported that when they attempted to create projects in the Asta Vision web app, when the web browser language was set to something other than 'English', the following error occurred:
The process cannot access the file 'C:\local\Temp\<filename>.tmp' because it is being used by another process. |
||||
| Resolution |
It is now once more possible to create projects within the Asta Vision web app, regardless of the language of the web browser.
|
||||
| DevOps Work Item | 16535 | ||||
| Category | Asta Vision API | ||||
| Summary | API Keys page accessible to customers who do not use the Asta Vision API. | ||||
| Description | Before this release, it was possible for customers to access the API Keys page within the Asta Vision web app, even if they did not use the Asta Vision API, by entering its URL directly into their web browser's address bar. | ||||
| Resolution |
It is no longer possible for customers who do not use the Asta Vision API to access the API Keys page.
|
||||
Integrate Asta Vision with external applications using a new API
The Asta Vision API is an extra-cost addition to Asta Vision. You can use the Asta Vision API to access Asta Vision and Asta Powerproject data relating to your programmes and projects from within external applications, thereby integrating Asta Vision with any external applications that you may use. For example, you could use the Asta Vision API to integrate Asta Vision with an external field application, enabling the field application to push progress updates into your projects automatically; or you could use it to integrate Asta Vision with a Business Intelligence dashboard, refreshing the dashboard with live project information every morning.
The data you can access using the Asta Vision API includes:
- Data on Asta Vision projects and programmes.
- Data contained within Asta Powerproject projects that are stored as Asta Vision programme revisions.
The Asta Vision API is a 'public' REST (Representational State Transfer) API, which uses standard HTTP methods and URLs to access resources.
You can use the Asta Vision API to read Asta Vision and Asta Powerproject data and to perform certain actions, such as creating new projects and accessing workflow actions. You can also use the API to temporarily lock the latest version of Asta Vision programmes in order to perform read and write operations on the Asta Powerproject data, such as adding progress to tasks.
If you use the Asta Vision API, a new API Keys option is available on the Asta VisionAdmin page. This leads to a new API Keys page, which you use to create and delete API access keys, which enable users to access the Asta Vision API.
You can use the Asta Vision API Portal to learn about and construct API requests. The API Portal describes the various operations that you can use to access and edit your Asta Vision and Asta Powerproject data in an API request, and shows the various parameters that you can apply to each operation. If you use the API Portal to construct sample API requests, you can then copy and paste these into external applications or into your own code, which saves you from having to code API requests from scratch.
More information on the Asta Vision API
More information on creating API access keys
More information on using the API Portal to learn about and construct API requests
Improvements to the bar chart on the Project View page
The following improvements have been made to the bar chart on the Project View page:
- For programmes that have at least one baseline, you can now choose to view information from the current baseline in the bar chart. You do this by selecting the new Show Baseline check box that has been added to the top-right of the page, just beneath the programme selector:

If you select this check box - which appears only for programmes that have at least one baseline - baseline tasks appear immediately beneath the corresponding tasks in the bar chart. A baseline task is highlighted in the image above. - Non-working time is now folded out of view, according to the programme's default calendar. You can see this in the image below, where Saturdays and Sundays - non-working time according to the default calendar - do not appear:

- You can now configure the spreadsheet to display columns with information on the codes that have been assigned to tasks:
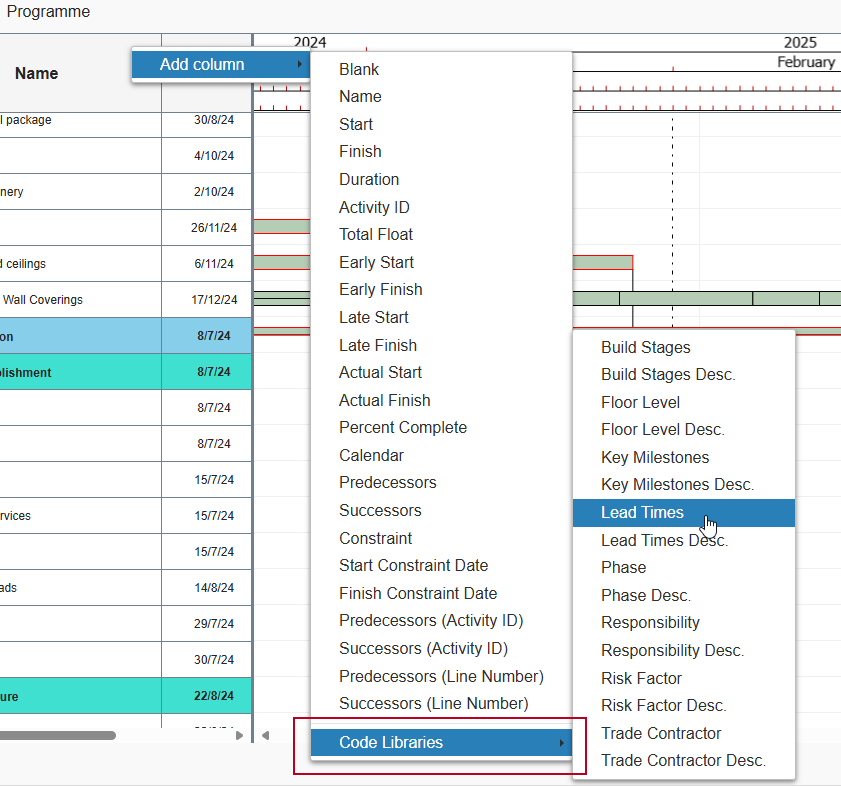
- Support has been added for localisation of the various elements of the bar chart - for example, the date zone - so that this page can now be localised to be displayed in a variety of different languages.
More information on viewing a programme as a bar chart
Issues addressed in this release
| DevOps Work Item | 9121 | ||||
| Category | Business Intelligence database | ||||
| Summary | Business Intelligence database contains duplicate project definitions after it has been updated with the latest data from Asta Vision. | ||||
| Description | A customer reported that their Business Intelligence database contained duplicate project definitions after it had been updated with the latest data from Asta Vision. The Asta Vision database did not contain duplicate projects. | ||||
| Resolution |
This issue, which could affect projects with multiple programmes, has been addressed, so duplicate project definitions can no longer be created in the Business Intelligence database when it is updated with the latest data from Asta Vision.
More information on updating your Business Intelligence database |
||||
| DevOps Work Item | 14658 | ||||
| Category | User-defined fields | ||||
| Summary | Unable to create projects having entered a string into the Read-only placeholder text field for a project-level, URL-type, user-defined field. | ||||
| Description | A customer reported that if they entered a string into the Read-only placeholder text field for a project-level, URL-type, user-defined field and set the field's default access to 'Write', they were unable to create projects. | ||||
| Resolution |
This issue has been addressed, so it is now possible to create projects in these circumstances.
|
||||
| DevOps Work Item | 15072 | ||||
| Category | Checking in | ||||
| Summary | Email notifications are not sent when an Asta Vision programme is checked in from within Asta Powerproject. | ||||
| Description | A customer reported that when they checked in Asta Vision programmes from within Asta Powerproject, email notifications were not sent. Notifications were sent correctly when they checked in programmes from within the Asta Vision web app. | ||||
| Resolution |
The email templates had been moved from their expected location, which meant that Asta Powerproject was unable to access them. Asta Powerproject is now able to access email templates that have been moved to a different location, which means that email notifications are now sent correctly when Asta Vision programmes are checked in from within Asta Powerproject.
More information on configuring email rules
More information on checking programmes into Asta Vision from within Asta Powerproject |
||||
| DevOps Work Item | 15521 | ||||
| Category | Web progress | ||||
| Summary | Unable to approve web progress when programme revision classifications are not enabled. | ||||
| Description |
A customer reported that when they attempted to approve web progress, the following error occurred:
Failed to import progress: Please contact your administrator to fix the problem.
The customer reported that if they clicked Retry, Asta Vision made another attempt to approve web progress, and that this second attempt was usually successful.
The customer in question had not enabled programme revision classifications. Investigation showed that this was causing the error. |
||||
| Resolution |
This issue has been addressed, so it is now possible to approve web progress when revision classifications are not enabled.
More information on understanding the workflow of programmes
More information on configuring programme revision classifications |
||||
Specify user role access rights for each programme type
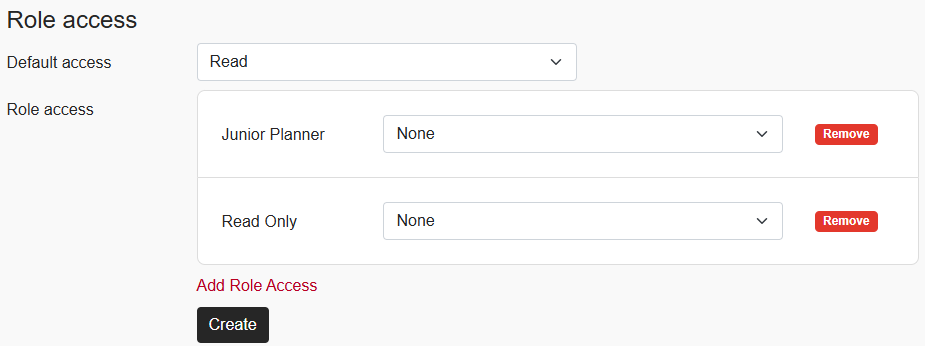
You can now specify the type of access that users with certain roles have to programmes of each type. For each programme type, you can specify a default level of access - either 'read' or 'none' - then specify a different level of access for users with certain roles. For example, you can specify that by default, all users can see programmes of a particular type - 'read' access' - but that users with two particular roles have no access to programmes of that type. If users with a particular role have no access to programmes of a particular type, they do not see those programmes in the Asta Vision website, or in the Asta Powerproject client.
To specify user role access rights for each programme type, you use the new Role access fields that have been added to the Create Programme Type and Edit Programme Type pages:
More information on configuring programme types
Classify programme revisions
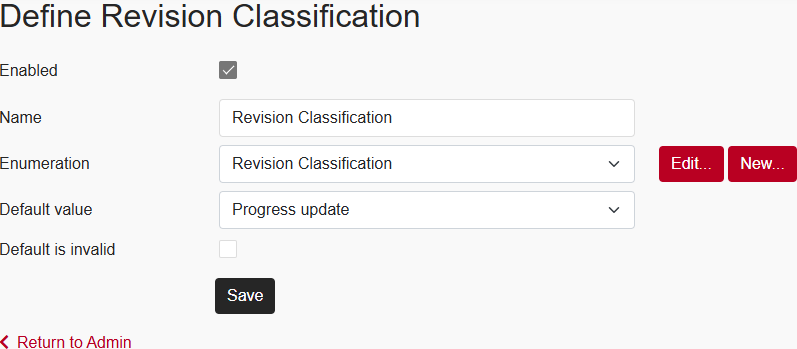
You can now classify programme revisions, to identify the type of each programme revision that is created. The different classifications you use depends on how your organisation works with revisions. For example, you could set up a series of classifications including 'Progress update', 'Client change' and 'Scenario planning', to apply to your revisions.
You use the new Define Revision Classification page to enable the classification of programme revisions:
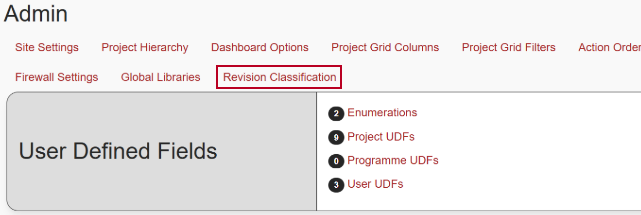
To access the new Define Revision Classification page, click the new Revision Classification link that has been added to the Admin page:
If you enable programme revision classification, you can apply a classification to a revision each time one is created - ie each time a programme is checked in or submitted - using a new field that has been added to the Programme Check In page:
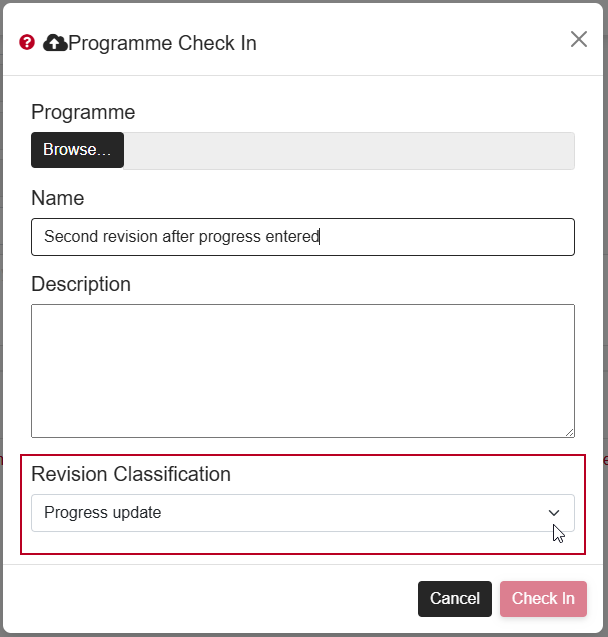
A similar field has been added to the dialogs in Asta Powerproject that you use to commit, check in and submit programmes. This field - and the similar fields described below - may be called something other than 'Revision Classification': its name is taken from what has been entered into the Name field on the Define Revision Classification page.
If you enable programme revision classification, the type of each programme's latest revision is displayed in the lower part of the Project page:
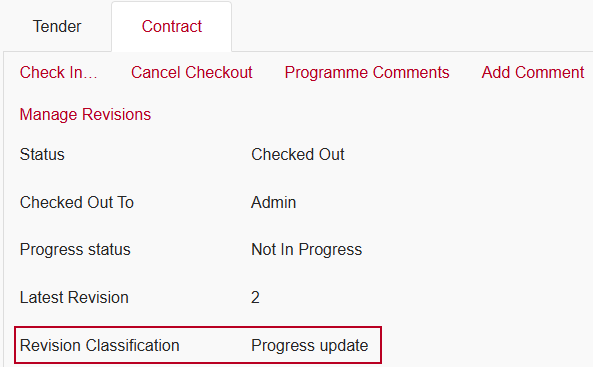
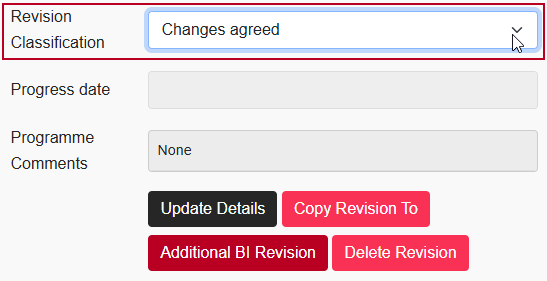
If you enable programme revision classification, you can also apply classifications to existing revisions - and change the classification of existing revisions, if required - using a new field that has been added to the Manage Revisions and Project Revisions pages:
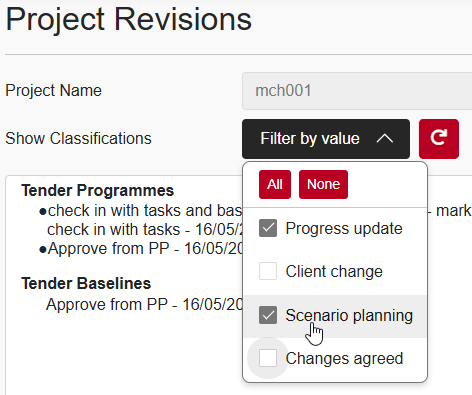
If you enable programme revision classification, a new Show Classifications field appears on the Manage Revisions and Project Revisions pages. You can use this field to narrow down the list of revisions on these pages to those of one or more particular types:
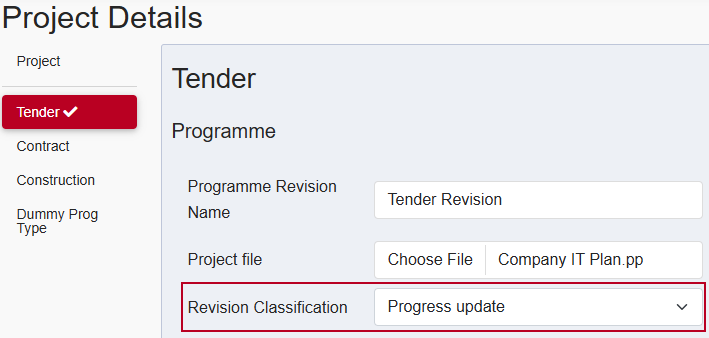
If you enable programme revision classification, you specify the classification to apply to the initial revision of each programme type when you create new projects and programmes in Asta Vision by uploading existing Asta Powerproject projects and their baselines, using a new field that has been added to each tab of the Project Details page:
More information on configuring programme revision classifications
Delete unwanted programme revisions
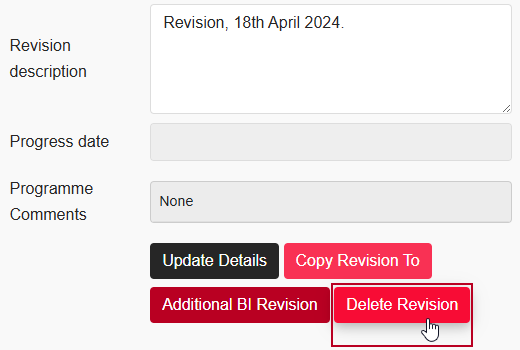
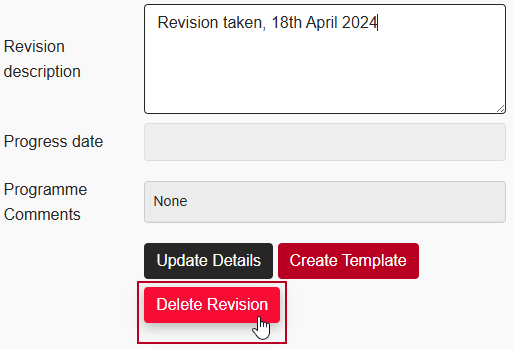
Before this release, it was not possible to delete unwanted programme revisions. You can now do this, by selecting a revision on the Project Revisions or Manage Revisions page and clicking the new Delete Revision button.
Here is how the new button appears on the Project Revisions page:
Here is how the new button appears on the Manage Revisions page:
A new 'Delete Revisions' miscellaneous-type security rule has been added to the Security Rules page:
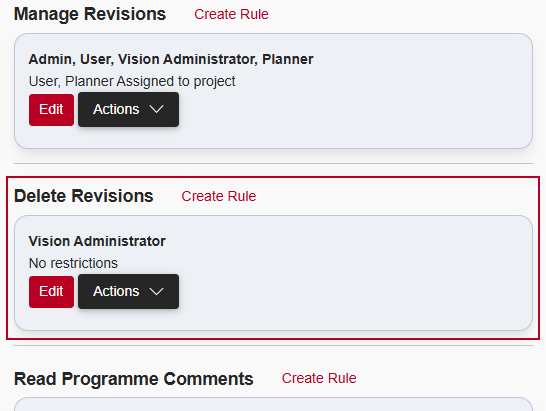
You use this security rule to determine which users are able to delete programme revisions, and to specify the conditions under which programme revisions can be deleted. For example, you could apply a field rule to a 'Delete Revisions' security rule that specifies that revisions from a specific programme type cannot be deleted. In order for a user to be able to delete revisions, they also need to be able to manage revisions.
You cannot delete the latest revision of a programme or baseline, as this is likely to be the revision on which users are currently working. You cannot delete a revision if it has been nominated as an 'additional BI revision'.
More information on viewing details of a project's programme revisions
More information on managing different revisions of a programme
More information on configuring security rules
Issues addressed in this release
| Work Item | 10397 | ||||
| Category | Project creation | ||||
| Summary | When creating a project using a template, the name of the 'Admin' user was changed to 'Untitled'. | ||||
| Description | Before this release, if a project was created using a template, the name of the 'Admin' user was incorrectly changed to 'Untitled'. | ||||
| Resolution |
It is now possible to create projects using a template without the name of the 'Admin' user being changed to 'Untitled'.
|
||||
Configure workflow rules to update the latest version of one programme type with a newly-approved version of an earlier programme type
Before this release, you could configure a workflow rule to create a programme of a specific type, based on a copy of a programme of a different type. This is useful if you want to create a programme of a particular type when a programme of a different type reaches a similar status. For example, if you have two different programme types - 'Tender' and 'Contract' - you could configure a workflow rule to create a 'Contract' programme when the 'Tender' programme reaches a certain status. However, it was not possible to update a programme of a specific type with a copy of a programme of a different type.
You can now do this, using the Always overwrite existing programme type check box that has been added to the Create Workflow Rule and Edit Workflow Rule pages:
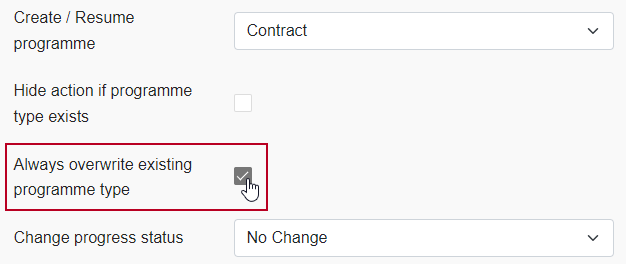
If you select this check box, if a programme of the type selected in the Create/resume programme field exists already, it will be replaced with a copy of the current programme. The contents of any programme-level user-defined fields that have been recorded in the programme of the selected type will be retained, but the active comment, error state and quality check values will be reset to those of the current programme.
More information on configuring workflow rules
Group projects on the Projects and Portfolio Overview pages according to the contents of non-hierarchical user-defined fields
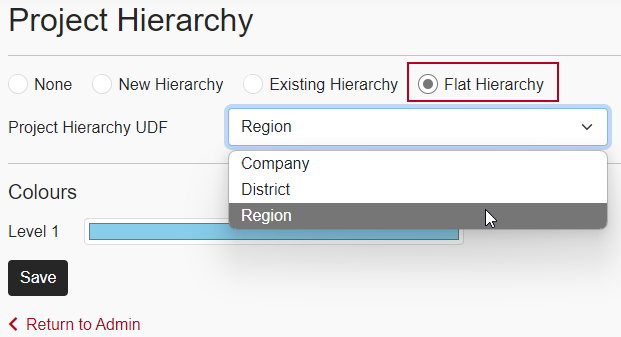
Before this release, you could group projects on the Projects and Portfolio Overview pages according to the contents of a project-level user-defined field that was linked to a hierarchical user-defined enumeration. You can now group projects on these pages according to the contents of a project-level user-defined field that is linked to a standard - ie non-hierarchical - user-defined enumeration.
For example, if your projects take place in different regions, you could set up a user-defined field called 'Region', link this to a standard user-defined enumeration that lists the regions in which you work, and use this field to assign the appropriate region to each project. You could then use the 'Region' field to group the projects on the Projects and Portfolio Overview pages.
You use the Flat Hierarchy radio button that has been added to the Project Hierarchy page to specify that you want to group projects according to the contents of a user-defined field that is linked to a standard user-defined enumeration, then select the user-defined field in the Project Hierarchy UDF field:
More information on grouping projects on the Projects and Portfolio Overview pages
Use a user-defined field to filter the users that appear in Assign User popups
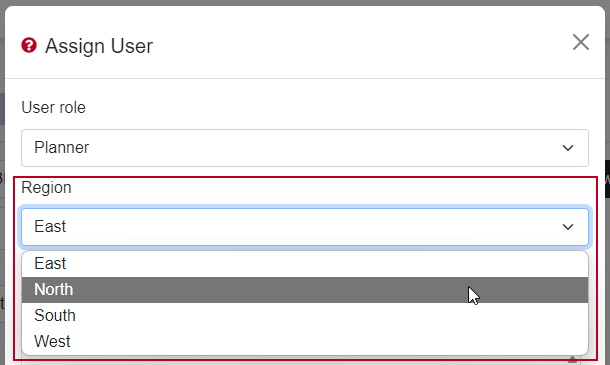
You use Assign User popups to assign users to projects when you create or edit them. If you have a large number of Asta Vision users, you can use a user-defined field to filter the users that appear in these popups. For example, if you have different teams of people to work on projects in 'North', 'East', 'South' and 'West' regions, you could set up a user-defined field called 'Region', populate this with the different regions in which you work, and use this field to assign the appropriate region to each user. You could then use the 'Region' field to filter the users that appear in the Assign User popups, reducing the number of users that you have to select from.
You use the User Selection Dialogs UDF field that has been added to the Site Settings page to specify the user-defined field you are using to filter users:
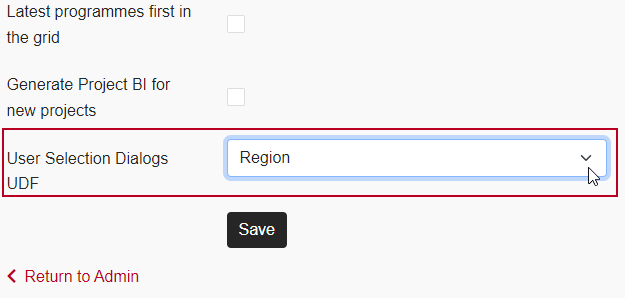
If you specify a user-defined field in this field, that field appears on the Assign User popups, directly beneath the User role field:
More information on using a user-defined field to filter the users that appear in Assign User popups
Only appropriate user roles appear when assigning users to projects
You use 'Can Be Assigned To Project' security rules to specify which types of user can be assigned to projects. A 'Can Be Assigned To Project' security rule may specify one or more user roles, meaning that only users to which the specified roles are assigned can be assigned to projects.
Before this release, when assigning users to new projects, the User role field on the Assign User popup included user roles that did not meet the appropriate 'Can Be Assigned To Project' security rules, and selecting such a role in the User role field would result in no users being displayed in the User name field. For example, if a security rule specified that users with roles 'A' and 'B' could be assigned to projects, but that users with roles 'C' and 'D' could not, all roles - 'A', 'B', 'C' and 'D' - would appear in the User role field, even though selecting roles 'C' and 'D' would result in no users being displayed in the User name field.
Now, only those user roles that meet the appropriate 'Can Be Assigned To Project' security rules appear in the User role field on the Assign User popup when you create new projects. Using the example above, this would mean that only roles 'A' and 'B' would appear, as these are the only roles whose users can be assigned to the project.
More information on configuring security rules
Use a user-defined field to filter the users that appear in Select User popups
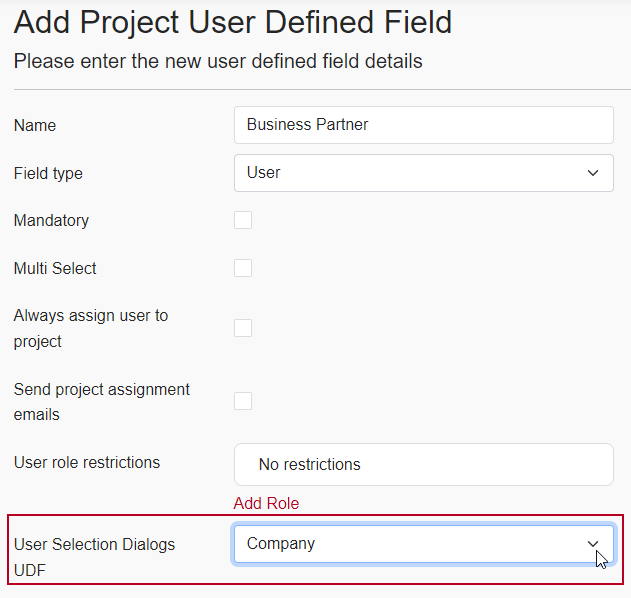
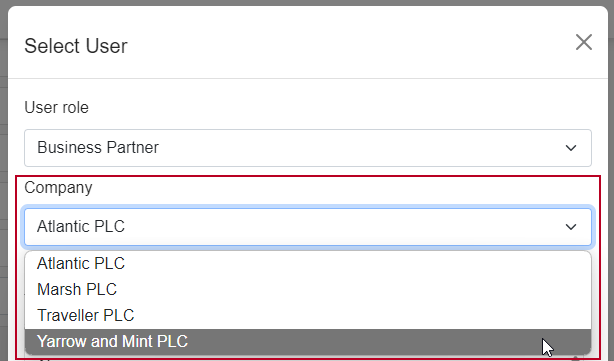
You use Select User popups to select users in user-type user-defined fields. If you have a large number of Asta Vision users, you can use a user-defined field to filter the users that appear in these popups. For example, if you have different teams of people who work in different business partner companies, you could set up a user-defined field called 'Company', populate this with the different companies with which you work, and use this field to assign the appropriate company to each user. You could then use the 'Company' field to filter the users that appear in the Select User popups that appear when you select users in user-type user-defined fields, reducing the number of users that you have to select from.
You use the User Selection Dialogs UDF field that has been added to the Add User Defined Field and Edit User Defined Field pages for standard, non-hierarchical, user-type, user-defined fields to specify the user-defined field you are using to filter users:
If you specify a user-defined field in this field, that field appears on the Select User popups, directly beneath the User role field:
Configure user-level user-defined fields to appear only for users with specific roles
Before this release, all user-level user-defined fields were visible when creating or editing all user records, unless the permissions specified for your user role did not give you access to view them.
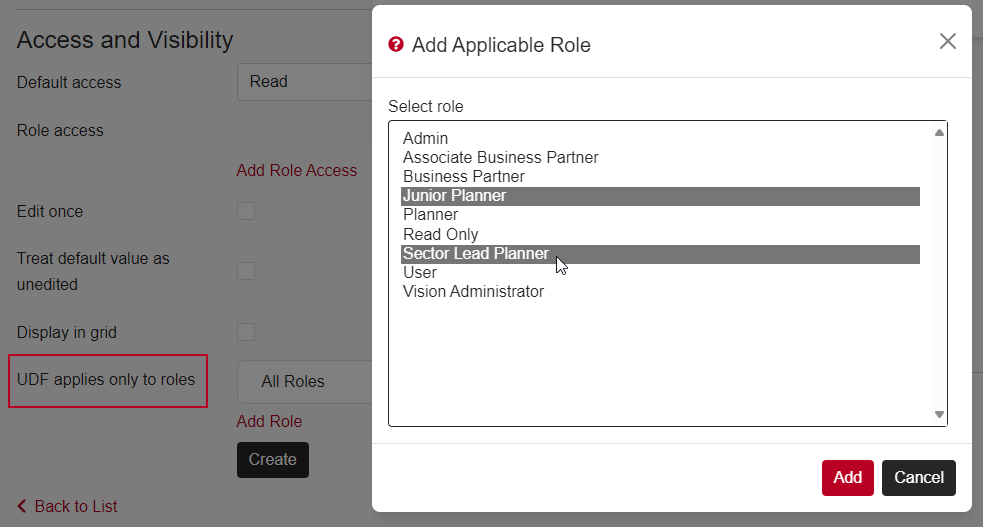
Now, you can configure user-level user-defined fields to be available only when creating or editing users with specific roles. For example, you might configure a 'Sector' user-defined field to be available when creating or editing users with 'Sector Lead Planner' or 'Junior Planner' user roles, but to be hidden when creating or editing users with any other role.
You use the UDF applies only to roles field that has been added to the Add User Defined Field and Edit User Defined Field pages for user-level user-defined fields. You can select more than one user role if required:
If you have entered information into a user-defined field that is configured to appear only for users with a specific role, then change a user's role to one for which the field does not appear, the field is reset to the default value when the user record is saved.
More information on working with user-defined fields
Restrict the users that can be selected in user-defined fields to those with specific roles
You use Select User popups to select users in user-type user-defined fields. If you have a large number of Asta Vision users, you restrict the users that can be selected in a user-type user-defined field to those with specific roles. For example, if you have a user role called 'Business Partner', which you apply to users who work for your various partner businesses, you may want to restrict the users that can be selected in a 'Business Partner Contact' user-defined field to users that have been assigned the 'Business Partner' user role.
You use the User role restrictions field that has been added to the Add User Defined Field and Edit User Defined Field pages for user-type user-defined fields to specify the user roles to which the selection of users in this field should be restricted. You can select more than one user role if required:
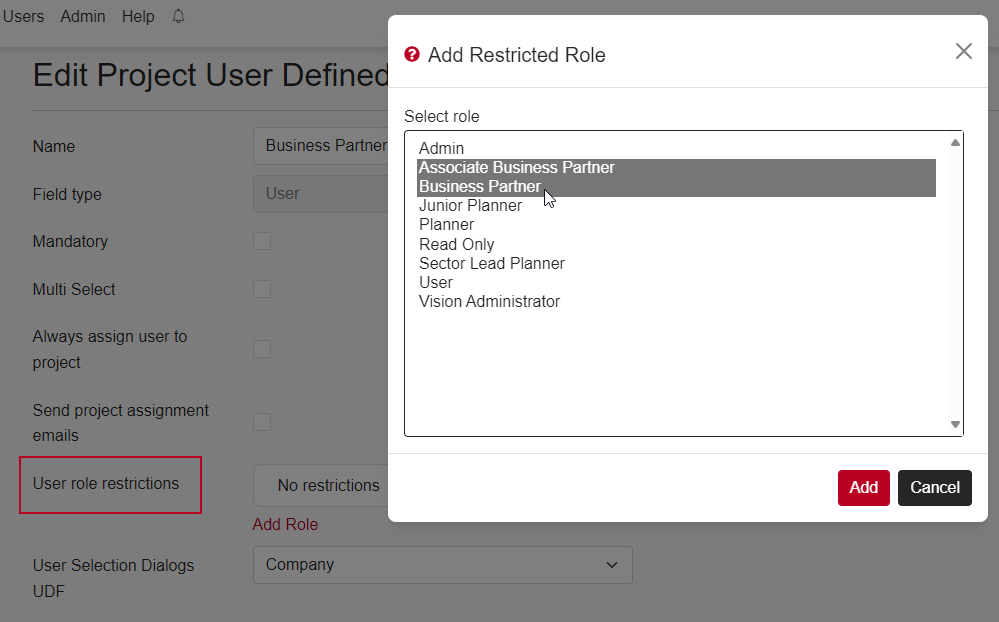
If you specify more than one user role in the User role restrictions field, only those roles will be selectable in the User role field on the Select User popups:
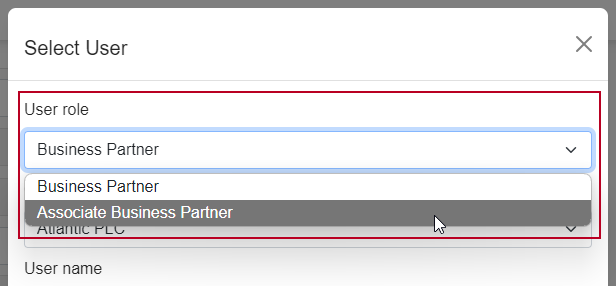
If you specify only one role in the User role restrictions field, the User role field will not appear at all on the Select User popup.
Filter and sort users on the Users page using user-defined fields
You can specify that one or more user-level, enumeration-type, user-defined fields should be displayed as columns on the Users page, then filter and sort the list of users according to what has been entered into the user-defined field for each user. This can make it easier to find the user you want if you have a large number of Asta Vision users. For example, if you have different teams of people who work in different business partner companies, you could set up a user-defined field called 'Company', populate this with the different companies with which you work, and use this field to assign the appropriate company to each user. You could then configure the 'Company' field to appear as a column on the Users page, and use this field to filter and sort users on that page, making it easier to find the users that work in a particular company.
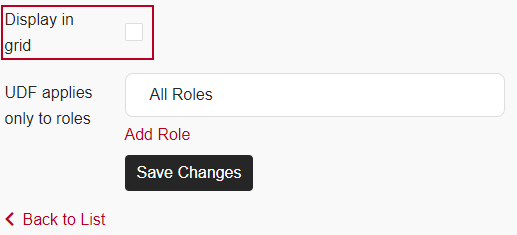
You use the Display in grid check box that has been added to the Add User UDF and Edit User UDF pages to specify that user-defined fields should appear as columns on the Users page:
More information on filtering and sorting users on the Users page using user-defined fields
Organise user roles into a hierarchy
Before this release, user roles were always arranged in a flat, non-hierarchical list, with all user roles at the same level. This meant that users who had permission to create and edit Asta Vision users were able to assign any user role to a user, which enabled them to create a user with more permissions than they have themselves.
You can now prevent this from happening by organising user roles into a hierarchy. If you do this, users with a particular role can only assign user roles that are lower down the hierarchy than their own role to other users, and can only view users with roles that are lower down the hierarchy than their own role.
You organise user roles into a hierarchy using the new Role Hierarchy link that has been added to the Roles page:
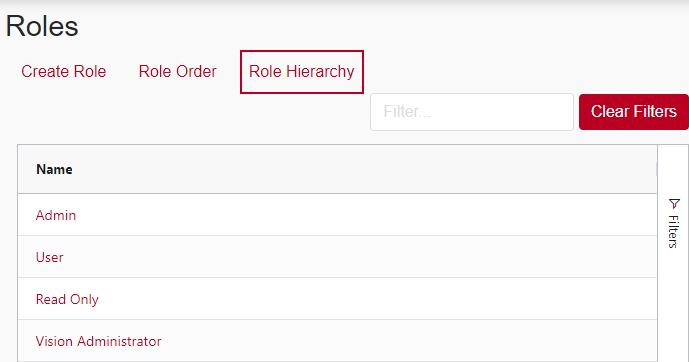
Clicking this link takes you to the new Role Hierarchy page, which you can use to organise your user roles into a hierarchy:

More information on configuring user roles
Configure user-defined fields to be editable only once
Before this release, if a user's access rights allowed them to edit a user-defined field, they could edit the field and change its value as many times as they liked.
You can now configure user-defined fields to be editable only once. You may want to do this to enable users to set a value against a programme, project or user which, once set, cannot be changed.
You configure a user-defined field to be editable only once using the Edit once check box that has been added to the Add User Defined Field and Edit User Defined Field pages. If you select this check box, the user-defined field can be edited only once, and after that, its value becomes fixed:
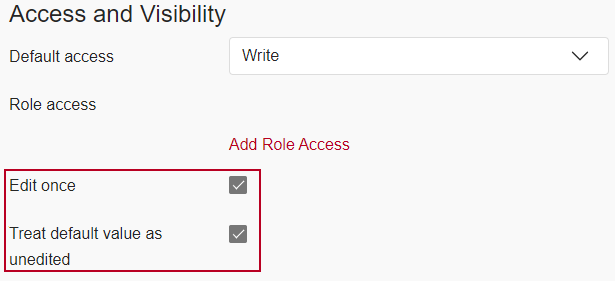
Beneath the Edit once check box on the Add User Defined Field and Edit User Defined Field pages, a new Treat default value as unedited check box has been added. For most user-defined fields that are editable once only, you should select this check box, which will allow users to edit the value that appears in the field by default once only - after the initial edit, the value will be fixed. To prevent users from editing the default value that appears in a field, forcing the field's default value to remain unchanged, clear this check box.
For example, for a user-defined field that enables you to specify a company against a project, selecting the Treat default value as unedited check box would enable you to specify 'None' initially in the field - when the company has not yet been decided - then to specify the company in the field when it has been decided; and after that, the 'Company' field would not be editable.
Note that administrator users are able to edit user-defined fields multiple times, even if they are configured to be editable once only. This enables administrator users to change the settings of these fields if their values have been set incorrectly.
More information on working with user-defined fields
Create user-type user-defined fields in which more than one user can be selected
You can now create user-type user-defined fields in which more than one user can be selected in the same field, which is useful if you need to assign more than one user to a project or programme for the same reason. For example, you could create a user-type, project-level user-defined field called 'Project Manager' and configure it to allow more than one user to be selected, then use this to identify multiple project managers against the same project.
To specify that more than one user can be selected in a user-type user-defined field , select the Multi Select check box that has been added to the Add User Defined Field and Edit User Defined Field pages:
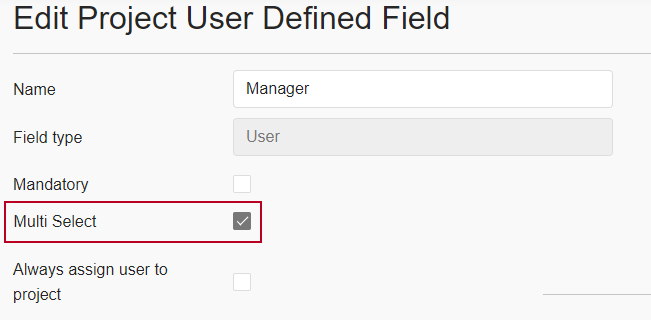
If you select this check box for a user-defined field, the field allows the multiple selection of users wherever the field appears, by clicking Select Users, which leads to the Select Users dialog.
You can subsequently remove users from a multi-select, user-type field by clicking Remove to the right of a user wherever the field appears.
Notes about multi-select, user-type, user-defined fields:
- If you have selected the Multi Select check box for a user-defined field, you cannot subsequently clear the check box - to turn the field back into a single-select field - if more than one user has been selected in the field anywhere in your data.
- Workflow, security or email rules that are triggered when a multi-select, user-type, user-defined field equals, or does not equal, a given user, will be triggered if the field equals, or does not equal, any one of the users that has been selected in the field.
- If a multi-select, user-type, user-defined field is displayed in the programme dashboard view, all users that have been selected in the field are displayed in a comma-separated list.
- If a multi-select, user-type, user-defined field is displayed as a column on the Projects page, only one user from the field is displayed in the column.
- If the Display in Powerproject check box is selected for a multi-select, user-type, user-defined field, only one user from the field is displayed in Asta Powerproject.
More information on working with user-defined fields
Send project assignment emails to users without actually assigning them to a project
You can now configure Asta Vision to send project assignment emails to users without actually assigning them to a project. This may be useful if, for example, you have one group of users - project managers - who you want to assign to a project and receive project assignment emails, and another group of users - business partners - who you do not want to assign to the project, but that you want to receive project assignment emails nevertheless.
To configure Asta Vision to do this, you set up a project-level, user-type user-defined field and select the new Send project assignment emails check box that has been added to the project-level user-defined field pages:
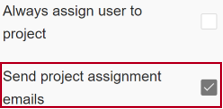
Once you have set up the user-defined field with this check box selected, it appears on the Create Project from Template and Project pages - the pages you use to create and edit projects - and on the Project Details page - the page you use to create projects by uploading existing Asta Powerproject projects. When you select one or more users in the field and save the project, the users you selected are sent an email to inform them that they have been assigned to the project - but they are not actually assigned to the project.
If a user selects the Assigned to me check box, on the Vision section of the Open tab of the Backstage view in Asta Powerproject, the list of Asta Vision programmes is filtered to include any programmes to which the user has been assigned, and any programmes in which the user has been selected in a user-defined field with the Send project assignment emails selected.
More information on working with user-defined fields
Project and Projects pages simplified when only one programme type exists
The Project page displays details of a project's programmes in tabs at the bottom of the page, with 'breadcrumb'-style hyperlinks at the top of the page that provide another way of accessing the different programmes. Before this release, these tabs and 'breadcrumb'-style hyperlinks were displayed even for instances of Asta Vision in which only one programme type has been created.
Now, the programme tabs and 'breadcrumb'-style hyperlinks only appear on the Project page if more than one programme type has been created. If only one programme type exists, the programme tabs and 'breadcrumb'-style hyperlinks do not appear, and any programme comments are displayed at the top of the Project page, followed by the single programme type's workflow actions:

The Projects page, which displays your projects in a list, has also been simplified when only one programme type exists. If more than one programme type exists, you can still click ![]() to the left of a project's name to display details of the project's programmes, with each programme appearing on a separate row. If only one programme type exists,
to the left of a project's name to display details of the project's programmes, with each programme appearing on a separate row. If only one programme type exists, ![]() no longer appears to the left of each project's name, so it is no longer possible to view details of a project's single programme on its own row, and the programme's workflow actions are now available by right-clicking the project itself.
no longer appears to the left of each project's name, so it is no longer possible to view details of a project's single programme on its own row, and the programme's workflow actions are now available by right-clicking the project itself.
More information on using the Project page to edit projects and programmes
More information on using the Projects page to work with projects and programmes
Enable collaboration on projects when you create them
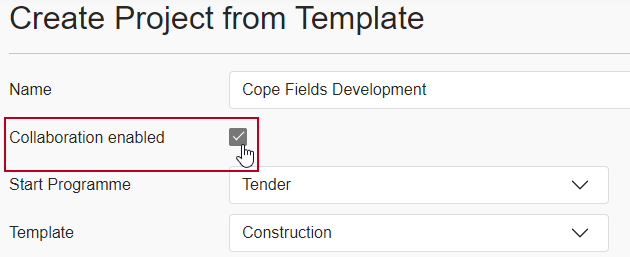
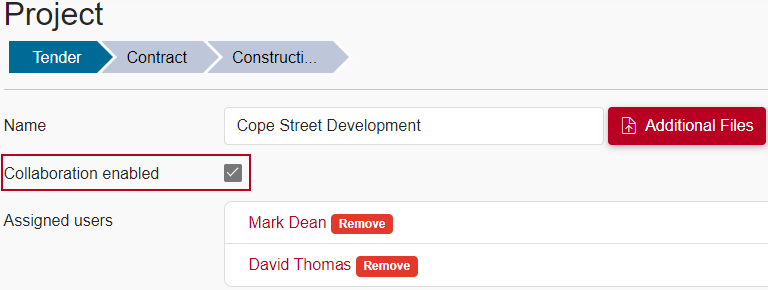
If your organisation uses Asta Vision Live, you can now enable users to collaborate on a project's programmes when you create the project, rather than having to edit the project after having created it to enable collaboration. You do this by selecting the Collaboration enabled check box that has been added to the Create Project from Template page:
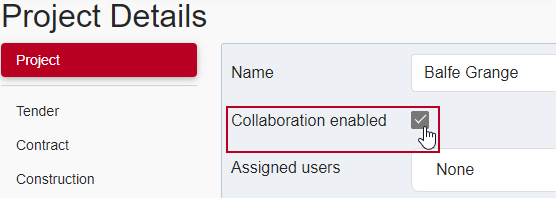
A Collaboration enabled check box has also been added to the Project Details page, so you can now enable collaboration on existing Asta Powerproject projects when you upload them to Asta Vision:
Enable different users to collaborate on a project's programmes in real time in Asta Powerproject
You can use Asta Vision Live to enable users to collaborate on projects - to work together on a project's programmes at the same time in Asta Powerproject.
If your organisation uses Asta Vision Live, users are able to collaborate on a set number of programmes at any one time. As well as being able to check out programmes in Asta Powerproject to work on them individually, users are able to start 'collaboration sessions' - sessions that other users can then join, with the users able to edit the same programme at the same time. A collaboration session lasts until the user that started the session checks in or submits the programme - or cancels the check out - in Asta Powerproject.
Enabling collaboration on a project does not prevent users from being able to check out the project's programmes individually; users can choose whether to check out a programme to work on it themselves, or start a collaboration session to work on it with others.
To enable users to collaborate on a project's programmes, you select the Collaboration enabled check box that has been added to the Project page:
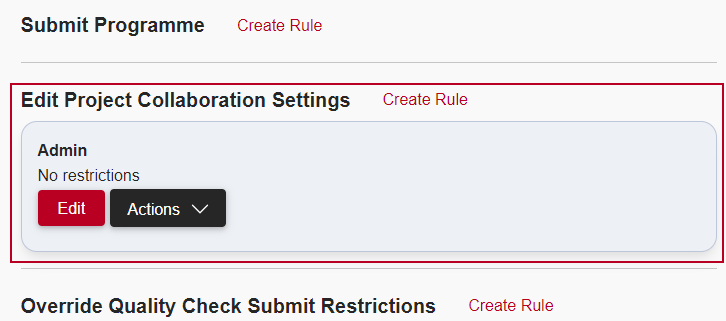
A new 'Edit Project Collaboration Settings' security rule has been added. Only users whose role is assigned to this security rule can enable collaboration on projects:
You can use the new Collaborate page to identify the projects that have collaboration enabled and to view the number of programmes that are currently being collaborated on by users in Asta Powerproject. You can also identify which user has started each ongoing collaboration session. This may be useful if you have reached your collaboration session limit, as you can contact the user to ask that they end a collaboration session that is currently ongoing, to enable you to start a new collaboration session. To access the new Collaborate page, you use the Collaborate option that has been added to the Admin page:

Collaboration is available only if you use Asta Vision Live, a version of Asta Vision that enables users to collaborate on programmes in real time. Please contact Elecosoft to find out more.
More information on enabling users to collaborate on projects
Use global libraries to manage a single set of calendars, codes, resources, etc across multiple projects
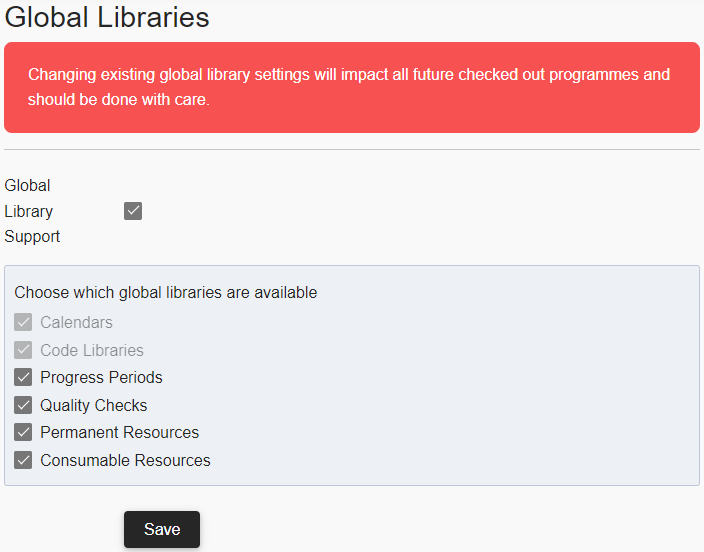
You can configure Asta Vision to use global libraries. These are calendars, codes, progress periods, quality checks and resources that can be stored in a global library file in Asta Vision and used in any number of individual projects, saving you from having to set up the same libraries in your projects multiple times. If you configure Asta Vision to use global libraries, you use the Global Libraries page to specify which types of library object should be included in the global libraries. For example, you may want to have global libraries for calendars, code libraries and permanent resources, but not for progress periods, quality checks and consumable resources.
To configure the use of global libraries, you use the new Global Libraries page, which is accessed using the new Global Libraries option on the Admin page:

The Global Libraries page has a Global Library Support check box, which you use to turn global library support on and off, and individual check boxes that you use to specify the global libraries you want to use:
Two new types of miscellaneous security rule, relating to global libraries, have been added to Asta Vision:
- Manage Global Library Options - use this to specify which users are able to configure global library options in Asta Vision.
- Edit Global Library File - use this to specify which users are able to edit the global library file that contains the global calendars, codes, resources, etc in Asta Powerproject.
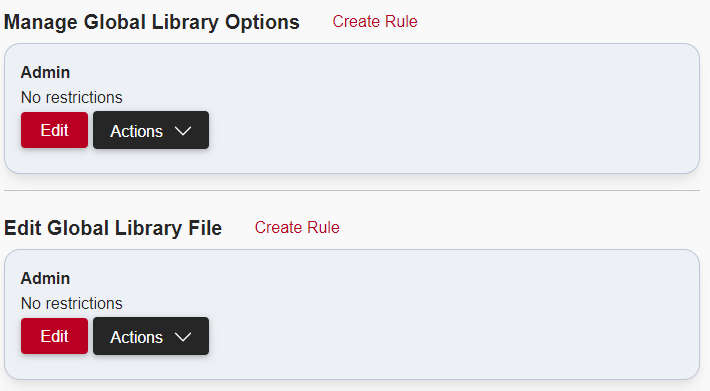
You can access these new security rules by clicking Miscellaneous Rules on the Security Rules page.
If you use global libraries, you cannot check programmes in or out using the Asta Vision website; you must check them in and out using Asta Powerproject. This is similar to the restriction on checking in and out programmes of a particular type when a quality check has been applied to that programme type. A new 'Override Check In/Out Programme Restrictions' project security rule has been added, which you can use to override this restriction:

When global libraries are in use or a quality check has been applied to a programme type, programmes should only be checked in and out using the Asta Vision website in exceptional circumstances, for example, on rare occasions such as a programme becoming corrupted. For this reason, you should only assign high-level user roles to this security rule.
More information on using global libraries
More information on configuring security rules
Sign into Asta Vision using your Microsoft Entra ID credentials
Traditionally, all users signed into Asta Vision using an Asta Vision user name and password. Setting this up involves specifying an email address and password for each user in Asta Vision. Users then enter the user name and password to sign into Asta Vision.
If your organisation uses Microsoft Entra ID to enable users to sign into their Microsoft accounts at your organisation, you can now choose to have your users sign into Asta Vision using federated authentication, which allows them to sign in using their Microsoft Entra ID credentials. There are three main advantages of this:
- If a user leaves your organisation, you no longer need to remember to edit their user record in Asta Vision and change their user name and password to prevent them from accessing Asta Vision; as soon as their Microsoft Entra ID account is disabled, they are automatically denied access to Asta Vision.
- If your organisation mandates the use of multi-factor authentication, you can implement this using Microsoft Entra ID and it will apply automatically to Asta Vision.
- Elecosoft will be implementing federated authentication across their range of software products, to enable users to sign into a range of Elecosoft apps using the same credentials.
If you switch to using federated authentication, users sign into Asta Vision by clicking Sign in with your Microsoft Entra ID account, on the Elecosoft Identity Service dialog:
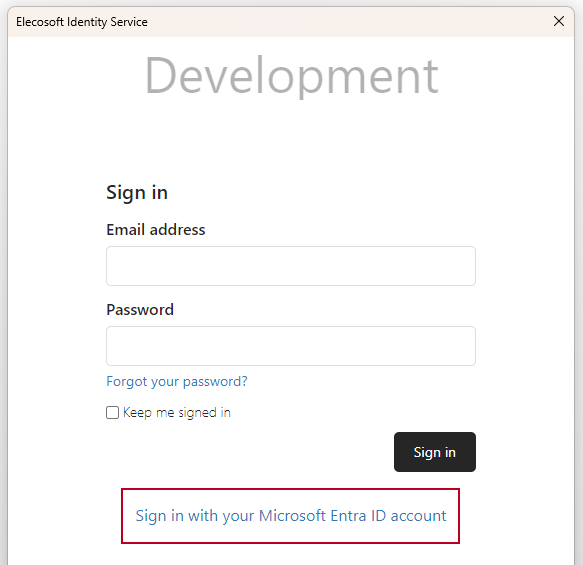
Clicking this link launches the Sign in to your account dialog, where users sign in using their Microsoft Entra ID credentials - unless they are already signed into that account on the browser they are using, in which case they are taken straight into Asta Vision.
If you enable users to sign in using federated authentication, you no longer specify a password for each user in Asta Vision; instead you specify details of the email address that they use to sign into Microsoft Entra ID.
More information on signing into Asta Vision using your Microsoft Entra ID credentials
More information on working with users
Improved Search facility in Asta Vision Help
The Search facility in the Asta Vision Help has been improved in this release: it will now handle natural language search queries that, before this release, would result in no search results, or in unhelpful search results.
For example, in the previous version of the Asta Vision Help, if you searched for How do I add a new project?, How do you edit a user role?, or How can I change my password?, you got either zero results, or unhelpful results.
If you try these searches in the new version of the Help, you get useful search results that point you towards topics that answer your questions.
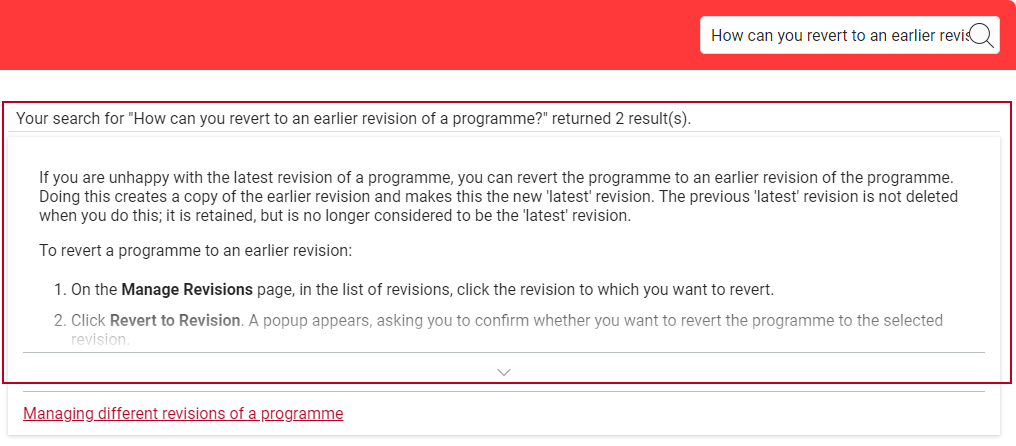
In addition to this, wherever possible, as well as pointing you towards Help topics that provide useful information on the things you are querying, the Help will now display information that answers your search query directly in the Search pane.
For example, if you search for How do I add a user-defined field?, How do you attach a file to a project? or How can you revert to an earlier revision of a programme?, you now see information above the topic list in the search results that answers your query directly:
New topic that explains how to use the Asta Vision Help
The Asta Vision Help now includes a topic that explains how to use the Help. It includes the following information:
- Accessing the Asta Vision Help.
- Displaying the Asta Vision Help in its own window.
- Moving between topics in the Asta Vision Help.
- Searching for information in the Asta Vision Help.
- Tips on how to search for information effectively.
- What to do if the table of contents is not visible.
Group projects on the Projects page according to a user-defined field
You can now group projects on the Projects page according to the contents of a project-level user-defined field. If you do this, a summary bar is displayed on the Projects page for each value in the user-defined field, and projects are grouped according to what has been selected in the user-defined field for each project. For example, if you select a user-defined field that is used to specify the geographical location of each project, a summary bar is displayed for each location and the projects that take place in that location are grouped beneath the summary bar:
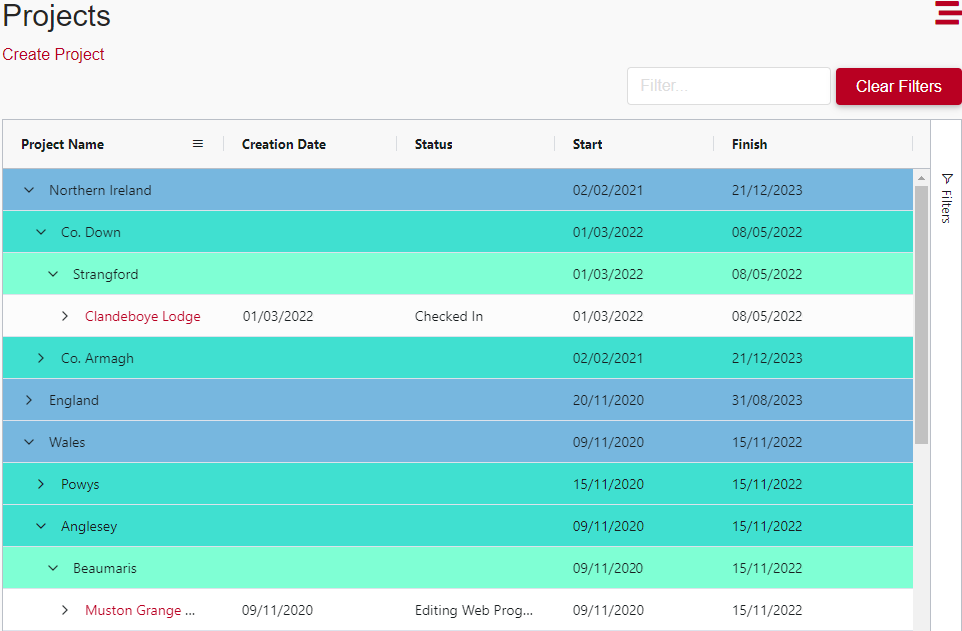
This matches the hierarchical display of projects on the Portfolio Overview page. If the user-defined field that is being used to group the projects is linked to a hierarchical user-defined enumeration, you can expand and contract it in the same way you expand and contract the project and programme hierarchy. If the field is linked to a standard user-defined enumeration, there will be only one level to the hierarchy.
As part of this change, a new Project Hierarchy administration page has been added. You use this page to configure the way in which projects are grouped on the Projects and Portfolio Overview pages:
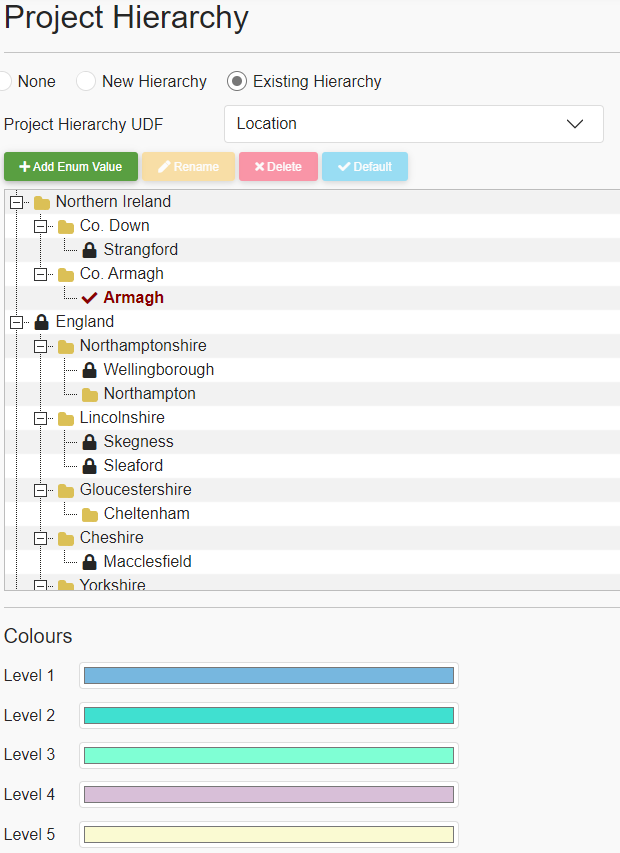
The Project Hierarchy UDF field has been moved from the Site Settings page to the new Project Hierarchy page, to make configuring the project hierarchy easier.
More information on working with the Projects page
Lists are no longer displayed over multiple pages
Before this release, Asta Vision pages that display a list of objects were spread over more than one page if lists contained a large number of items, and you could move between the different pages of the list.
Now, list pages that display a list of objects are displayed on a single page, with a scroll bar that you can use to move between the items in the list. This makes it easier to locate the item you want in a long list when filtering and sorting, as all the results are displayed on a single page.
More information on filtering and sorting lists
Access programme information using links at the top of the Project page
Before this release, when you accessed the Project page to view information about a specific project, the page would scroll down automatically to display the programme tabs. This automatic scrolling no longer happens when you access the Project page, and a series of hyperlinks now appears at the top of the page that you can use to access each programme's tab. The programmes are listed according to the order numbers that have been defined for each programme type, with the programme type with the lowest order number appearing first, and the programme type with the highest order number appearing last. Programme types with a darker background exist for the project you are viewing; programme types with a lighter background have yet to be created. In the following illustration, a 'Contract' programme has been created for a project, but the remaining programme types have yet to be created:

More information on editing projects and programmes
Display a bar chart view of programmes
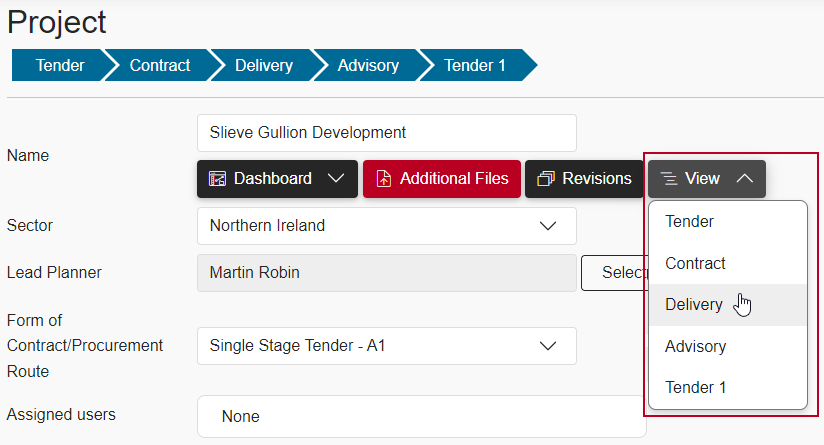
You can now display a project's programmes in the form of a Gantt chart - a bar chart that illustrates a project, or projects, graphically, using the new View control that has been added to the Project page:
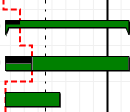
The bar chart displays each task on its own row, with a spreadsheet displaying - by default - the name, start and finish date and duration of each task. If a bar contains more than one task in Asta Powerproject, that bar's tasks are displayed on the same row in the Asta Vision bar chart. The programme hierarchy is colour-coded to indicate the different hierarchy levels. A red, dotted progress line appears in the bar chart, representing the report date of the latest progress period in the programme. The duration percentage complete of each task is displayed as a black progress bar:
More information on displaying a bar chart view of programmes
Display a dashboard view of your programmes
You can now display a dashboard view of a programme, which provides you with a quick indication of how the programme is progressing without the need to use an external reporting package:
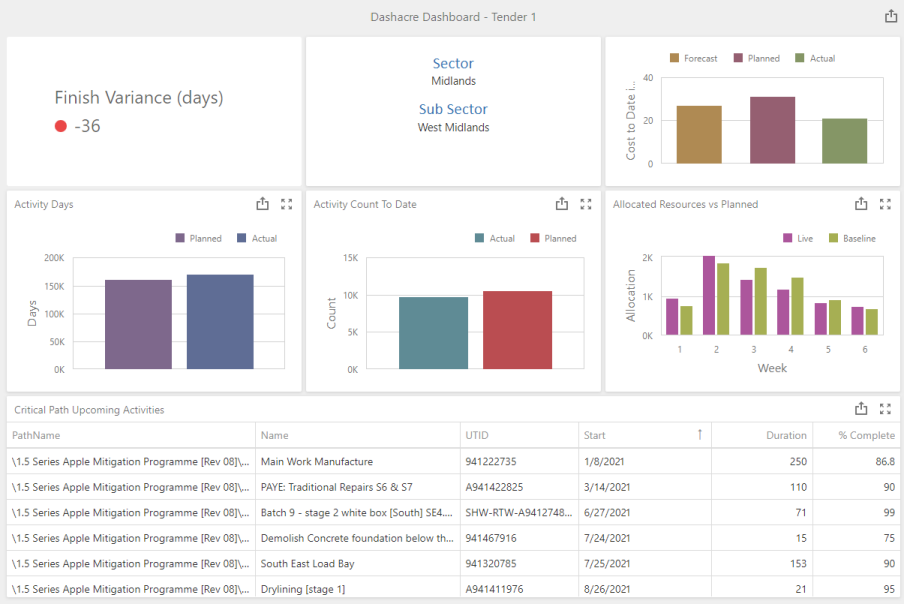
You can export the entire dashboard or a specific element of the dashboard, in PDF or Microsoft Excel format, or as an image. You may want to do this to access the information using another application. For example, you may want to incorporate programme dashboard information in a report
The programme dashboard view comprises a number of elements, some of which are configurable, using the new Dashboard Options page:
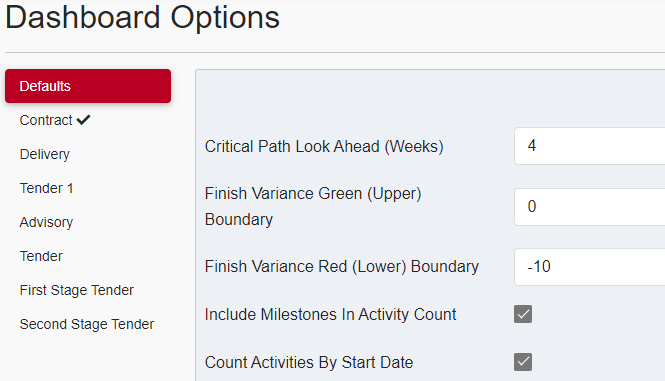
You can specify individual dashboard settings for each programme type if required.
Programme dashboard views are not available in Asta Vision by default. Please contact Elecosoft to find out more.
More information on displaying a programme dashboard view
More information on configuring programme dashboard settings
Enter a comment to indicate why projects are being archived
When you archive a project from the list on the Projects page, a new Archive Project dialog appears, in which you can enter a comment to indicate why the project is being archived:
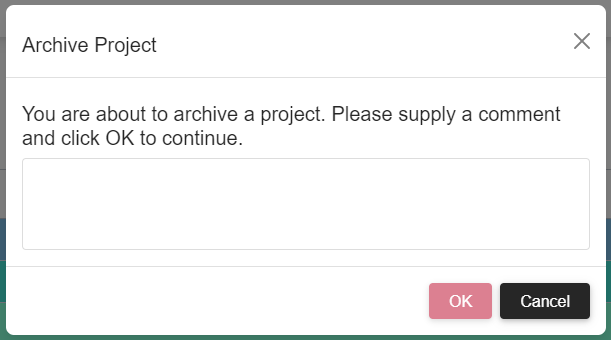
The comment that you enter is appended to the project's Notes field. If you have purchased the optional Business Intelligence module, this information is included when you extract data from Asta Vision to update your Business Intelligence database.
More information on archiving projects
Update the Business Intelligence database with project details as projects are created
You can use the new Generate Project BI for new projects check box, on the Site Settings page, to specify whether the Business Intelligence database is updated with basic details of new projects as they are created:
- If you select this check box, basic details of new projects are added to the database as they are created.
- If you clear this check box, no information on new projects is added to the database until the first time a project's programme is checked in, or the first time a particular workflow rule is performed on the project's initial programme - depending on the selection you have made in the B. I. behaviour field for that programme type.
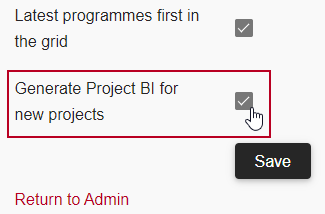
The Business Intelligence database is always updated with basic details of new projects when you add existing projects to Asta Vision (as opposed to creating brand new projects), provided that 'Always run on latest version' is selected in the B. I. behaviour field for the programme type for which you are uploading a project.
More information on when the Business Intelligence database is updated
New look and feel
The look and feel of Asta Vision has been updated in this release, to integrate it more closely with other Elecosoft applications. You may notice that some of the controls that you use appear in a different font, or in a different colour.
Programme details now appear on the Projects page
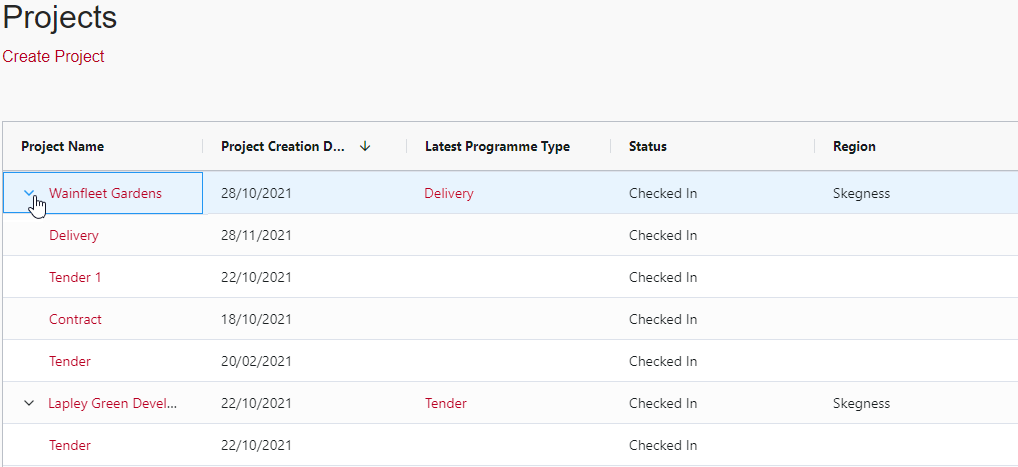
Before this release, the Projects page used to display details of your Asta Vision projects, but not details of each project's programmes. Details of each project's programmes are now available to view on the Projects page, in drop-down rows immediately beneath the project.
To view a project's programmes, click ![]() to the left of the project's name. The project's programmes appear immediately beneath the project in the list, with details of each programme displayed on a separate row:
to the left of the project's name. The project's programmes appear immediately beneath the project in the list, with details of each programme displayed on a separate row:
You can carry out programme-level workflow actions by right-clicking a programme on the Projects page and selecting the workflow action from the menu that appears:
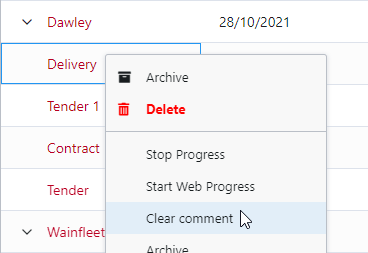
Before this release, if you wanted to display programme data on the Projects page, you had to set up a separate column for each programme type. For example, if you wanted to display the status of each of a project's programmes, you had to set up one column to display the first programme type's status; another column to display the second programme type's status; and so on. Now that programmes appear on the Projects page, you no longer need to do this - and it may be worth reconfiguring your project grid columns to remove any columns that you no longer need as a result of this.
More information on working with projects and programmes
You can specify which of a project's programmes appears first in the list, using the Latest programmes first in the grid check box that has been added to the Site Settings page:
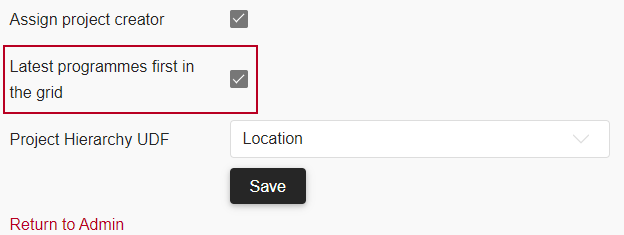
Select this check box to order each project's programmes from latest to earliest; clear the check box to order the programmes from earliest to latest.
More information on configuring site settings
The introduction of this new feature means that it is no longer necessary to select a programme type when configuring project grid columns. As a result of this, the column in which you used to select a programme type has been removed from the Project Grid Columns page, leaving only two columns on that page:
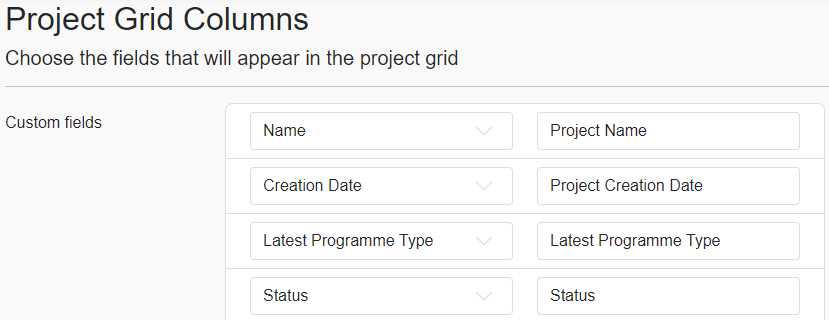
If a project grid column is configured to display programme data, data from the latest programme is displayed against each project.
More information on configuring project grid columns
New slide-out menu containing frequently-used menu commands
This version introduces a new slide-out menu, containing frequently-used menu commands.
To access the slide-out menu, click  at the top-left of the Asta Vision window. The menu slides out from the left of the window:
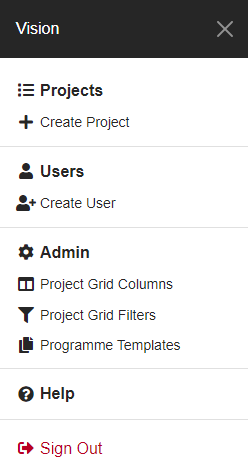
The commands available on the menu differ depending on the page you are currently looking at. Click a command on the menu to select it.
Project page scrolls automatically to display programme data
When you click a project on the Projects page to display its details, the Project page now scrolls automatically to display details of the project's programmes. If you want to view details of the project itself, you need to scroll up to the top of the page.
More information on editing projects and programmes
Improved way of adding existing projects to Asta Vision
The Project Details page, which you use to upload existing projects and baselines to Asta Vision, has been improved. The left pane of this page now displays 'Project', plus an entry for each programme type:
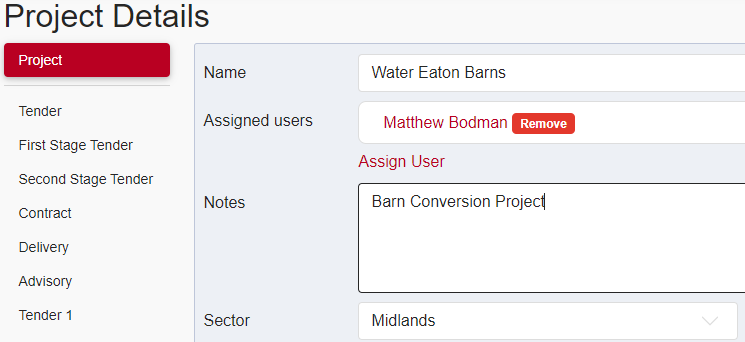
You can upload one project and baseline for each programme type, but you do not need to upload a project for every programme type; you may have only a single project to upload, representing one of your programme types.
More information on adding existing projects to Asta Vision
Group projects on the Portfolio Overview page according to a user-defined field
You can now group projects on the Portfolio Overview page according to the contents of a project-level user-defined field. If you do this, a summary task is displayed in the bar chart for each value in the user-defined field, and projects are grouped according to what has been selected in the user-defined field for each project. For example, if you select a user-defined field that is used to specify the geographical location of each project, a summary task is displayed for each location and the projects that take place in that location are grouped beneath the summary task:
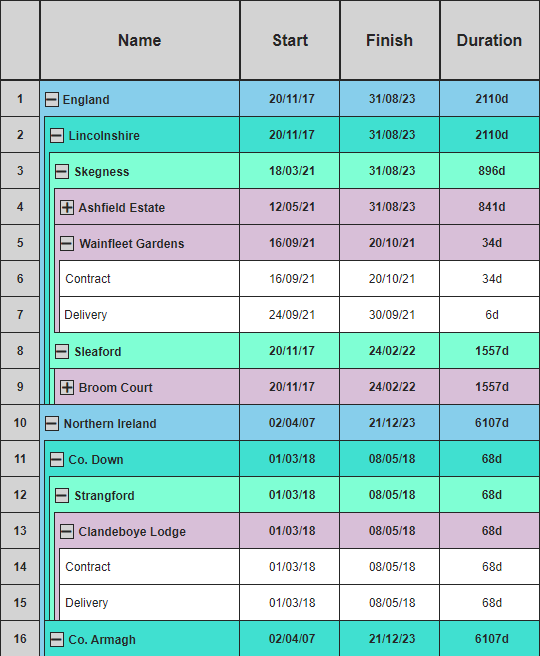
If the user-defined field that is being used to group the projects is linked to a hierarchical user-defined enumeration, you can expand and contract it in the same way you expand and contract the project and programme hierarchy. If the field is linked to a standard user-defined enumeration, there will be only one level to the hierarchy.
More information on viewing your portfolio as a bar chart
You specify the field with which to group projects using the Project Hierarchy UDF field that has been added to the Site Settings page:
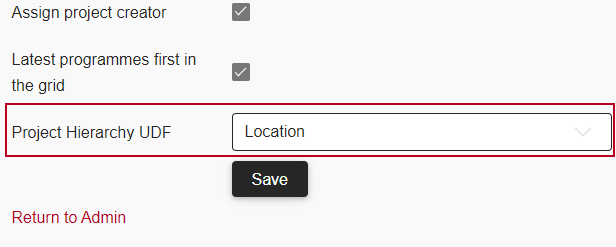
If you select a user-defined field in the Project Hierarchy UDF field, programmes are also grouped according to what has been selected in the field on the Open tab of the Asta Powerproject Backstage view, with headings to indicate the different values in the selected user-defined field.
More information on configuring site settings
Configure firewall settings to enable access to your Business Intelligence database
If you have purchased the optional Business Intelligence module, you can now configure firewall settings in Asta Vision that will enable you to access the Business Intelligence database that you use for external reporting. The database is protected by a firewall, which disallows external access, except via any IP addresses that you specify. If you want to be able to access the database yourself, you must enter details of the IP addresses that should be allowed through the firewall to access the database.
You use the Firewall Settings page to configure firewall settings:
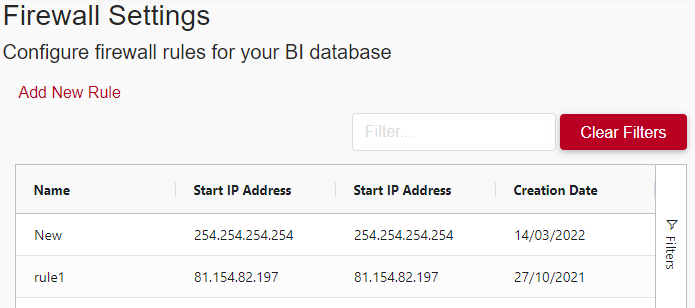
If you have not purchased the optional Business Intelligence module, you cannot access the Firewall Settings page.
More information on configuring firewall settings
Nominate a programme revision to be always available in your Business Intelligence data
If you have purchased the additional Business Intelligence module, you can now nominate one programme revision for each project to be an 'additional BI revision', meaning that it is always available in your Business Intelligence data. When you nominate an additional BI revision for a project, Business Intelligence data is extracted from this revision into your Business Intelligence database. This enables you to use external reporting tools to compare the latest revision of a programme with a specific revision of your choice. For example, you may want to compare the current contract against the original contract - to do this, you would nominate the revision that represents the current contract as the additional BI revision.
You use the new Additional BI Revision button, on the Project Revisions page, to nominate a project's 'additional BI revision':

If you have not purchased the additional Business Intelligence module, the Additional BI Revision button does not appear on the Project Revisions page.
More information on nominating a revision to be an 'additional BI revision'
Update your Business Intelligence database
In some circumstances, you may need to update the Business Intelligence database that you use for external reporting with the latest information from Asta Vision. You can now do this, using the Update Vision BI Data command that has been added to the Admin page:

You should only do this if advised to by Elecosoft Technical Support.
If you have not purchased the additional Business Intelligence module, the Update Vision BI Data command does not appear on the Admin page.
More information on updating your Business Intelligence database
Improvements to the display of lists in Asta Vision
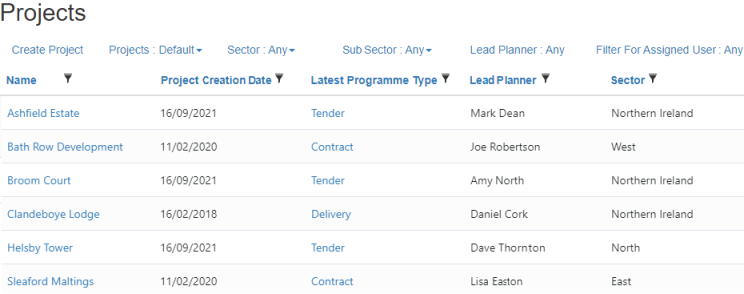
Some Asta Vision pages comprise lists of objects. For example, the Projects page comprises a list of your projects; the Users page comprises a list of your Asta Vision users. The design of these pages has been improved, to provide you with a better way of working with the lists.
Before
The list on the Projects page used to look like this:
Now...
It now looks like this:
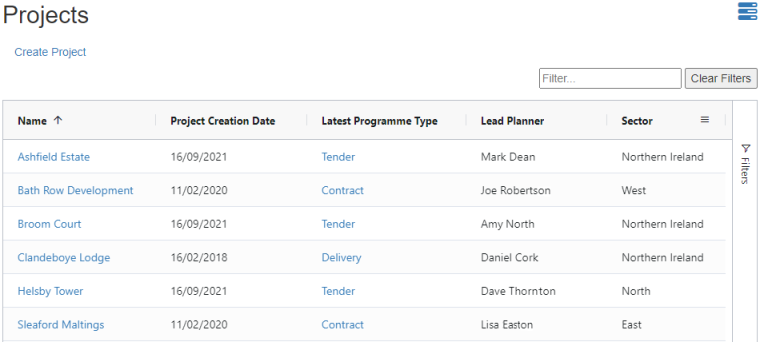
Before...
You used to filter lists according to the data in a column by clicking  at the top-right of a column heading:
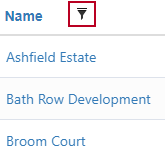
This would display a popup in which you could specify your filter criteria.
Now...
You now filter lists according to the data in a column by clicking  at the top-right of a column heading:
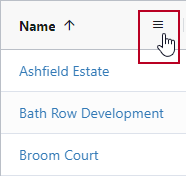
This displays a drop-down, which you can use to specify your filter criteria:
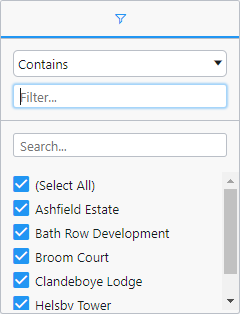
The controls that appear on the drop-down depend on the type of information that is displayed in the column.
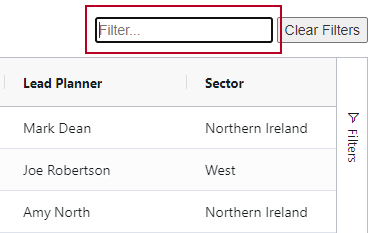
You can also apply a simple filter to a list, so that it displays only items that contain the text you enter in any of the columns:
Before...
Project grid filters used to appear on the Projects page, in a row above the list of projects:

Now...
You now access project grid filters by clicking Filters at the right-hand side of the project list on the Projects page:
![]()
The Filters pull-out pane contains a 'Grid Filters' drop-down, containing further 'Project Status' and 'Assigned Users' drop-downs, plus one drop-down for each project grid filter. In the following illustration, three project grid filters have been set up: 'Sector', 'Sub Sector' and 'Lead Planner':
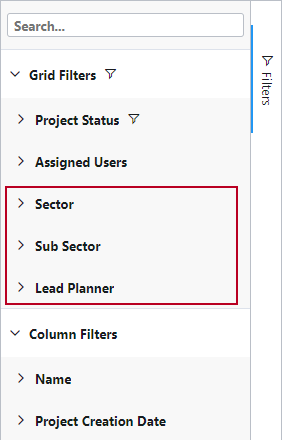
Click any of the project grid filters to display a drop-down in which you can specify your filter criteria.
The Filters pull-out pane also displays all of the page's column filters - it gives you an alternative way of accessing them.
Before...
Project 'status' and 'assigned user' filters used to appear on the Projects page, above the list of projects:

Now...
You now access these filters by clicking Filters at the right-hand side of the project list on the Projects page:
![]()
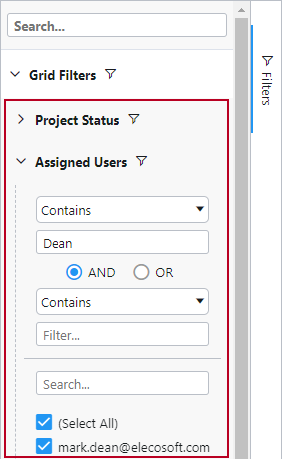
The Filters pull-out pane contains a 'Grid Filters' drop-down, containing further 'Project Status' and 'Assigned Users' drop-downs. You use these drop-downs to filter projects by status and assigned user:
Before...
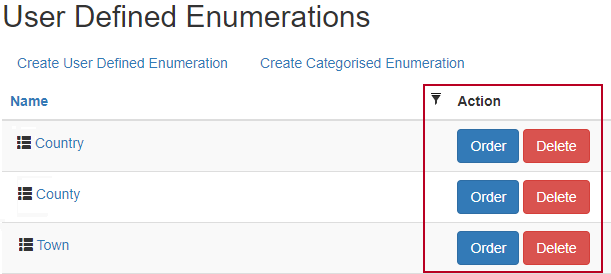
Some lists used to have an Action column, containing commands:
Now...
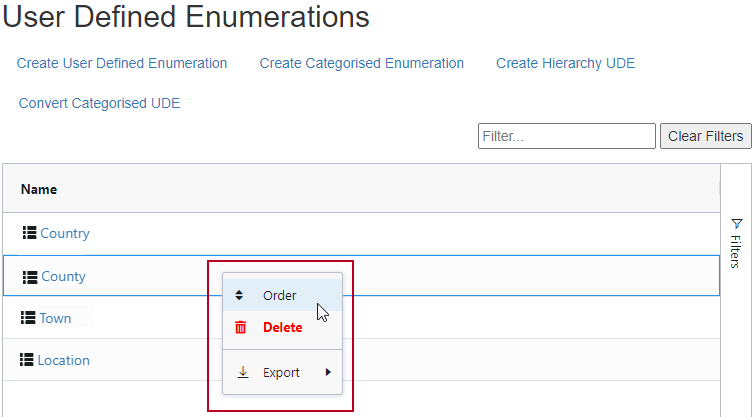
The Action column has been removed from all lists. To carry out a command that used to be listed in an Action column, you now right-click a list item and select a command from the menu that appears:
These improvements apply to the lists on the following Asta Vision pages:
- Projects.
- Programme Comments.
- Users.
- User Defined Enumerations.
- Project UDFs.
- Programme UDFs.
- User UDFs.
- User Roles.
- Programme Types.
- Programme Templates.
- Quality Checks.
Export information from Asta Vision in .CSV or .XLSX format
You can now export information from many Asta Vision pages that comprise lists, in either .CSV or .XLSX (Microsoft Excel) format. You may want to do this to access the information using another application. For example, you may want to construct a spreadsheet containing information about each of your projects.
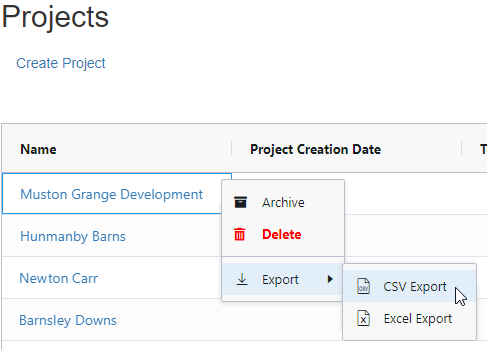
You export information from a list by right-clicking an item in the list and selecting Export - CSV Export, or Export - Excel Export from the menu that appears:
More information on exporting information from Asta Vision lists
Simpler method of configuring hierarchical user-defined fields
Before this release, if you wanted to configure a series of hierarchical user-defined fields - fields in which the value you select in one field determines the values that are available in another - you had to set up a series of 'categorised' user-defined enumerations that were associated with one other, create a series of corresponding user-defined fields, and display these fields in the appropriate order. Configuring categorised user-defined enumerations and their associated fields was quite a complex process.
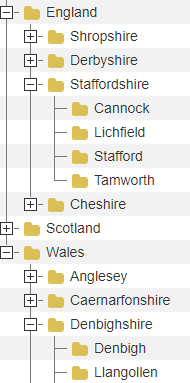
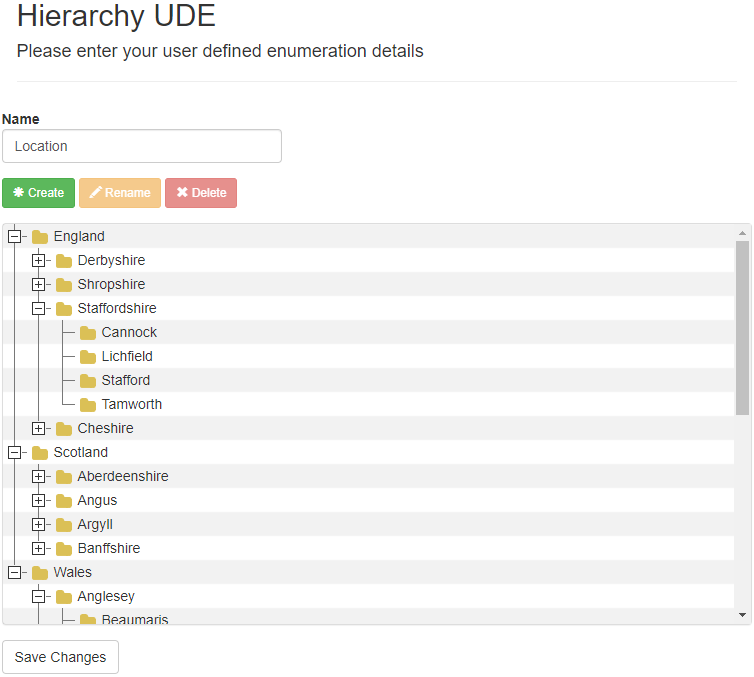
To simplify this, categorised user-defined enumerations have been superceded by hierarchical user-defined enumerations. Each individual hierarchical user-defined enumeration comprises a hierarchical list of selections. For example, you might want to create a user-defined enumeration that defines the location of a project in terms of country, county and town:
Hierarchical user-defined enumerations offer the following advantages over categorised user-defined enumerations:
- You can create a complete hierarchy of values in one single enumeration, rather than having to create a separate enumeration for each level of the hierarchy.
- It is simple to move values between the different levels of the hierarchy.
- You no longer need to create an individual user-defined field for each level of the hierarchy and display these in the correct order; each hierarchical user-defined enumeration needs only one corresponding user-defined field, which enables you to make selections from all levels of the hierarchy.
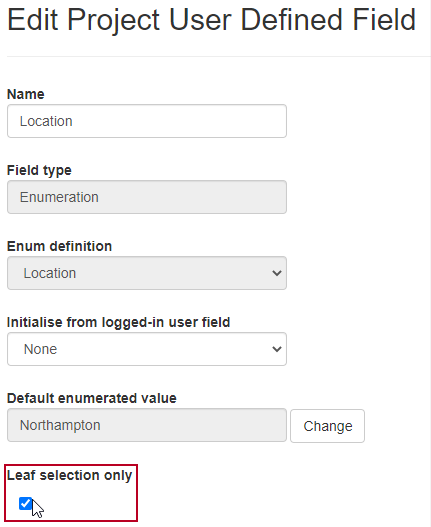
- You can configure the corresponding user-defined fields to allow only selections from the lowest level of the hierarchy. For example, if the field relates to a user-defined enumeration that defines the location of a project in terms of country, county and town, you limit users to selecting a town in this field - preventing them from selecting only a county or country.
You create user-defined enumerations using the Create Hierarchy UDE command that has been added to the User Defined Enumerations page:
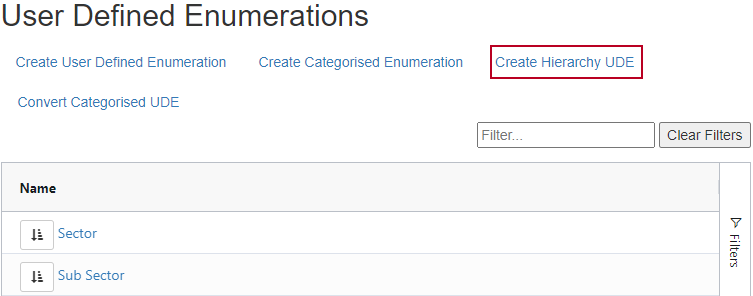
This leads you to a new Hierarchy UDE page, which you use to construct the hierarchy. In the illustration below, a country - country - town hierarchy has been constructed:
You specify whether the user-defined fields that correspond to hierarchical user-defined enumerations limit users to making selections from the lowest level of the hierarchy only using a new Leaf selection only check box that has been added to the pages in which you create and edit user-defined fields:
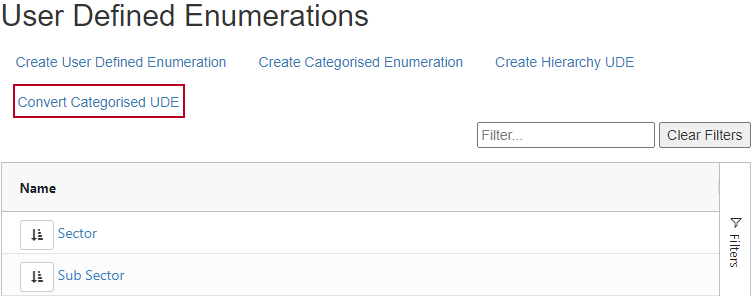
If you have already set up one or more categorised user-defined enumerations, you can convert them into hierarchical user-defined enumerations, using the Convert Categorised UDE command that has been added to the User Defined Enumerations page:
We recommend that you convert any categorised user-defined enumerations that you have set up into hierarchical enumerations, as it will make it easier to work with them, both now and in the future.
More information on creating hierarchical user-defined enumerations
More information on converting categorised user-defined enumerations into hierarchical
Programme fields cleared when a suspended programme is resumed
Before this release, if you resumed a programme that had been suspended, the resumed programme retained the programme comment from the programme that had been suspended, and this was not updated even if a new programme comment was entered against the resumed programme. Also, if a quality check had been applied to the programme type, the Quality field was not cleared when a programme was resumed, and the Start and Finish fields retained the start and finish dates of the programme that had been suspended.
Now, if you resume a programme:
- Its programme comment is cleared.
- The Quality field is cleared.
- The Start and Finish fields are updated to display start and finish dates taken from the 'source' programme - ie the programme that is causing the next programme type to resume. For example, the 'Tender' programme may be the source programme for a new 'Contract' programme.
Display high-priority user-defined fields above other project and programme-related fields
You can now specify that particular project and programme-level user-defined fields are high priority.
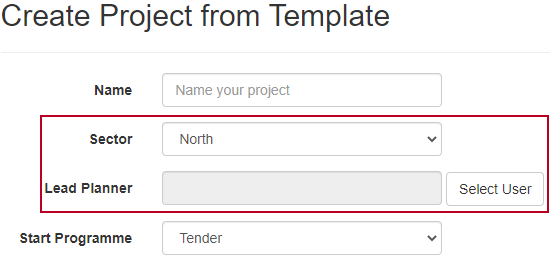
You do this by clicking and dragging fields into the 'Priority' section that has been added to the top of the Project UDFs Order and Programme UDFs Order pages:

Any high-priority user-defined fields are given prominence on the following pages, rather than being displayed with the other user-defined fields towards the bottom of the page:
- High-priority project-level fields are displayed immediately beneath the Name field on the Create Project from Template and Project pages:
- High-priority programme-level fields are displayed at the top of the programme-related fields in the tabs in the lower part of the Project page:
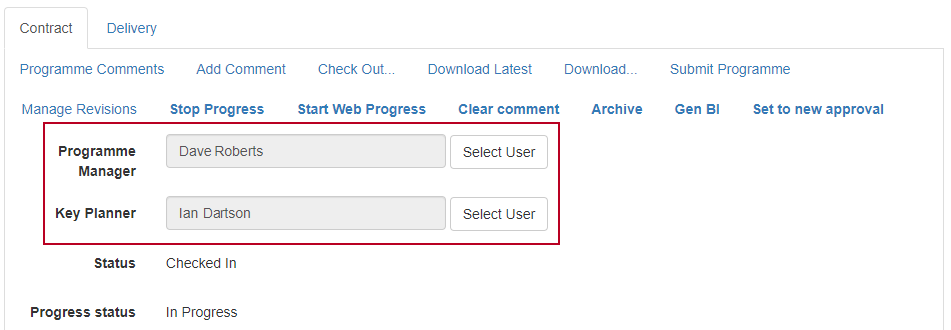
More information on specifying the order in which user-defined fields appear
Determine the programme types that are available when creating a project
You can now make the programme types that are available to users when creating a new project dependent upon the value they select in a particular user-defined field. For example, if you have a number of different contract types or procurement routes, you may want to specify that some programme types are available when creating a project that has one contract type or procurement route, and that other programme types are available when creating a project that has a different contract type or procurement route. Doing this prevents users from accidentally selecting the wrong start programme type for a project, which could mean that your workflow and email rules may not work
You do this by assigning one or more programme types to each value in a project-level, enumeration-type, user-defined field, using the new Starting Programme Type UDF page:
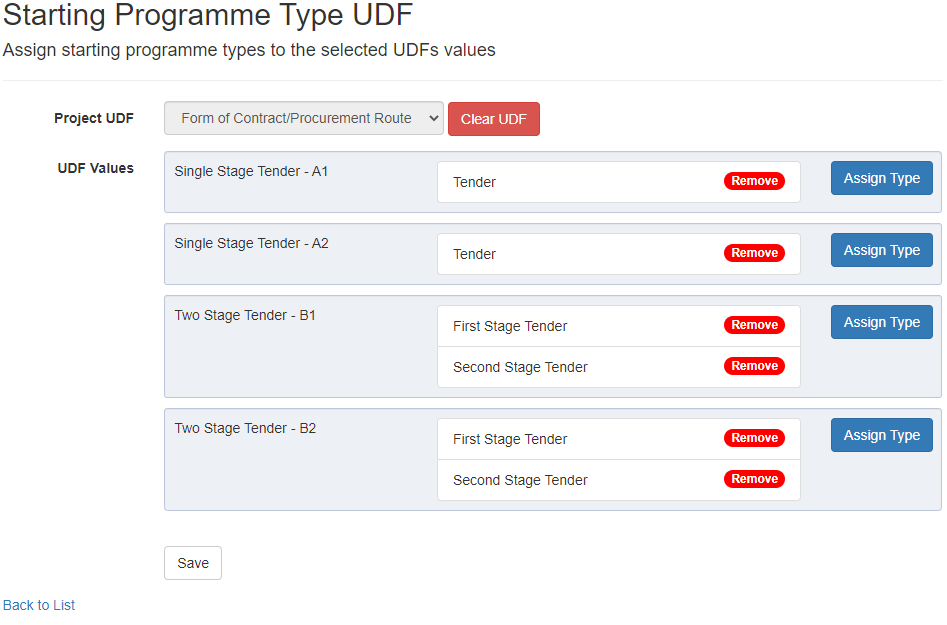
You must then display the user-defined field as a high-priority field, so that it appears beneath the Name field and above the Start programme field on the Create Project from Template page. Once you have done this, the selection you make in the user-defined field determines the programme types that are available in the Start programme field.
More information on determining the project types that are available when creating a project
Display a hierarchy that shows how categorised user-defined enumerations or fields are related to each other
You can create 'categorised' user-defined enumerations - enumerations that are associated with each other. When you create user-defined fields based on categorised user-defined enumerations, the value that you select in one field determines the values that are available in the other.
Before this release, it could be difficult to identify which categorised enumerations or fields were related to each other. Now, for each categorised enumeration or field, you can view a hierarchical display that shows how the categorised enumerations or fields are related to each other. You do this using the  icon that has been added to the User Defined Enumerations page, and to the various UDFs pages:
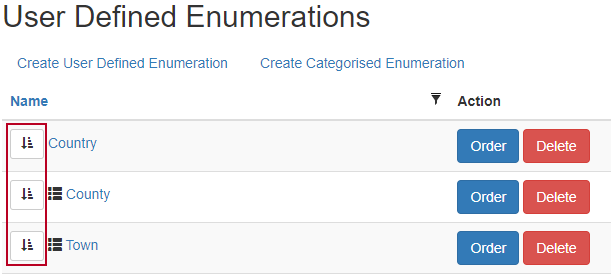
This icon appears against all 'categorised' enumerations or fields - those that are associated with other enumerations or fields. It does not appear against standard enumerations or fields.
Click this icon to display a page with a hierarchical display that shows how the categorised enumerations or fields are related to each other:
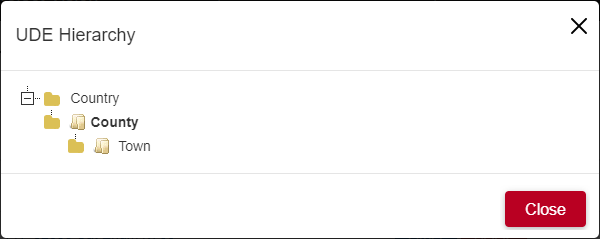
While viewing this page, you can click the triangle to the left of a level in the hierarchy to expand or contract it; click the name of a user-defined enumeration or field to edit it.
More information on working with categorised user-defined enumerations
Enable users to indicate that comments have been incorporated into programmes
When you record a comment against a programme, you can now specify that users should indicate when the comment has been incorporated into the programme - or that it has been dealt with in some other way. For example, if you record a comment to ask a planner to revise part of a programme, you may want the planner to indicate when the programme has been revised. You do this using the new Display completion check box check box that has been added to the Programme Comment page:
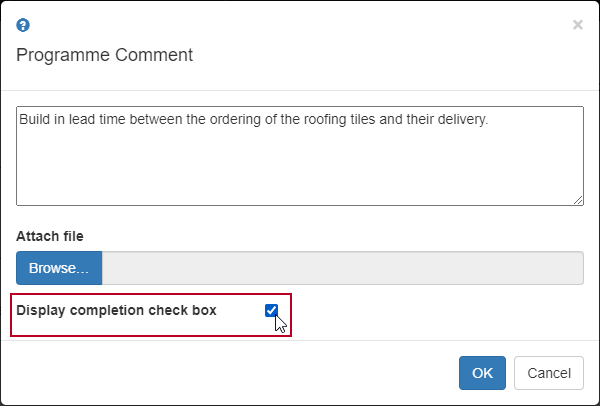
If one or more of a programme's comments has Display completion check box selected, a Completed column appears on the Programme Comments page, and users can select the check boxes in this column to indicate that they have incorporated a comment into the programme:
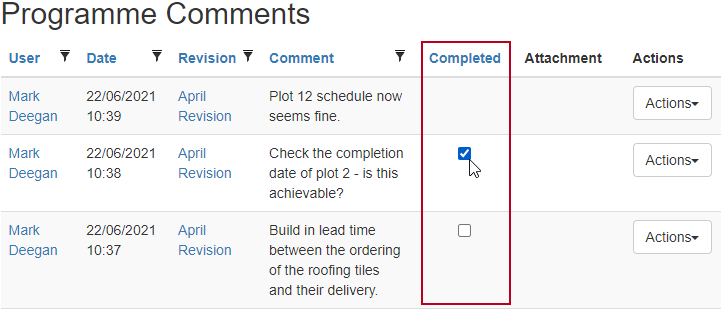
'Completed' check boxes also appear against comments on the Project Revisions and Manage Revisions pages.
For users to be able to select the 'Completed' check boxes, their user role must be assigned to a 'Read Programme Comments' security rule, and to a 'Mark Programme Comment As Completed' security rule:
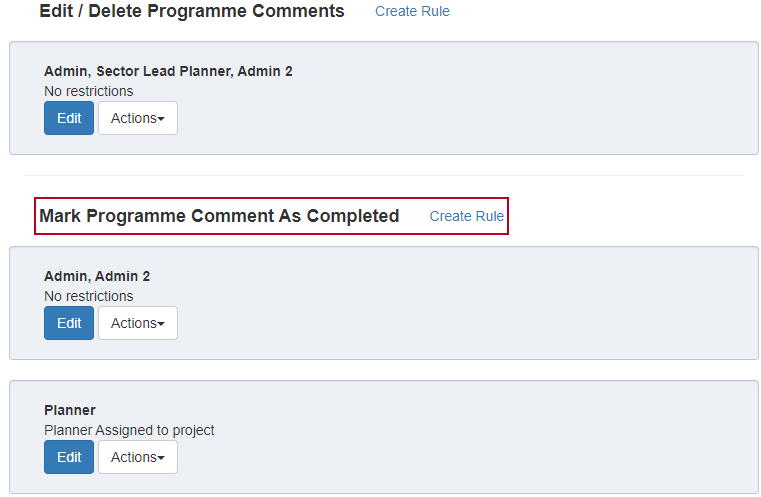
More information on recording comments against programmes
More information on configuring security rules
Set programmes to a 'Suspended' status
You can now configure workflow rules to set programmes to a 'Suspended' status. This effectively reverts a programme back to its previous state. You may want to do this if a user has accidentally moved a programme to an incorrect state. Alternatively, you may have programmes that - for example - move on to tender stage, but are then put on hold and need to be reverted to a pre-tender state.
You set programmes to a 'Suspended' status by carrying out an action relating to a workflow rule for which 'Suspended' has been selected in the Destination status field:
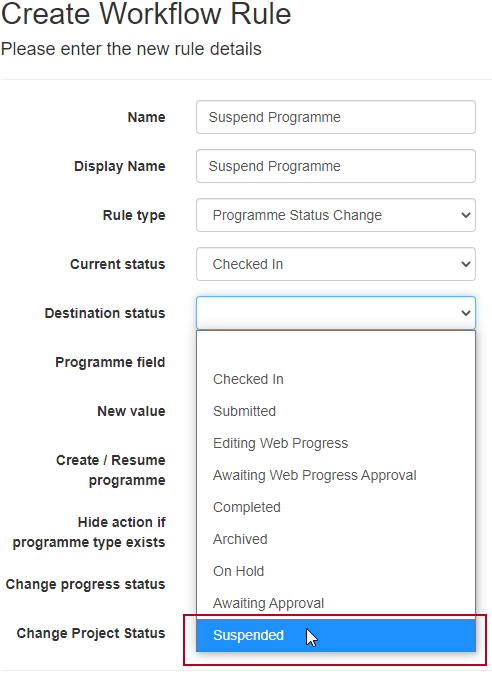
When a programme is suspended, it is treated as if it has never been created. However, it is not deleted, so you can subsequently resume the suspended programme if required.
Suspended programmes are displayed in a tab with a  icon, in the lower part of the Project page:
![]()
This enables you to identify suspended programmes and to access workflow actions within them. For example, you may want to view the tab of a suspended programme to click a 'Resume' workflow action that resumes the suspended programme.
More information on understanding the workflow of programmes
Configure workflow rules to prompt you to set the revision name only, and not a revision description
Before this release, you could configure workflow rules to prompt you to enter a new name and description for the latest revision of a programme when the workflow rule is performed. If you did this, you had to enter both a name and a description for each new revision.
You can now configure workflow rules to prompt you to enter a name only for the latest revision. You do this using the Set revision name only check box that has been added to the Create Workflow Rule and Edit Workflow Rule pages:
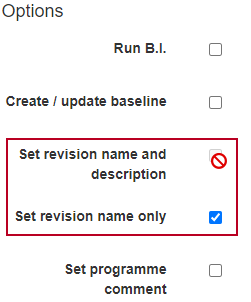
If you select this check box, the Set revision name and description check box - which used to be called 'Set revision description' - is unavailable; if you select the Set revision name and description check box, the Set revision name only check box is unavailable.
More information on configuring workflow rules
Assign the project creator to projects automatically
You can now configure Asta Vision to assign the user that creates a project to that project automatically, using the Assign project creator check box that has been added to the Site Settings page:
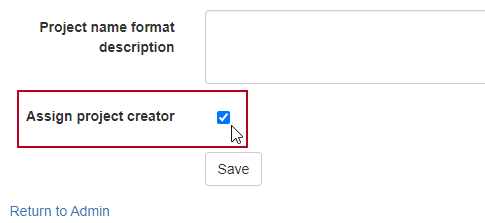
If you select this check box, the user that creates a project is added to the project's list of assigned users automatically, provided Asta Vision's security rules allow the user to be assigned to the project.
More information on configuring site settings
Specify the start date and WBN prefix when creating projects
You can now specify a project start date and a prefix that should be added to each task ID (WBN) code when creating a project from a template, using the Start date and WBN prefix fields that have been added to the Create Project from Template page:
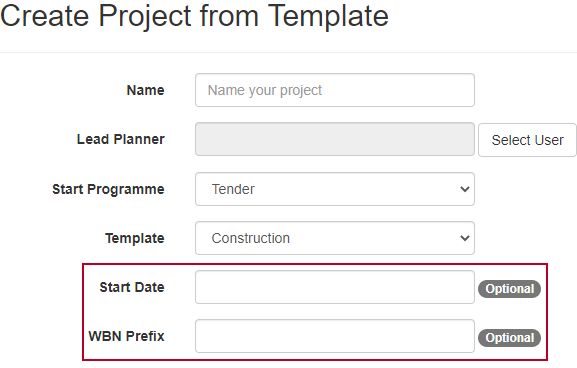
These fields are optional - you do not have to complete them when you create a project - but if you do, it saves you from having to specify this information in the project's initial programme manually. If you specify a start date when you create a project, this becomes the start date of the project's first programme, overriding the start date that is specified in the template. The start date you specify is also used as the programme's 'date zero'. If you specify a WBN prefix, this overrides the WBN prefix that is specified in the template.
More information on creating projects and programmes
Popups inform you that custom workflow actions have been completed
After you have clicked a custom workflow action on the Project page, if the workflow action does not have an obvious effect, such as being taken to a different page or a file being downloaded, a popup now appears to inform you that the workflow action has been completed:
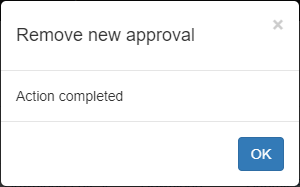
This helps you identify that workflow actions that do not have an obvious effect have been completed. Before this release, this was not always obvious, which lead to users clicking workflow actions more than once, thinking that they had not been completed.
Click OK to acknowledge the popup and return to the Project page.
More information on editing projects and programmes
Use project-level, user-type, user-defined fields as project grid filters
Before this release, you could only select project-level, enumeration-type, user-defined fields for use as project grid filters - items that appear above the list of projects on the Projects and Portfolio Overview pages, that you can use to filter the projects that are displayed on those pages.
Now, you can also select project-level, user-type, user-defined fields for use as project grid filters. Depending on the way in which you have configured your user-defined fields, this enables you to filter projects - for example - according to which user is a project's lead planner, or which user is its temporary planner.
You can now select project-level, user-type, user-defined fields on the Choose Project Grid Filters page:
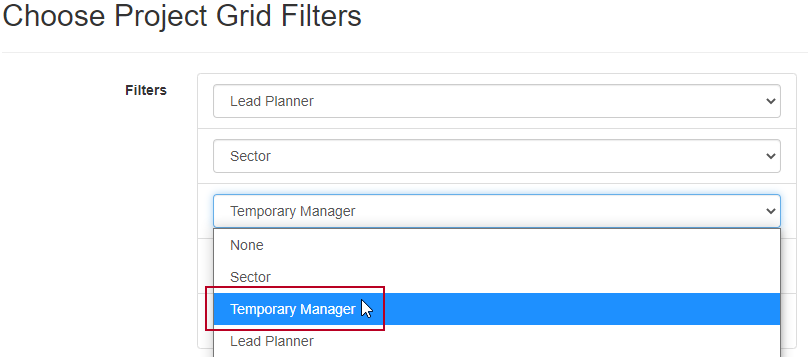
If you use a project-level, user-type, user-defined field as a project grid filter, it appears above the list of projects on the Projects and Portfolio Overview pages:

Click the filter and select a user from the popup that appears to filter projects according to that user-defined field:
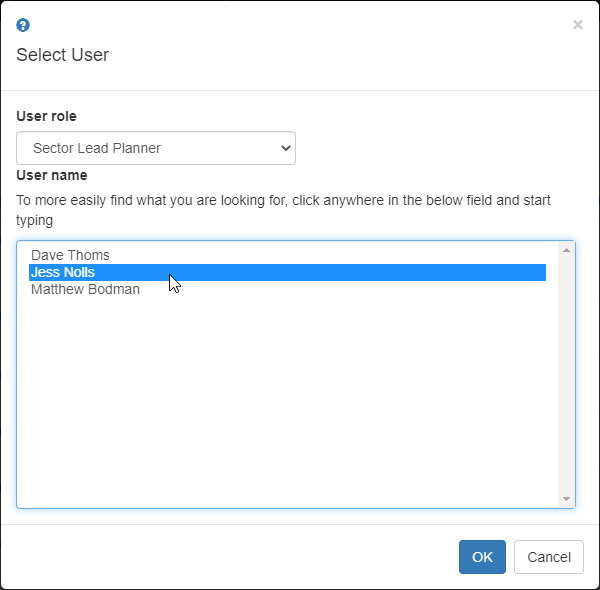
Once you have filtered projects according to a project-level, user-type user-defined field, if you click the filter again a drop-down menu appears:

You can use this menu to filter according to a different user, or to clear the filter altogether.
More information on configuring project grid filters
Display the project creation date and project start date as columns on the Projects page
You can now choose to display the project creation date and project start date as columns on the Projects page - the page that displays a list of your projects - and on the Portfolio Overview page - the page that displays projects and programmes as a bar chart - and use these columns to filter and sort the projects that appear in the list.
The project creation date is the date on which a project's earliest programme was created; the project start date is the earliest start date of all the project's programmes.
You do this by selecting 'Project Creation Date' or 'Project Start Date' from the list of project-related fields, on the Choose Project Grid Columns page:
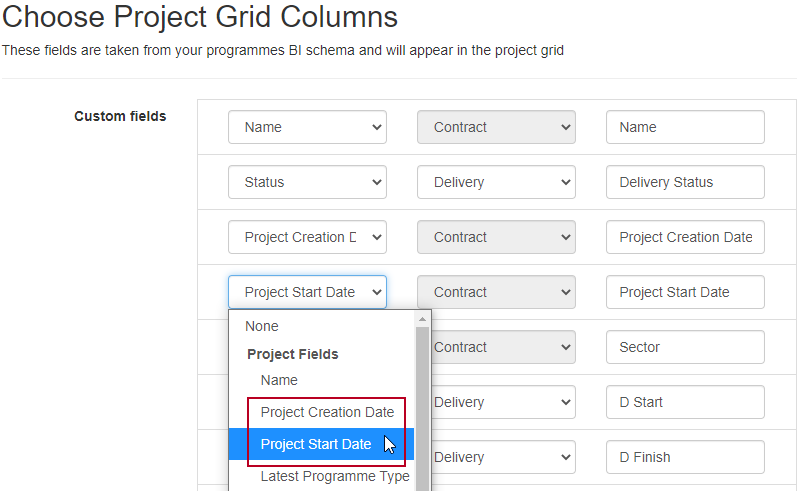
More information on configuring project grid columns
Display the latest programme type and project revision as columns on the Projects page
You can now choose to display the name of the latest programme type and the name of the latest project revision as columns on the Projects page - the page that displays a list of your projects - on the Portfolio Overview page - the page that displays projects and programmes as a bar chart - and use these columns to filter and sort the projects that appear in the list.
You do this by selecting 'Latest Programme Type' or 'Latest Project Revision' from the list of project-related fields, on the Choose Project Grid Columns page:
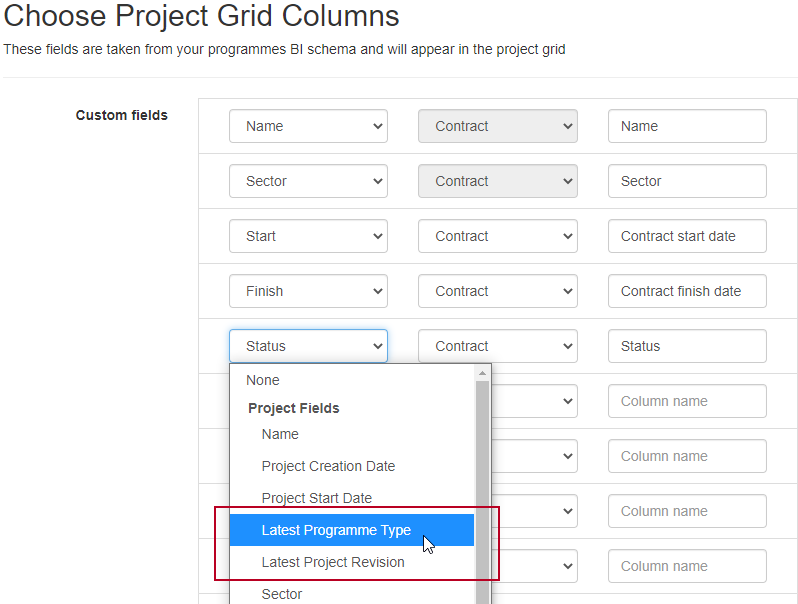
If you display either of these fields as a project grid column, you can sort and filter the column. Sorting is done alphanumerically, and takes no account of the order in which a programme type or revision appears in your workflow.
More information on configuring project grid columns
Specify whether workflow actions appear only in the Asta Vision website, only in Asta Powerproject, or in both
Before this release, all workflow actions appeared both in the Asta Vision website and in Asta Powerproject. Some workflow actions may be applicable only to users of the Asta Vision website, or only to users of Asta Powerproject; others may be applicable to both.
You can now specify whether workflow actions appear only in the Asta Vision website, only in Asta Powerproject, or in both. You do this using the Rule applies to field that has been added to the Create Workflow Rule and Edit Workflow Rule pages:
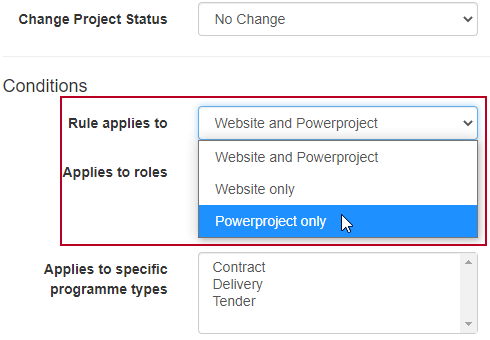
The default setting is for actions to appear both in the Asta Vision website and in Asta Powerproject; if you want to make use of this field to specify where workflow actions appear, you must edit each of your existing workflow rules and select the appropriate setting in this field.
More information on configuring workflow rules
Specify whether security rules apply only to the Asta Vision website, only to Asta Powerproject, or to both
For the following types of security rule, you can now specify whether the rule applies only to the Asta Vision website, only to Asta Powerproject, or to both:
- Read Project.
- Check In/Out Programme.
- Submit Programme.
- Add Programme Comments.
You do this using the Rule applies to field that has been added to the Create Security Rule and Edit Security Rule pages:
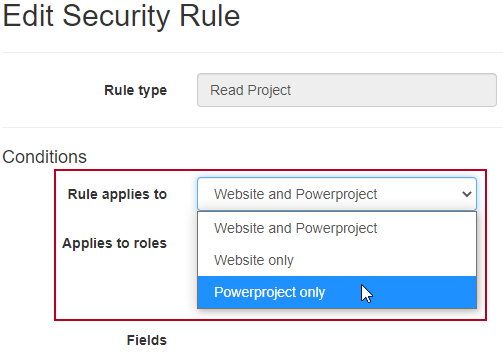
For example, you could use this field to specify that non-administrator users are able to check out and check in programmes from within Asta Powerproject, but not from within the Asta Vision website.
The default setting is for security rules to apply both to the Asta Vision website and to Asta Powerproject; if you want to make use of this field, you must edit each of your existing security rules of the above types, and select the appropriate setting in this field.
More information on configuring security rules
Make the completion of User-type user-defined fields mandatory
You can now make the completion of User-type user-defined fields mandatory, using the Mandatory check box that has been added to the user-defined field pages:
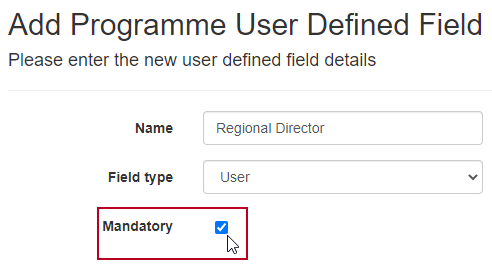
If you make a User-type user-defined field mandatory, users must make a selection in the field. This may be useful if the selection of a particular user is integral to your workflow. For example, you may want to force users to specify a 'Regional Director' for each programme, who receives a notification whenever the programme is submitted.
More information on working with user-defined fields
Custom workflow actions now appear in bold on the Project page
Custom workflow actions now appear in bold on the lower part of the Project page:

This enables you to differentiate between custom workflow actions - ones that are unique to your workflow - and standard workflow actions that are part of the Asta Vision workflow by default.
More information on editing projects and programmes
Programme revisions displayed with the most recent programme type listed first
Before this release, if you used the Project Revisions page to view details of the revisions that have been created of a project's programmes and baselines, the revisions were grouped by programme type, with the earliest programme type listed first and the most recent programme type listed last.
The revisions on this page are now displayed with the most recent programme type listed first and the earliest programme type listed last. This makes the most recent revisions - the ones you are most likely to want to review - more easily-accessible:

More information on viewing details of a project's programme revisions
Specify the order in which user roles appear in drop-down lists
You can now specify the order in which user roles appear in drop-down lists. You may want to do this to place the most frequently-used roles (for example 'Planner') at the top of lists, and the least frequently-used roles (for example 'Admin') at the bottom. You specify the order of user roles by clicking Role Order on the Roles page:
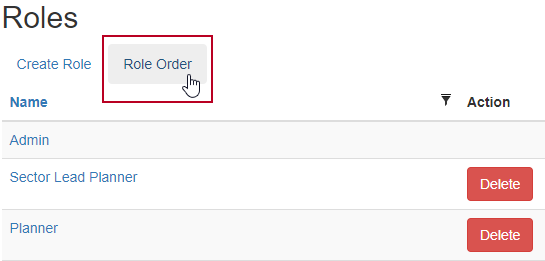
This displays the Role Order page, in which you can click and drag the user roles to change their order:
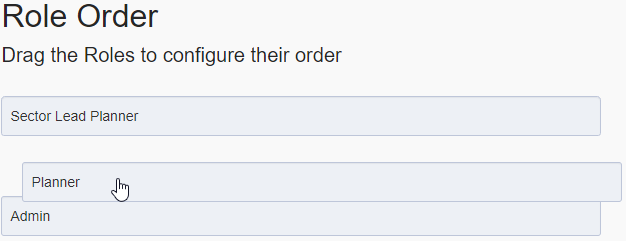
More information on specifying the order in which user roles appear
Send email reminders to users with a specific role
Before this release, email reminders were sent to all users who are assigned directly to a programme's project. You can now specify that email reminders are sent only to users with a specific role, using the Specific role field that has been added to the New Email Reminder popup:
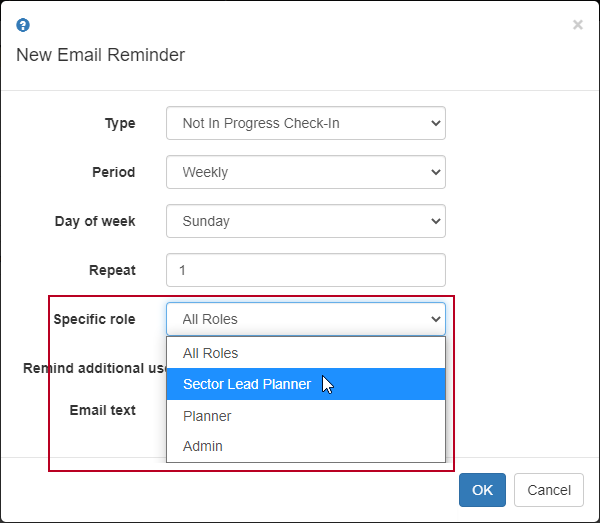
If you select a specific role in this field for an email reminder, email reminders are sent only to users with this role, who are assigned to a programme's project. For example, you may want email reminders to be sent only to planners, rather than to every user who is assigned to a programme's project.
More information on configuring programme types
Automated emails now identify the revision name of programmes
The default email template that is used for automated emails now includes the revision name of the programme to which the email relates. This can help users identify which revision of a programme requires their attention:
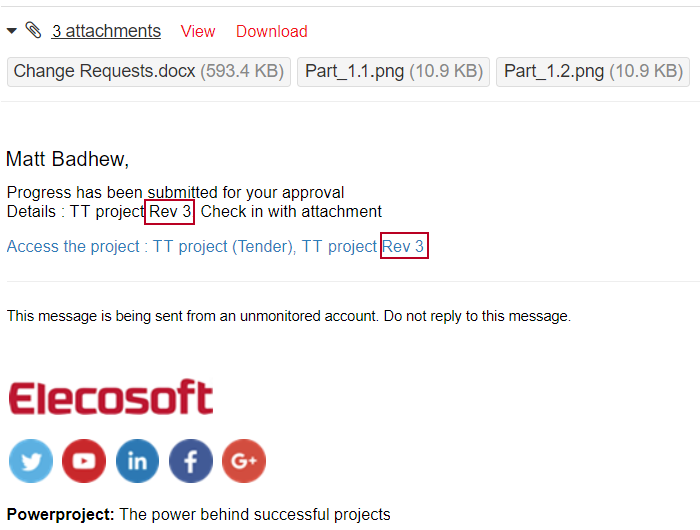
More information on managing different revisions of a programme
More information on configuring email rules
Files attached to emails when checking and submitting programmes
Depending on the way in which Asta Vision is configured, you may be able to attach files to programmes when you use Asta Powerproject or Asta Vision to check them in, and when you use Asta Powerproject to submit them. If you attach a file when checking in or submitting a programme, a new programme comment is recorded against the programme, with the file attached.
In addition to this, the files you attach when checking in or submitting are now attached to the emails that are sent automatically as a result of the check in or submit, as part of your workflow. This makes it easier for reviewers to access any files relating to the checked in or submitted programme.
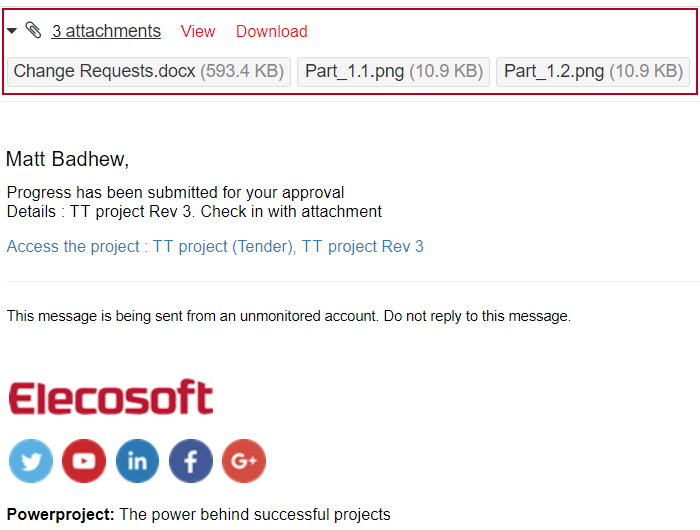
The Users page displays the date on which each user last logged in
A Last Logged In column has been added to the Users page. It displays the date on which each user last logged into Asta Vision:

If the Last Logged In column displays no date for a user, this means that the user last logged into Asta Vision before this column was added to the Users page. A date will appear in the column for that user after they next log in.
Configure rules to apply only when users with specific roles are assigned to the project
You can now specify that security and workflow rules apply only to users with specific roles that are assigned to the current project, and that email rules notify only users with specific roles that are assigned to the project that triggered the rule. You do this using the new All roles must be assigned to project and Specific roles which must be assigned fields, which have been added to the security, workflow and email rule pages:
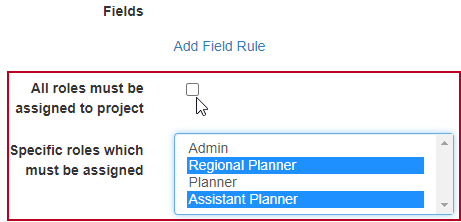
The All roles must be assigned to project check box replaces the previous Assigned to project check box.
To specify that a rule's action is available only to users that are assigned to the current project:
- To make the action available only to users that are assigned to the current project, select the All roles must be assigned to project check box.
- To make the action available to all users, regardless of whether they are assigned to the current project, clear the All roles must be assigned to project check box and select nothing in the Specific roles which must be assigned field.
- To make the action available only to users with specific roles that are assigned to the current project, clear the All roles must be assigned to project check box and select the user roles in the Specific roles which must be assigned field. CTRL or SHIFT-click to select as many user roles as you need.
To deselect a user role that is currently selected in this field, hold down CTRL and click the user role.
More information on configuring security rules
More information on configuring workflow rules
More information on configuring email rules
Configure workflow rules to apply to specific programme types
You can now specify that workflow rules apply to one or more specific programme types, using the Applies to specific programme types field that has been added to the Create Workflow Rule and Edit Workflow Rule pages. This prevents you from having to set up separate, very similar, workflow rules for multiple programme types. If you want a workflow rule to apply to all programme types, you do not need to select anything in this field.
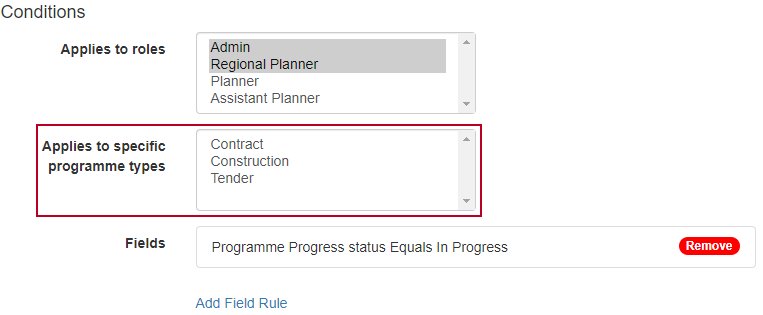
If you configure a workflow rule to apply to one or more specific programme types, a 'Specific Programme Types' indicator appears against the rule on the Workflow Rules page. Hover the mouse pointer over this indicator to view a tooltip that shows the programme types to which the rule applies:

More information on configuring workflow rules
Specify an alternative 'display name' for workflow rules
You can now specify an alternative 'display name' for workflow rules, in addition to their standard 'name', using the Display name field that has been added to the Create Workflow Rule and Edit Workflow Rule pages:
If you specify a 'display name', it is used to identify each workflow rule on the Project page in place of the standard 'name'.
You may want to specify a display name for a workflow rule if you have set up a number of similar rules with only minor differences. For example, you may have set up two workflow rules called 'Approve Progress', with one applying to the 'Contract' programme type and one applying to the 'Tender' programme type. In this situation, you could give each rule a standard 'name' that indicates the programme type to which it relates, and give both workflow rules a display name of 'Approve Progress'. This would mean that users would see the workflow rules identified on the Project page simply as 'Approve Progress', regardless of the programme type to which they referred, but administrator users would be able to use the standard 'name' to differentiate between the rules.
More information on configuring workflow rules
Configure field rules to apply to specific user roles
When configuring security rules, workflow rules and email rules, you can now specify that field rules apply only to users with a specific user role, using the Applies to role field that has been added to the New Field Rule popup. This field enables you to trigger rules according to different criteria for different types of user: a rule may be triggered for one type of user if field 'A' is set to a particular value, or it may be triggered for a different type of user if field 'B' is set to a particular value.
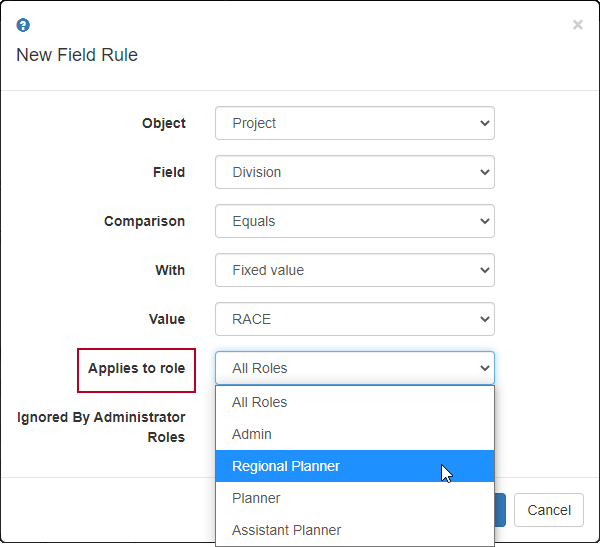
If you need a field rule to apply to more than one type of user, you can set up two identical field rules, with the only difference being the user role specified against each one. This is easier than having to set up multiple security, workflow or email rules for different types of user.
If you configure a field rule to apply only to users with a specific user role, the role name appears to the left of the field rule description in the list of field rules once you have created it:

The role name also appears to the left of the field rule description on the Security Rules, Workflow Rules or Email Rules page:

More information on configuring security rules
More information on configuring workflow rules
More information on configuring email rules
Configure field rules based on the value of integer-type user-defined fields
When configuring security rules, workflow rules and email rules, you can now configure field rules based on the values of integer-type user-defined fields. Integer-type user-defined fields are now available in the Field field on the New Field Rule popup.
If you select an integer-type user-defined field in this field, two additional options appear in the Comparison field - 'Less Than' and 'Greater Than':
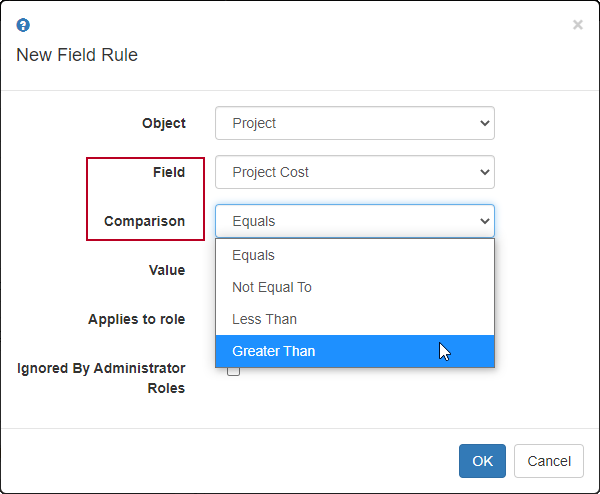
For example, you could set up a field rule based on the value of a 'Project Cost' integer-type user-defined field, triggering the rule if the cost of a project was greater than, or less than, a specific value.
More information on configuring security rules
More information on configuring workflow rules
More information on configuring email rules
Specify a pre-defined format for String-type user-defined fields
You can now specify a pre-defined format for String-type user-defined fields. This may be useful if you are using a field to record a code that must follow a particular format. For example, you could create a String-type user-defined field to represent a project code, comprising three numbers, three alphanumeric characters and two letters, with the three groups separated by hyphens. For each String-type user-defined field you can specify a non-editable prefix, and a 'placeholder' and tooltip, to help users understand what they need to enter into the field:
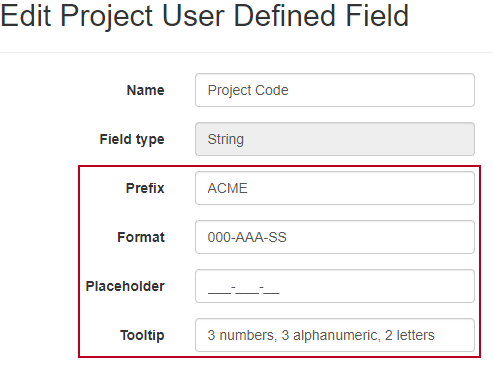
More information on working with user-defined fields
Make the completion of Integer and String-type user-defined fields mandatory
You can now make the completion of Integer and String-type user-defined fields mandatory, using the Mandatory check box that has been added to the user-defined field pages:
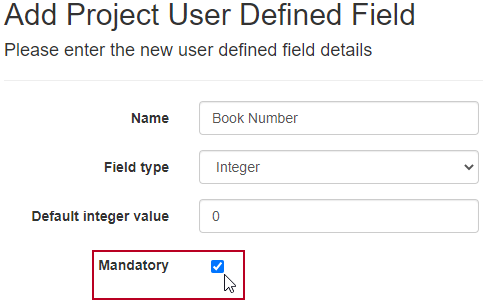
If you make an Integer-type user-defined field mandatory, users must complete the field with a value other than zero; if you make a String-type user-defined field mandatory, users must enter a string into the field.
More information on working with user-defined fields
Configure project-level, User-type user-defined fields to assign the selected user to the current project
You can now configure project-level, User-type user-defined fields to assign the user that is selected in the field to the current project, using the Always assign user to project field that has been added to the project-level user-defined field pages:
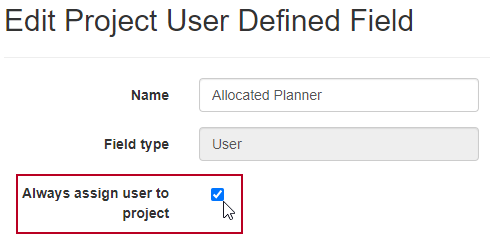
Selecting this check box may be useful if you want users to assign whichever user they select in the field to the current project, and they sometimes forget to do so. With this new check box selected, whichever user is selected in the user-defined field is assigned to the project automatically.
More information on working with user-defined fields
Specify the order of values in user-defined enumerations
The values in user-defined enumerations used to appear in user-defined fields in the order in which they were created. These values are now ordered alphanumerically by default:
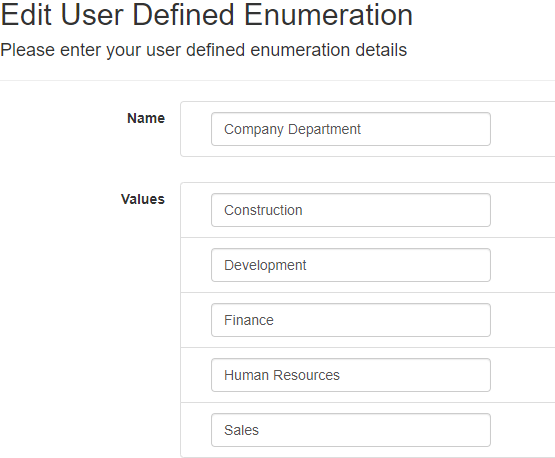
You can now change the ordering of values in user-defined enumerations, by clicking the Order button that has been added to the User Defined Enumerations page:
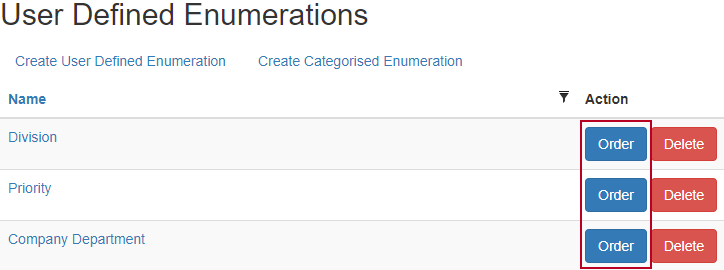
Clicking this button displays the User Defined Enumeration Order page, in which you can click and drag the values to change their order:

You may want to re-order values to place the most-frequently used value at the top of the list, for example.
More information on working with user-defined enumerations
Allow users with specific roles to submit programmes that have failed a quality check
Before this release, you could specify that users should be prevented from submitting programmes that have failed one or more quality checks. You can now configure Asta Vision to allow users with specific roles to submit programmes that have failed a quality check, even if most users are prevented from doing so. For example, you may want to allow top-level users to submit programmes that have failed a quality check, but prevent all other users from doing this.
You do this by creating an 'Override Quality Check Submit Restrictions' project security rule and assigning the roles of users that you want to be able to submit regardless of the quality check failure to the security rule.

View your portfolio as a bar chart
You can now view your portfolio of projects and programmes in the form of a Gantt chart - a bar chart that illustrates a project, or projects, graphically:
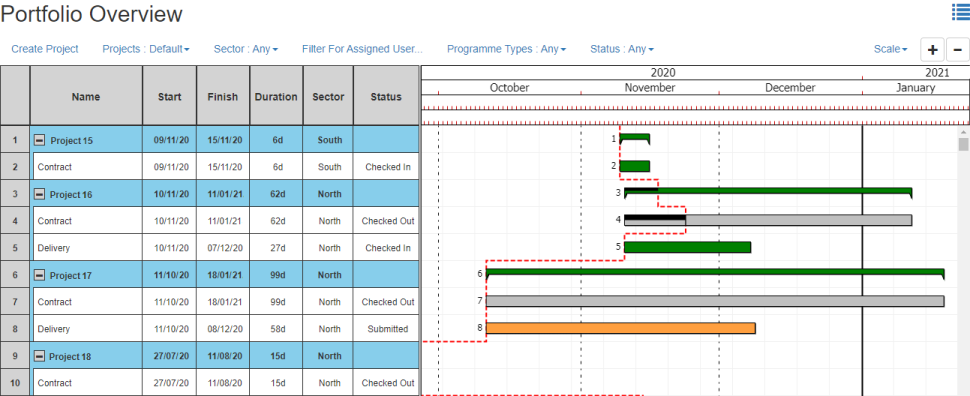
The bar chart displays each project and programme on its own row, with a spreadsheet displaying project and programme information. The spreadsheet displays the name, start and finish date and duration of each project and programme, plus the same columns that are displayed on the Projects page.
Projects are displayed like this:  ; programmes are displayed like this:
  . The colour of each project and programme indicates its current status.
More information on viewing your portfolio as a bar chart
More fields to choose from when configuring project grid columns
A new 'BI Project Fields' group of fields has been added to the list of available fields on the Choose Project Grid Columns page. You can select any one of these fields to be displayed as columns on the Projects page - the page that displays a list of your projects - and as read-only fields on the pages that you use to create projects and edit their properties:
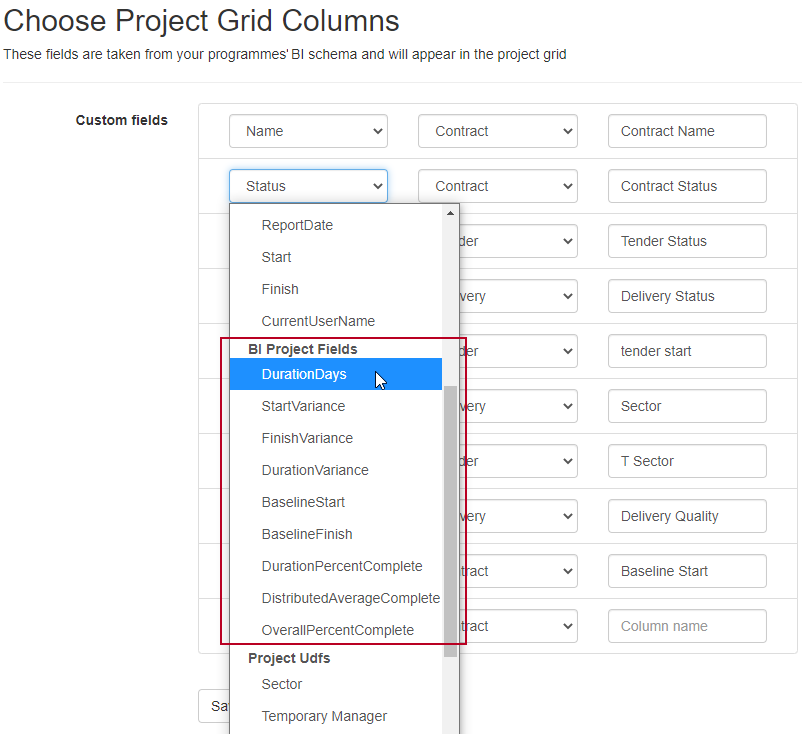
The information in the fields is taken from the 'Project' table in your Business Intelligence schema, which relates to the root level expanded task; if the root level expanded task is not marked as 'Is a Project' in Asta Powerproject, the information is taken from the 'Expanded' table. If any of the fields highlighted above are not included in your Business Intelligence schema, they will not be available for use in Asta Vision and will not appear in the list on the Choose Project Grid Columns page.
More information on configuring project grid columns
Specify the initial programme type when creating new projects
A new 'Override Start Programme' security rule type has been introduced.

If you create a security rule of this type, users to which the rule applies are able to specify the programme type with which a project should start when they create new projects, using the Start programme field that appears on the Create Project from Template page:
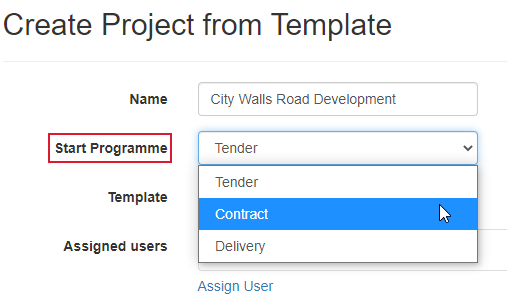
For example, if you have three programme types - 'Tender', 'Contract' and 'Delivery' - you might want most projects to start with a 'Tender' programme, but with the flexibility to create some projects that start with a 'Contract' programme. An 'Override Start Programme' security rule lets you give your users the chance to change the programme type of each project's initial programme.
More information on security rules
More information on creating projects and programmes
Programme tabs appear only when programmes of that type have been created
Before now, the Project page used to display a tab for each programme type, even if a programme of a particular type had not yet been created for a project. Now, a tab appears for a programme type only when a programme of that type has been created for a project.
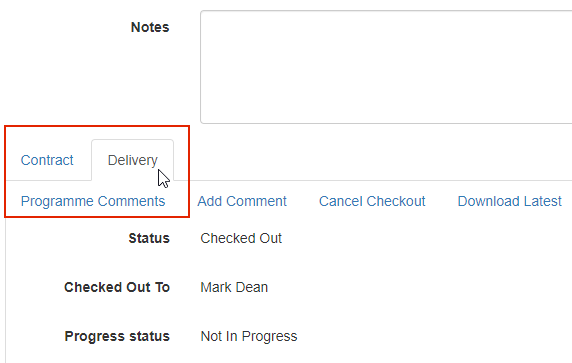
Set up administrator user roles
Before now, when setting up workflow and security rules you may have found that you had to duplicate a number of rules: setting up one version of a rule for administrator users and another version for other, non-administrator users - ie 'standard users' - with the only difference between the rules being that the Assigned to project check box is selected for the standard user version of the rule, and cleared for the administrator user version. You may also have included certain user-defined field checks in the standard user version of a rule, but excluded them from the administrator user version.
You no longer need to set up two versions of each workflow and security rule in this situation. You can now specify which user roles apply to administrator users, using the Administrator role check box that has been added to the Create Role and Edit Role pages:
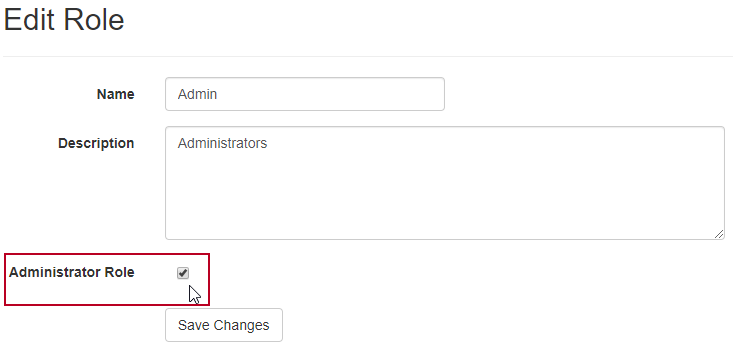
You should select this check box for user roles that apply to administrator users. When you configure a workflow or security rule that applies to an administrator role, users to which the user role has been assigned will be able to carry out the rule's action regardless of whether they are assigned to the project in question, even if the All roles must be assigned to project check box is selected for the workflow or security rule, or if the administrator role has not been selected in the Specific roles which must be assigned field.
When configuring workflow and security rules, you can now specify that specific field rules do not apply to users with administrator roles, by selecting the Ignored by administrator roles check box that has been added to the New Field Rule popup:
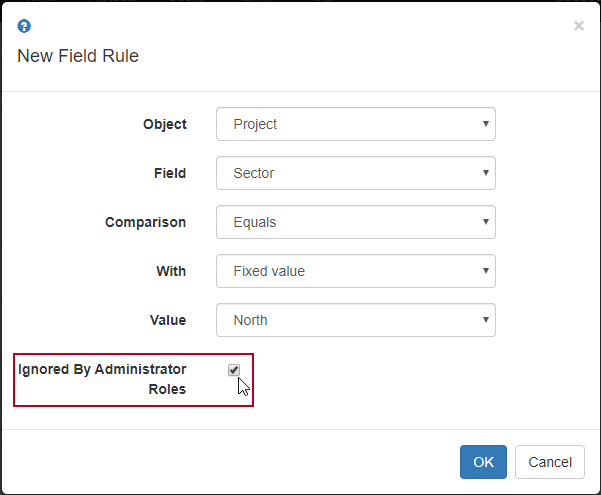
Selecting this check box means that administrator users can carry out the rule's action even if this field rule is not met. For workflow and security rules, field rules that do not apply to administrator users - those for which the Ignored by administrator roles check box has been cleared - are marked with a  :
:

More information on administrator roles
Configure user-defined fields to appear only if you select specific values in another field
You can now configure project-level user-defined fields to appear only if you select specific values in another field. For example, if you had a Sector project-level user-defined field, offering the values 'Healthcare' and 'Retail', you might want a Healthcare sector field to appear if 'Healthcare' was selected in the Sector field, and a Retail sector field to appear if 'Retail' was selected in the Sector field.
The illustration below shows the Add Project User Defined Field page, which now contains new Visibility UDF and Visible with values fields:
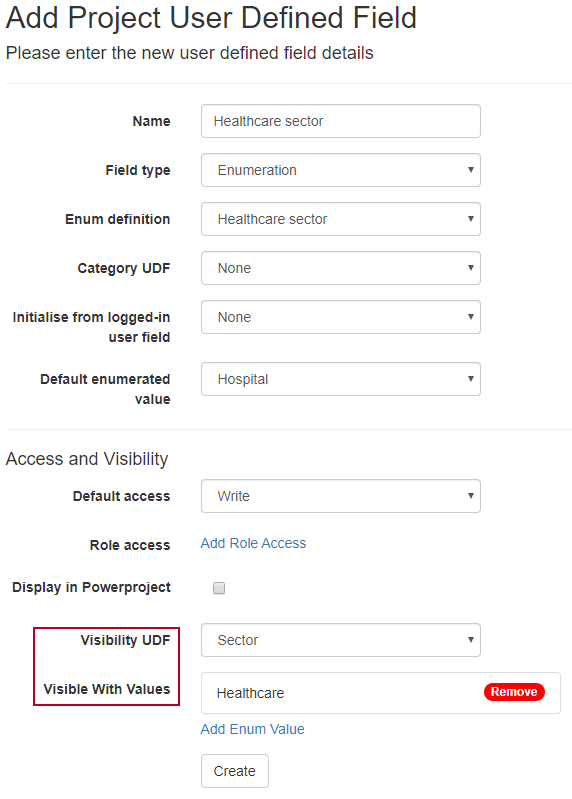
If you want to make the appearance of a field on the Project page dependent upon your selection in another field, select the field in which the appearance is dependent in the Visibility UDF field, and select the values that should make the field appear in the Visible with values field. For example, if you are setting up a Healthcare sector field that should only appear on the Project page if 'Healthcare' is selected in the Sector field:
- Select 'Sector' in the Visibility UDF field.
- Click Add Enum Values in the Visible with values field and select 'Healthcare' in the popup that appears.
If you configure the Healthcare sector field in this way, it will appear on the Project page if 'Healthcare' is selected in the Sector field:

If any other value is selected in the Sector field, the Healthcare sector field will not appear; in this example, a different field - Retail sector - appears, because 'Retail' has been selected in the Sector field and the Retail sector field has been made dependent on 'Retail' being selected:

More information on working with user-defined fields
Create user-defined fields in which your selection in one field determines the values available in another
You can create 'categorised' user-defined enumerations. These are user-defined enumerations that are associated with each other. When you create user-defined fields based on categorised user-defined enumerations, the value that you select in one field determines the values that are available in the other. For example, you might want to create a series of user-defined enumerations that define the location of a project in terms of country, county and town. Categorised user-defined enumerations are complex to set up, and have been superseded by hierarchical user-defined enumerations, which are much simpler.Using categorised user-defined enumerations, you can set them up in such a way that your 'Country' selection determines the 'County' values that are available, and your 'County' selection determines the 'Town' values that are available. For example, if you selected 'England' in the Country field, the only counties available in the County field might be 'Cheshire', 'Derbyshire', 'Shropshire' and 'Staffordshire'; if you then selected 'Shropshire' in the County field, the only towns available in the Town field might be 'Ludlow', 'Shrewsbury', 'Oswestry' and 'Wem'.
If 'Country', 'County' and 'Town' were set up as categorised user-defined enumerations, then used in three project-level user-defined fields and displayed one after another, they would appear as follows when you created or edited a project:

More information on working with categorised user-defined enumerations
Specify the order in which workflow actions appear on the Project page
You can now specify the order in which workflow actions appear on the Project page - the page you use to create or edit projects and their programmes.
To do this, you use the Action Order page. To access the Action Order page from the Asta Vision Home page, click Admin then click Action Order:
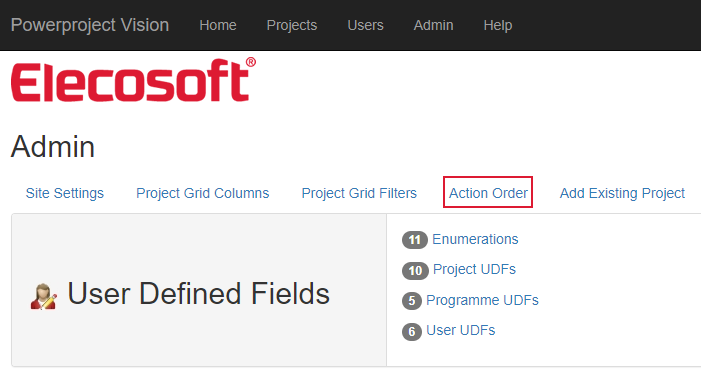
Each workflow action corresponds to a workflow rule with the same name. All available workflow actions appear on this page in a vertical list. The list includes actions corresponding to workflow rules that are part of the standard Asta Vision workflow - coloured in green - and actions corresponding to custom workflow rules - coloured in grey.
The workflow action at the top of the vertical list will appear first on the Project page, followed by the second, the third, the fourth, and so on. Users may not see all of the workflow actions in the list on the Project page; the status of a programme determines the actions that are visible on the Project page. For example, the 'Cancel Checkout' workflow action will only appear for programmes that are currently checked out.
Click and drag a workflow action up or down the list to change its order:
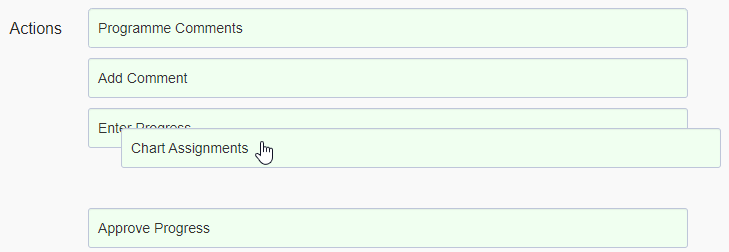
More information on specifying the order of workflow actions on the Project page
Specify the order in which user-defined fields appear on the Project, Create User and Edit User pages
You can now specify the order in which user-defined fields appear on the Project, Create User and Edit User pages - the pages you use to create or edit projects and users.
To do this, you use the appropriate UDFs Order page. There are three UDFs Order pages:
- Project UDFs Order. To access this page from the Asta VisionHome page, click Admin, click Project UDFs then click Project UDFs Order (pictured below).
- Programme UDFs Order. To access this page from the Asta VisionHome page, click Admin, click Programme UDFs then click Programme UDFs Order.
- User UDFs order. To access this page from the Asta VisionHome page, click Admin, click User UDFs then click User UDFs Order.
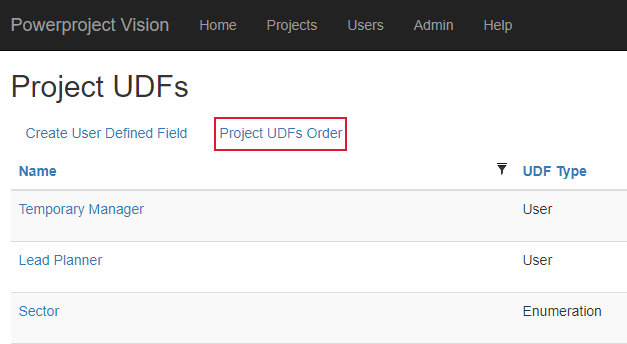
All user-defined fields of the appropriate type appear on this page in a vertical list. The user-defined field at the top of the vertical list will appear first on the Project or Create User and Edit User pages, followed by the second, the third, the fourth, and so on. Users may not see all of the user-defined fields in the list on the Project or Create User and Edit User pages; the individual user-defined field settings and each user's role determines which user-defined fields are visible.
Click and drag a user-defined field up or down the list to change its order:
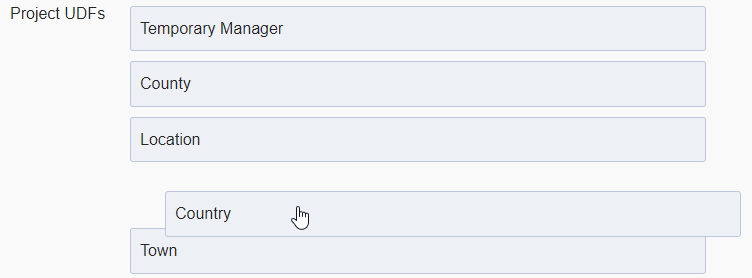
More information on specifying the order in which user-defined fields appear