Working with user-defined enumerations
You use the User Defined Enumerations page to create, edit and delete user-defined enumerations, which are lists of values that are grouped under a given name. For example, you could have a user-defined enumeration called 'Region', which contains all of the regions in which you work. The user-defined enumerations are displayed in a list. You can filter and sort the enumerations in the list.
To access the User Defined Enumerations page from the Asta Vision Home page, click Admin then click Enumerations.
Once you have created a user-defined enumeration, you can use it as a project, programme or user-level field - for example, to specify the region in which a project takes place or in which a user works - and to control security or workflow rules. You can also display up to five user-defined enumerations on the Projects page, and use them to filter the projects that are displayed in the list on that page.
As well as creating standard user-defined enumerations, you can create 'hierarchical' user-defined enumerations. These are user-defined enumerations that comprise a hierarchical list of selections. For example, you might want to create a user-defined enumeration that defines the location of a project in terms of country, county and town:
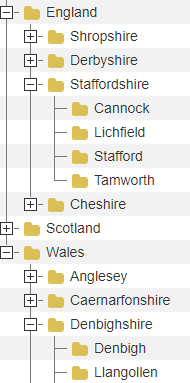
Each hierarchical user-defined enumeration has a  icon to the left of it.
You can create 'categorised' user-defined enumerations. These are user-defined enumerations that are associated with each other. When you create user-defined fields based on categorised user-defined enumerations, the value that you select in one field determines the values that are available in the other. For example, you might want to create a series of user-defined enumerations that define the location of a project in terms of country, county and town. Categorised user-defined enumerations are complex to set up, and have been superseded by hierarchical user-defined enumerations, which are much simpler. Each categorised user-defined enumeration has a  icon to the left of it.
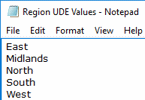
There are two ways of creating standard user-defined enumerations: you can enter the values manually, or you can import a text file that contains the values you want to include in the user-defined enumeration. For a text file to be valid, each value must appear on its own separate line and it must be saved as a .TXT file, as shown in the example below:
To create a standard user-defined enumeration by entering the values manually:
- On the User Defined Enumerations page, click Create User Defined Enumeration. The Add User Defined Enumeration page appears.
- Enter a descriptive name for the user-defined enumeration in the Name field. For example, if you were creating a user-defined enumeration that contains all of the regions in which you work, you would enter a name such as 'Region'.
- Click Add Enum Value. A Values field appears.
- Enter the name of the first value that you want to add to the user-defined enumeration in the Values field, then click away from the field. For example, if you were creating a user-defined enumeration that contains all of the regions in which you work, you would enter the name of one of the regions.
- Repeat the above two steps as many times as required to enter all of the required values into the user-defined enumeration.
Click Remove to the right of a value to remove it from the list if required. - Click Create. You return to the User Defined Enumerations page, where the new user-defined enumeration appears in the list.
To create a standard user-defined enumeration by importing a text file that contains the values you want to include:
- On the User Defined Enumerations page, click Create User Defined Enumeration. The Add User Defined Enumeration page appears.
- Enter a descriptive name for the user-defined enumeration in the Name field. For example, if you were creating a user-defined enumeration that contains all of the regions in which you work, you would enter a name such as 'Region'.
- Click Choose File. The Open dialog appears.
- Browse for the file that contains the user-defined enumeration values then click Open. You return to the Add User Defined Enumeration page, where the values from the text file appear in a list.
You can add more values to the user-defined enumeration manually by clicking Add Enum Value if required.
Click Remove to the right of a value to remove it from the list if required. - Click Create. You return to the User Defined Enumerations page, where the new user-defined enumeration appears in the list.
To create a hierarchical user-defined enumeration:
- On the User Defined Enumerations page, click Create Hierarchy UDE. The Hierarchy UDE page appears. You use the box beneath the Name field to create the hierarchy of the user-defined enumeration, including all its values.
- Enter a descriptive name for the user-defined enumeration in the Name field. For example, if you were creating a categorised user-defined enumeration that contains all of the countries, counties and towns in which you work, you could enter a name such as 'Location'.
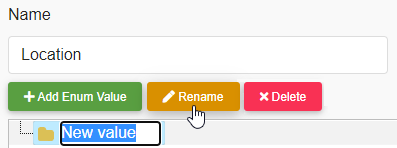
- An initial value appears in the box beneath the Name field, called 'New value'. This will be one of your top-level values. Click this value and click Rename. The name of the value becomes editable:
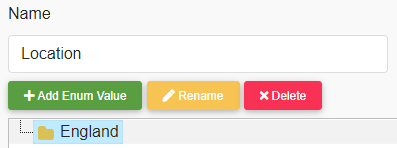
- Enter a descriptive name for the value and press ENTER. If you were creating a hierarchical user-defined enumeration to store countries, counties and towns, you would enter the name of one of the countries here:
- To create a subordinate value, click the value under which you want to create a value and click Add Enum Value - or right-click the value under which you want to create a value and select Add Enum Value from the menu that appears. A new value appears beneath the selected value, with its name editable:

- Enter a descriptive name for the value and press ENTER. If you were creating a hierarchical user-defined enumeration to store countries, counties and towns, you would enter the name of one of the counties here:

- To create another value at the top level, click a blank area of the box, so that no existing values are selected, and click Add Enum Value. A new value appears at the top level, with its name editable:

- Enter a descriptive name for the value and press ENTER. If you were creating a hierarchical user-defined enumeration to store countries, counties and towns, you would enter the name of another country here:

- Follow the above steps to continue adding values to the hierarchy. Follow the basic rules below:
- To create a value at the top level of the hierarchy, click a blank area of the box then click Add Enum Value.
- To create a value that is subordinate to an existing value, click the existing value then click Add Enum Value.
- To rename a value, click it, click Rename, enter a new name for the value and press ENTER.
- To delete a value, click it then click Delete.

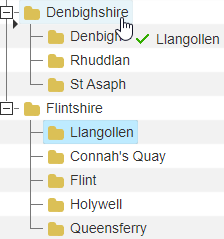
- If required, you can move values from one branch of the hierarchy to another. To do this, position the mouse pointer over the value you want to move, click and drag it to the top level of the branch to which you want to move it - holding down the mouse button - then release the mouse button. In the illustration below, the 'Llangollen' value has mistakenly been created in the 'Flintshire' branch of the hierarchy and is being dragged and dropped into the 'Denbighshire' branch:
You can drag and drop more than one value at a time. To do this, hold down CTRL and click the values you want to move, release CTRL, then click and drag one of the selected values to the top level of a different branch. In the illustration below, the 'Bakewell' and 'Derby' values have been mistakenly created in the 'Shropshire' branch of the hierarchy and are being dragged and dropped into the 'Derbyshire' branch: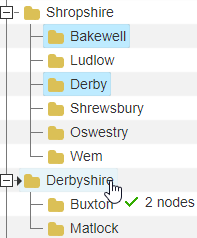
You can move entire branches of the hierarchy in one step, by clicking the top level of the branch and dragging it to the top level of a different branch.
If you accidentally drag and drop one or more values to a value within a branch, rather than to the top level of the branch, the destination value becomes the top level of a new branch of the hierarchy. This is illustrated below, where the 'Fraserburgh' value, instead of being moved to the top level of the 'Aberdeenshire' branch, has been moved accidentally to the 'Peterhead' value within it: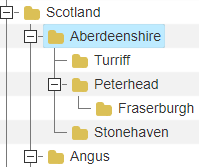
If this happens, simply drag and drop the value to the correct location. - Click Create. You return to the User Defined Enumerations page, where the hierarchical user-defined enumeration appears in the list, with a
 icon to the left of it, indicating that it is a hierarchical user-defined enumeration.
As with standard user-defined enumerations, there are two ways of creating categorised user-defined enumerations: you can enter the values manually, or you can import a text file that contains the values you want to include in the user-defined enumeration.
Before you create a categorised user-defined enumeration, you must have created a standard user-defined enumeration to act as the top-level user-defined enumeration. For example, if you were setting up a series of categorised user-defined enumerations to represent country, county and town, you must first create a standard user-defined enumeration with a name of 'Country'. You can then create a categorised user-defined enumeration to act as the second level - 'County' - and after that, a categorised user-defined enumeration to act as the third level - 'Town'.
To create a categorised user-defined enumeration:
- On the User Defined Enumerations page, click Create Categorised Enumeration. The Create Categorised Enumeration page appears.
- Enter a descriptive name for the user-defined enumeration in the Name field. For example, if you were creating a categorised user-defined enumeration that contains all of the counties in which you work, you would enter a name such as 'County'.
- Select the user-defined enumeration that is directly above this categorised user-defined enumeration in the hierarchy in the Category UDE field. For example, if you were setting up a series of categorised user-defined enumerations to represent country, county and town and you were creating the 'County' user-defined enumeration, you would select 'Country' in this field; if you were creating the 'Town' user-defined enumeration, you would select 'Country' in this field.
- Click Create. The Select the UDE Category to Edit page appears, displaying the enumeration values of the category user-defined enumeration - the user-defined enumeration you selected in the Category UDE field:
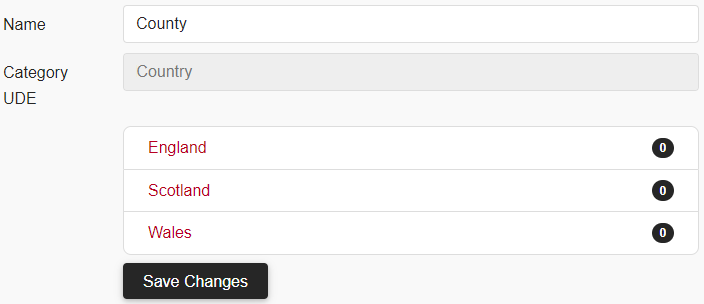
The numbers to the right of each enumeration value indicate how many enumeration values have been entered for each category value. At present, these numbers are all zero, as you have not entered any enumeration values. - Click one of the category values. The Edit User Defined Enumeration page appears.
- Click Add Enum Value. A Values field appears.
Alternatively, you can enter enumeration values by importing a text file that contains the values you want to include, as you can with standard user-defined enumerations. - Enter the name of the first value that you want to add to the user-defined enumeration in the Values field, then click away from the field. For example, if you were creating a user-defined enumeration that contains all of the counties in which you work, you would enter the name of one of the counties.
- Repeat the above two steps as many times as required to enter all of the required values into the user-defined enumeration.
Click Remove to the right of a value to remove it from the list if required. - Click Save Changes. You return to the Select the UDE Category to Edit page, where the number to the right of the category value now indicates the number of enumeration values you have entered:

- Repeat steps 5 to 9 to enter enumeration values for each of the category values - in this example, for England, Scotland and Wales.
- Click Back to List. The categorised user-defined enumeration appears in the list on the User Defined Enumerations page, with a
 icon to the left of it, indicating that it is a categorised user-defined enumeration.
If you want to create a series of user-defined enumerations with more than two levels, you can now create the next-level user-defined enumeration. For example, if you were setting up a series of categorised user-defined enumerations to represent country, county and town, you would create a third-level user-defined enumeration called 'Town', selecting 'County' in the Category UDE field and entering enumeration values for each 'County' category value, representing the towns in which you work.
Once you have set up a series of categorised user-defined enumerations, a  icon appears to the left of the enumerations on the User Defined Enumerations page - and to the left of the standard enumeration that acts as the top-level of the hierarchy. Click this icon to the left of an enumeration to view a hierarchical display that shows how it is related to other categorised enumerations.
To edit a user-defined enumeration:
- On the User Defined Enumerations page, click the name of the user-defined enumeration that you want to edit.
- Edit the details of the user-defined enumeration as required.
When editing a hierarchical user-defined enumeration, you can:- Create new values at the different levels of the hierarchy.
- Rename values.
- Change the position of values in the hierarchy.
- Delete values. You cannot delete values that have a
 symbol next to them, as these values have been assigned to one or more projects, programmes, users or workflow actions.
- Click Save Changes. You return to the User Defined Enumerations page.
When editing a categorised user-defined enumeration, you can move enumeration values from one category value to another. For example, if you had set up a series of categorised user-defined enumerations to represent country, county and town and you had accidentally entered a 'Shrewsbury' enumeration value against the 'Staffordshire' category value, you could move it into the correct category value - 'Shropshire'. To do this, you would:
- Click the 'Town' user-defined enumeration to edit it. The Select the UDE Category to Edit page appears.
- Click the 'Staffordshire' category value. The Edit User Defined Enumeration page appears.
- Click Move to the right of the 'Shrewsbury' enumeration value. The Move to Category Value popup appears.
- Select the 'Shropshire' category value and click OK. The 'Shrewsbury' enumeration value is moved from the 'Staffordshire' category value to the 'Shropshire' category value.
The values in standard and categorised user-defined enumerations are ordered alphanumerically by default. This is the order in which they appear in user-defined fields. You can change the ordering of values in user-defined enumerations. You may want to do this to place the most-frequently used value at the top of the list, for example.
To specify the order of values in a standard or categorised user-defined enumeration:
- On the User Defined Enumerations page, right-click the user-defined enumeration that you want to re-order and select Order. The User Defined Enumeration Order page appears.
- Click the value that you want to re-order.
- Holding down the left mouse button, drag the value up or down the list:

- When the value appears in the correct position, release the left mouse button. The value now appears in its new position in the list.
- Re-order any other values as required, then click Save.
Once you have re-ordered the values in a standard or categorised user-defined enumeration, any new values that you add subsequently appear at the top of the list - once you have re-ordered the values, they are no longer ordered alphanumerically. After re-ordering the values in a user-defined enumeration, you should check the order each time you create a new value and move the value to the appropriate position in the list.
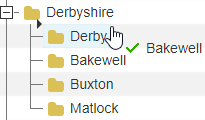
You specify the order of values in a hierarchical user-defined enumeration by editing the user-defined enumeration and clicking and dragging values to different positions in the hierarchy. In the illustration below, the 'Bakewell' value is being dragged from a position below the 'Derby' value and dropped to a position above it:
To delete a user-defined enumeration:
- On the User Defined Enumerations page, right-click the user-defined enumeration that you want to delete and select Delete. A popup appears, asking you to confirm whether you want to delete the user-defined enumeration.
- Click OK to delete the user-defined enumeration and return to the User Defined Enumerations page.
You cannot delete a user-defined enumeration that is currently in use - for example, one that is referenced by one or more user-defined fields.
Working with user-defined fields
Working with categorised user-defined enumerations
Converting categorised user-defined enumerations into hierarchical
Configuring how projects are grouped on the Projects and Portfolio Overview pages