Configuring user roles
You use the Roles page to create, edit and delete user roles, which define the actions that users can carry out in Asta Vision. The user roles are displayed in a list. You can filter and sort the user roles in the list and change the width of columns in the list.
To access the Roles page from the Asta Vision Home page, click Admin then click User roles.
Each user must be assigned at least one user role; they can be assigned more than one user role. You should create a user role for each different type of Asta Vision user. For example, if you have three different types of user - administrators, managers and planners - you should create one user role for each. Once you have created the user roles that you need, you can define rules to determine the actions that users of each role can carry out and the events about which users of each role should be notified.
You can specify the order in which user roles appear in drop-down lists. You may want to do this to place the most frequently-used roles (for example 'Planner') at the top of lists, and the least frequently-used roles (for example 'Admin') at the bottom. You should check the order of roles each time you create a new role to ensure that the new user role appears in the appropriate position.
You can organise the user roles you have created into a hierarchy. If you do not use a hierarchy of user roles, users who have permission to create and edit Asta Vision users are able to assign any user role to a user, which enables them to create a user with more permissions than they have themselves. You can prevent this from happening by organising user roles into a hierarchy. If you do this, users with a particular role can only assign user roles that are lower down the hierarchy than their own role to other users, and can only view users with roles that are lower down the hierarchy than their own role.
To create a user role:
- On the Roles page, click Create Role. The Create Role page appears.
- Enter a descriptive name for the user role in the Name field.
- Enter a fuller description of the user role in the Description field. For example, you might like to enter a description that summarises the rights that users to which the role is assigned have.
- If this user role applies to administrator users, select the Administrator role check box. When you configure a workflow or security rule that applies to an administrator role, users to which the user role has been assigned will be able to carry out the rule's action regardless of whether they are assigned to the current project, even if the All roles must be assigned to project check box is selected for the workflow or security rule, or if the administrator role has not been selected in the Specific roles which must be assigned field. Also, when configuring workflow and security rules, you can specify that specific field rules do not apply to users with administrator roles.
- Click Create. You return to the Roles page, where the new user role appears in the list.
You can specify the order in which user roles appear in drop-down lists. To do this:
- On the Roles page, click Role Order. The Role Order page appears.
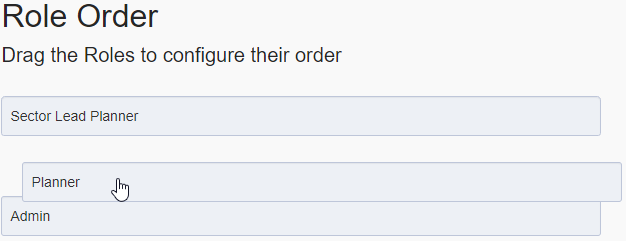
All user roles appear on this page in a vertical list. The user role at the top of the vertical list will appear first in the drop-down lists in which you select a user role, followed by the second, the third, the fourth, and so on. - Click the user role that you want to move.
- Holding down the left mouse button, drag the user role up or down the list:

- When the user role appears in the correct position, release the left mouse button. The user role now appears in its new position in the list.
- Click Save.
Each time you create a new user role, it is added to the top of the list. You should check the order of user roles each time you create a new role and move the role to the appropriate position in the list.
The following flat list of user roles is one in which roles are not organised into a hierarchy:

In this list, if users with the 'Junior Planner' role were given permission to create and edit users, they could assign any of the user roles to a user. For example, they could assign the 'Sector Lead Planner' role to a user, which probably has greater user access rights than their own role allows. They would then be able to access Asta Vision as this new user, giving them potentially inappropriate user access rights.
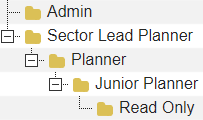
If the above list of user roles was organised into a user role hierarchy, it might look like this:

When user roles are organised into a hierarchy:
- Users can only assign user roles that are lower down the hierarchy than their own role to other users.
- Users can only view users with user roles that are lower down the hierarchy than their own role.
In the example above, this would mean that:
- Users with the 'Read Only' role cannot assign any user roles to users, and cannot view any users in Asta Vision.
- Users with the 'Junior Planner' role can assign only the 'Read Only' user role to users, and can view only 'Read Only' users in Asta Vision.
- Users with the 'Planner' role can assign only the 'Junior Planner' and 'Read Only' user roles to users, and can view only 'Junior Planner' and 'Read Only' users in Asta Vision.
- Users with the 'Sector Lead Planner' role can assign only the 'Planner', 'Junior Planner' and 'Read Only' user roles to users, and can view only 'Planner', 'Junior Planner' and 'Read Only' users in Asta Vision.
- Users with the 'Admin' role can assign any user role to users, and can view all users in Asta Vision. The 'Admin' role is a special case: users with this role can always assign any user role, and can always view all users, regardless of their role.
This prevents users from being able to access Asta Vision as a different user that they have created with potentially inappropriate user access rights.
If you organise your user roles into a hierarchy and you leave any user roles other than 'Admin' at the top level of the hierarchy, with no subservient 'child' roles, users with these roles cannot assign any user roles to users and cannot view any users in Asta Vision.
If more than one user role has been assigned to a user, and a second user's role is above only one of these roles in the user role hierarchy, the second user will be able to view and edit the first user (unless 'Admin' is one of the roles that has been assigned to the first user), but will not be able to remove the role to which they do not have access from that user.
To create a hierarchy of user roles:
- On the Roles page, click Role Hierarchy. The Role Hierarchy page appears.
- Click the Enable Role Hierarchy check box to specify that you want to organise your user roles into a hierarchy. If you want to revert to using a flat, non-hierarchical, list of user roles, clear this check box.
- Click and drag the user roles in the list to the appropriate place in the hierarchy. For example, to click and drag the 'Junior Planner' user role so that it appears beneath the 'Planner' role in the hierarchy, click and drag it to the 'Planner' role - holding down the mouse button - then release the mouse button when a green tick appears next to the 'Junior Planner' role name:

- Click Save Changes. You return to the Roles page.
Each time you create a new user role, it is added to the top of the user role hierarchy. If you organise your user roles into a hierarchy, each time you create a new user role, you should move it to the appropriate position in the hierarchy.
To edit a user role:
- On the Roles page, click the name of the user role that you want to edit. The Edit Role page appears.
- Edit the details of the user role as required.
- Click Save Changes. You return to the Roles page.
To delete a user role:
- On the Roles page, right-click the user role that you want to delete and select Delete. A popup appears, asking you to confirm whether you want to delete the user role.
- Click OK to delete the user role and return to the Roles page.
You cannot delete the 'Admin' user role and you cannot delete a user role if any users to which the role is assigned are currently logged into Asta Vision.
You should select the Administrator role check box on the Create Role or Edit Role page for those user roles that apply to administrator users, and clear it for all other user roles.
If, when configuring a workflow rule or a security rule, you select an administrator role in the Applies to roles field and select the Assigned to project check box, users with that role are able to carry out the workflow or security rule's action regardless of whether they are assigned to the current project. Users with non-administrator roles - 'standard' users - can carry out the rule's action only if they are assigned to the current project.
When configuring workflow and security rules, you can specify that specific field rules do not apply to users with administrator roles, by selecting the Ignored by administrator roles check box on the New Field Rule popup. Selecting this check box means that administrator users can carry out the rule's action even if this field rule is not met. For workflow and security rules, field rules that do not apply to administrator users - those for which the Ignored by administrator roles check box has been cleared - are marked with a  :
:

For example, if you set up:
- A user role called 'Administrator', with the Administrator role check box selected.
- A user role called 'Manager', with the Administrator role check box cleared.
- A workflow rule called 'Create Delivery Programme', with the 'Administrator' and 'Manager' user roles selected in the Applies to roles field; the Assigned to project check box selected; and a 'Project Sector Equals North' field rule for which the Ignored by administrator roles check box has been selected.
Users will be able to carry out the workflow rule's action as follows:
- Users with the 'Manager' user role will be able to carry out the workflow rule's action only if they are assigned to the current project and if the project sector equals 'North'.
- Users with the 'Administrator' user role will be able to carry out the workflow rule's action regardless of whether they are assigned to the current project and regardless of whether the project sector equals 'North'.
Working with user-defined fields