Configuring how projects are grouped on the Projects and Portfolio Overview pages
You use the Project Hierarchy page to configure the way in which projects are grouped on the Projects and Portfolio Overview pages - and on the Open tab of the Asta Powerproject Backstage view. You can group projects according to the contents of any project-level user-defined field that is linked either to a hierarchical user-defined enumeration or to a standard user-defined enumeration.
If you choose to group projects:
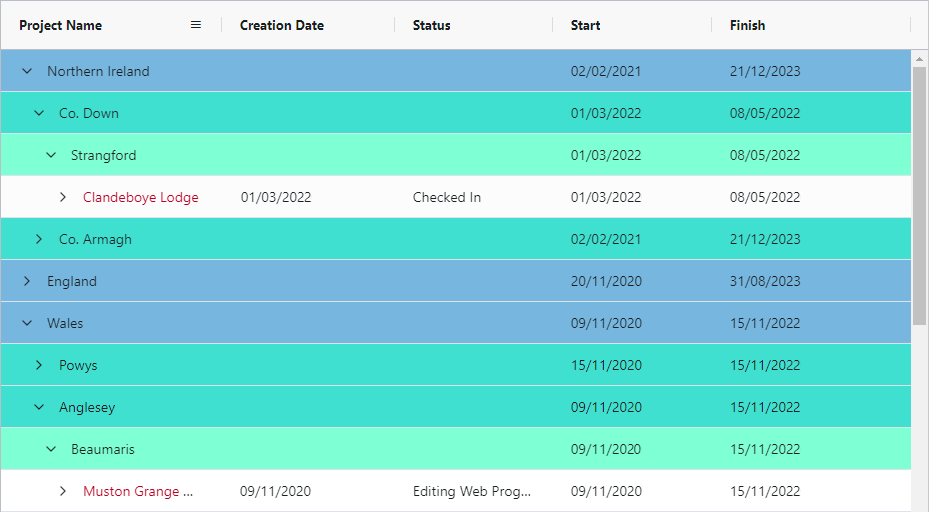
- A summary bar is displayed on the Projects page for each value in the selected user-defined field, and projects are grouped according to what has been selected in the user-defined field for each project. For example, if you select a user-defined field that is used to specify the geographical location of each project, a summary bar is displayed for each location and the projects that take place in each location are grouped beneath the summary bars:
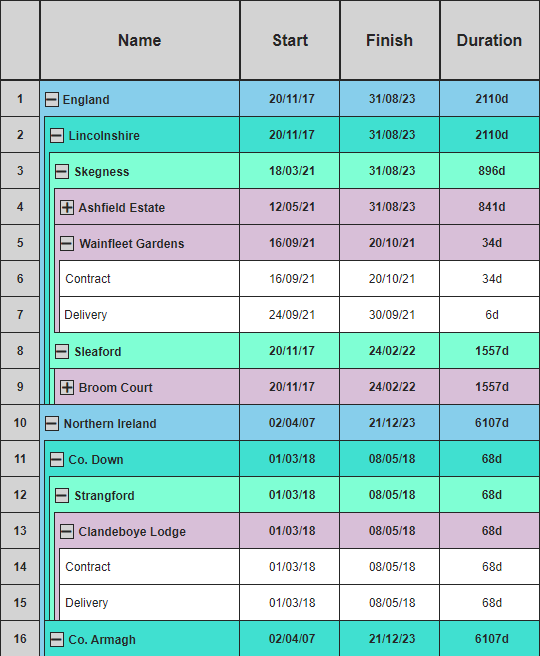
- A summary task is displayed in the bar chart on the Portfolio Overview page for each value in the selected user-defined field, and projects are grouped according to what has been selected in the user-defined field for each project. For example, if you select a user-defined field that is used to specify the geographical location of each project, a summary task is displayed for each location and the projects that take place in each location are grouped beneath the summary tasks:
If the user-defined field that is being used to group the projects is linked to a hierarchical user-defined enumeration, you can expand and contract it in the same way you expand and contract the project and programme hierarchy. If the field is linked to a standard user-defined enumeration, there will be only one level to the hierarchy. - On the Open tab of the Asta Powerproject Backstage view, programmes are grouped according to what has been selected in the user-defined field, with headings to indicate the different values in the selected user-defined field. For example, if you select a user-defined field that is used to specify the geographical location of each project, a heading is displayed for each location and the projects that take place in each location are grouped beneath the headings.
If a suitable project-level user-defined field already exists, you can use this to group projects. If you want to group projects using a field that is linked to a hierarchical user-defined enumeration and a suitable field does not yet exist, you can create the user-defined field and the associated user-defined enumeration on this page. If you choose not to group projects, they appear on the Projects and Portfolio Overview pages in a simple list.
To access the Project Hierarchy page from the Asta Vision Home page, click Admin then click Project Hierachy.
To specify that projects should not be grouped on the Projects and Portfolio Overview pages, but should appear in a simple list:
- On the Project Hierarchy page, click the None radio button.
- Click Save to save your settings and return to the Admin page.
Use this option if you have not already created a suitable project-level user-defined field that is linked to a hierarchical user-defined enumeration. You can create the user-defined field and the associated user-defined enumeration on this page.
To specify that projects should be grouped on the Projects and Portfolio Overview pages according to the contents of a new project-level user-defined field:
- On the Project Hierarchy page, click the New Hierarchy radio button.
- In the Name field, enter a descriptive name to apply to the project-level user-defined field that will be created. You use the box beneath the Name field to create the hierarchy of the user-defined enumeration, including all its values.
- An initial value appears in the box beneath the Name field, called 'New value'. This will be one of your top-level values. Click this value and click Rename. The name of the value becomes editable:

- Enter a descriptive name for the value and press ENTER. If you were creating a hierarchical user-defined enumeration to store countries, counties and towns, you would enter the name of one of the countries here:

- To create a subordinate value, click the value under which you want to create a value and click Add Enum Value - or right-click the value under which you want to create a value and select Add Enum Value from the menu that appears. A new value appears beneath the selected value, with its name editable:

- Enter a descriptive name for the value and press ENTER. If you were creating a hierarchical user-defined enumeration to store countries, counties and towns, you would enter the name of one of the counties here:

- To create another value at the top level, click a blank area of the box, so that no existing values are selected, and click Add Enum Value. A new value appears at the top level, with its name editable:

- Enter a descriptive name for the value and press ENTER. If you were creating a hierarchical user-defined enumeration to store countries, counties and towns, you would enter the name of another country here:

- Follow the above steps to continue adding values to the hierarchy. Follow the basic rules below:
- To create a value at the top level of the hierarchy, click a blank area of the box then click Add Enum Value.
- To create a value that is subordinate to an existing value, click the existing value then click Add Enum Value.
- To rename a value, click it, click Rename, enter a new name for the value and press ENTER.
- To delete a value, click it then click Delete.
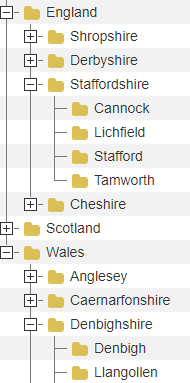
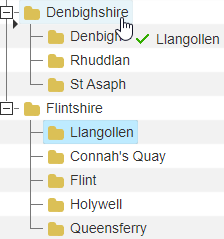
- If required, you can move values from one branch of the hierarchy to another. To do this, position the mouse pointer over the value you want to move, click and drag it to the top level of the branch to which you want to move it - holding down the mouse button - then release the mouse button. In the illustration below, the 'Llangollen' value has mistakenly been created in the 'Flintshire' branch of the hierarchy and is being dragged and dropped into the 'Denbighshire' branch:
You can drag and drop more than one value at a time. To do this, hold down CTRL and click the values you want to move, release CTRL, then click and drag one of the selected values to the top level of a different branch. In the illustration below, the 'Bakewell' and 'Derby' values have been mistakenly created in the 'Shropshire' branch of the hierarchy and are being dragged and dropped into the 'Derbyshire' branch: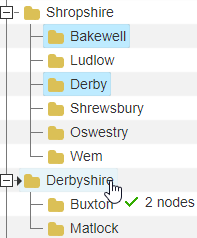
You can move entire branches of the hierarchy in one step, by clicking the top level of the branch and dragging it to the top level of a different branch.
If you accidentally drag and drop one or more values to a value within a branch, rather than to the top level of the branch, the destination value becomes the top level of a new branch of the hierarchy. This is illustrated below, where the 'Fraserburgh' value, instead of being moved to the top level of the 'Aberdeenshire' branch, has been moved accidentally to the 'Peterhead' value within it: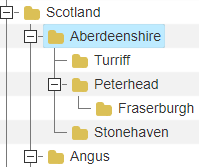
If this happens, simply drag and drop the value to the correct location. - If you want a value to be assigned to new projects by default, click the value in the hierarchy then click Default. The default value you select is highlighted in red, with a tick to the left of it:

If you do not specify a default value, no selection will be made in the user-defined field when you create new projects, and new projects will appear at the bottom of the project list, ungrouped, until a value is selected in the user-defined field. - Specify the colours in which to display each level of the hierarchy in the Level 1, Level 2, etc fields. The Level 1 colour is applied to the top level of the hierarchy; the Level 2 colour is applied to the second level, and so on.
- Click Save to save your settings and return to the Admin page.
When you click Save, the following items are created, with the name you entered in the Name field applied to each:
- A hierarchical user-defined enumeration, containing details of the hierarchy you have specified.
- An enumeration-type, project-level user-defined field, linked to the hierarchical user-defined enumeration.
Use this option if you have already created the project-level user-defined field and associated hierarchical user-defined enumeration that you want to use to group projects.
To specify that projects should be grouped on the Projects and Portfolio Overview pages according to the contents of an existing project-level user-defined field that is linked to a hierarchical user-defined enumeration:
- On the Project Hierarchy page, click the Existing Hierarchy radio button.
- In the Project hierarchy UDF field, select the user-defined field to use when grouping projects. You can select any project-level user-defined field that is linked to a hierarchical user-defined enumeration. The hierarchy of the user-defined enumeration that is associated with the field appears on the page.
- If you want a value to be assigned to new projects by default, click the value in the hierarchy then click Default. The default value you select is highlighted in red, with a tick to the left of it:

If you do not specify a default value, no selection will be made in the user-defined field when you create new projects, and new projects will appear at the bottom of the project list, ungrouped, until a value is selected in the user-defined field. - Edit the values of the user-defined field if required. You can add values, delete values, rename values, and move values around in the hierarchy (see the section above for details). You cannot delete values that have a
 symbol next to them, as these values have been assigned to one or more projects.
 - Specify the colours in which to display each level of the hierarchy in the Level 1, Level 2, etc fields. The Level 1 colour is applied to the top level of the hierarchy; the Level 2 colour is applied to the second level, and so on.
- Click Save to save your settings and return to the Admin page.
To specify that projects should be grouped on the Projects and Portfolio Overview pages according to the contents of an existing project-level user-defined field that is linked to a standard user-defined enumeration:
- On the Project Hierarchy page, click the Flat Hierarchy radio button.
- In the Project Hierarchy UDF field, select the user-defined field to use when grouping projects. You can select any project-level user-defined field that is linked to a standard user-defined enumeration.
- Specify the colour in which to display the single hierarchy level in the Level 1 field. As you are grouping projects according to a user-defined field that is linked to a standard user-defined enumeration, there is only one level to the hierarchy.
- Click Save to save your settings and return to the Admin page.