Configuring legacy programme dashboard settings
You use the Dashboard Options page to configure the information that is displayed in legacy programme dashboards. Legacy programme dashboards are those that appear at the top of the Dashboard list, on the Project page. Legacy programme dashboards can be identified by the fact that their name is purely the name of the corresponding programme type. You may or may not see legacy dashboards in your instance of Asta Vision.
You can specify default settings, to be applied to legacy programme dashboards of all programme types, and specify individual settings for each programme type if required. If you specify settings for a particular programme type, these settings are used in place of your default settings when you view a legacy programme dashboard of a programme of that type.
The fields on this page have no effect on other programme dashboards, or on global dashboards.
A tick appears against any programme types for which specific programme dashboard settings have been configured. In the illustration below, programme dashboard settings have been configured for the 'Contract' programme type, but not for the 'Delivery' or 'Tender 1' programme types:
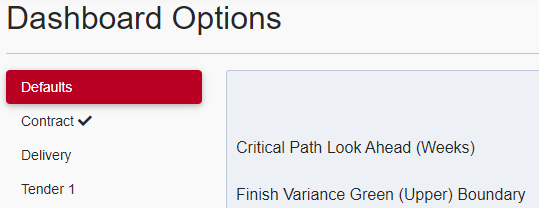
To access the Dashboard Options page from the Asta Vision Home page, click Admin then click Dashboard Options.
 Configuring legacy programme dashboard settings for a specific programme type
To configure legacy programme dashboard settings for a specific programme type:
- On the Dashboard Options page, click the name of the programme type in the left pane. If settings have already been configured for this programme type, they appear on the screen; if settings have not yet been configured for this programme type, an Override Default Options check box appears.
- Select the Override Default Options check box. The settings appear on the screen.
- Use the fields on the page to configure the legacy programme dashboard settings for the selected programme type, in the same way as you would configure the default settings - see below for details of the fields on the page.
- Click Save. Your programme dashboard settings are saved and you return to the Admin page. A tick now appears against the programme type on the Dashboard Options page, indicating that it now has specific programme dashboard settings.
Configuring a programme type to use the default legacy programme dashboard settings
If you have previously configured specific legacy programme dashboard settings for a programme type, you can configure it to use the default settings.
To configure a programme type to use the default legacy programme dashboard settings:
- On the Dashboard Options page, click the name of the programme type in the left pane.
- Clear the Override Default Options check box. The remaining fields disappear from the screen.
- Click Save. Your programme dashboard settings are saved and you return to the Admin page. A tick no longer appears against the programme type on the Dashboard Options page, indicating that it no longer has specific programme dashboard settings.
Explanation of the fields on the Dashboard Options page
| Critical Path Look Ahead (Weeks) |
Enter the number of weeks into the future in which to look for upcoming critical tasks.
These critical tasks are listed in the 'Critical Path Upcoming Activities' section of the dashboard. For example, if you enter '2' in this field, any critical tasks that are due to take place in the next two weeks are listed in the 'Critical Path Upcoming Activities' section.
|
| Finish Variance Green (Upper) Boundary |
Enter a value at or above which the coloured variance indicator in the 'Finish Variance (days)' section of the dashboard should display green.
The indicator displays green if the variance between the live programme finish date and the planned programme finish date, taken from the baseline, is equal to or greater than the value you enter, in terms of days. For example, if you enter '2' in this field, the coloured variance indicator displays green if the live programme finish date is two days or more earlier than the planned programme finish date.
|
| Finish Variance Red (Lower) Boundary |
Enter a value at or below which the coloured variance indicator in the 'Finish Variance (days)' section of the dashboard should display red.
The indicator displays red if the variance between the live programme finish date and the planned programme finish date, taken from the baseline, is equal to or less than the value you enter, in terms of days. For example, if you enter '-2' in this field, the coloured variance indicator displays red if the live programme finish date is two days or more later than the planned programme finish date.
The coloured variance indicator displays amber if the variance is between the upper and lower boundaries that you specify. In the examples given above, with an upper boundary of '2' and a lower boundary of '-2', the indicator would display amber if the variance was -1, 0 or 1.
|
| Include Milestones in Activity Count |
Select this check box to include milestones when counting tasks for the 'Activity Count To Date' and 'Activity Count By Code To Date' sections of the dashboard; clear the check box to exclude milestones when counting tasks. |
| Count Activities by Start Date |
Select this check box to include tasks in the 'Activity Count To Date' and 'Activity Count By Code To Date' sections of the dashboard if they have started by the report date of the project's last used progress period; clear the check box to include tasks if they have finished by that date. |
| Activity Count Code Library Name |
Enter the name of the code library by which to group tasks in the 'Activity Count By Code To Date' section of the dashboard.
If the code library you specify does not exist in the project, the 'Activity Count By Code To Date' section does not appear in the dashboard.
|
| Key Milestone Code Library Name |
Enter the name of the code library to use in the 'Key Milestones' section of the dashboard. Milestones will be included in that section of the dashboard if they have been assigned a code from this code library.
If the code library you specify does not exist in the project, the 'Key Milestones' section does not appear in the dashboard.
|
| Milestone Variance Green (Upper) Boundary |
Enter a value at or above which the coloured variance indicator in the 'Key Milestones' section of the dashboard should display green.
The indicator displays green if the variance between the milestone date in the live data and the date in the baseline is equal to or greater than the value you enter, in terms of days. For example, if you enter '2' in this field, the coloured variance indicator displays green if the live date is two days or more earlier than the planned date.
|
| Milestone Variance Red (Lower) Boundary |
Enter a value at or below which the coloured variance indicator in the 'Key Milestones' section of the dashboard should display red.
The indicator displays red if the variance between the milestone date in the live data and the date in the baseline is equal to or less than the value you enter, in terms of days. For example, if you enter '-2' in this field, the coloured variance indicator displays red if the live date is two days or more later than the planned date.
The coloured variance indicator displays amber if the variance is between the upper and lower boundaries that you specify. In the examples given above, with an upper boundary of '2' and a lower boundary of '-2', the indicator would display amber if the variance was -1, 0 or 1.
|
| Project UDF Name 1/Project UDF Name 2 |
Enter the names of one or two project-level user-defined fields that you want to display in the (untitled) 'User-Defined Fields' section of the dashboard. Specify user-defined fields that will help to identify the project. For example, you may want to specify 'Sector' and 'Sub-Sector' user-defined fields, or a 'Region' user-defined field.
If you specify a user-type user-defined field in which more than one user can be selected, all users that have been selected in the field are displayed in a comma-separated list.
If the user-defined fields you specify do not exist in the project, the (untitled) 'User-Defined Fields' section does not appear in the dashboard. If you display a user-defined field in the dashboard and subsequently change its name, the user-defined field name is not updated on the dashboard until you have edited the dashboard options and reselected the renamed user-defined field.
|
Related Topics:
Displaying programme-specific dashboards