What's new in Asta Connect
Whenever a new release of Asta Connect becomes available, it is a good idea to refresh your web browser by pressing CTRL F5 to ensure that any updated web pages in the application and its Help are displayed.
Tasks displayed at a smaller size in the whiteboard by default
Tasks are now displayed at a smaller size in the whiteboard by default than previously - essentially, the whiteboard is 'zoomed out' more by default - for new pull plans. This means that more tasks can be displayed in the whiteboard, so you have to scroll around the whiteboard less often.
You can still zoom in and out of the whiteboard whenever you like. Zoom in to display fewer tasks on the screen, with more information displayed about each task; zoom out to display more tasks on the screen, with less information displayed about each task.
This change does not affect existing pull plans, as the zoom level of the whiteboard for existing pull plans is cached from the last time you displayed the whiteboard.
More information on zooming in and out of the whiteboard
Week numbering now begins at the project start date by default
Before this release, when you created a new project, Asta Connect numbered weeks in the project according to the ISO week date system by default. Now, when you create a new project, the Use Project Start Date for Week Numbering toggle is selected by default, which means that whiteboard week numbering begins on the project start date:
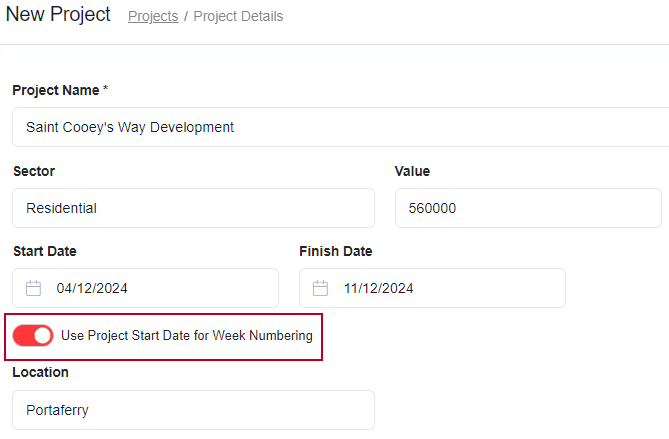
If you want to number weeks in a project according to the ISO week date system, you can clear the Use Project Start Date for Week Numbering toggle, either on the New Project page or on the Project Details page.
More information on creating projects in Asta Connect
More information on viewing and editing project details
Issues addressed in this release
| Work Item | 9810 | ||||
| Category | Pull plans | ||||
| Summary | Unable to export details of a project's pull plans with their tasks to a Microsoft Excel workbook when the project has multiple pull plans. | ||||
| Description | Before this release, if you attempted to export details of a project's pull plans and their tasks to a Microsoft Excel workbook - by clicking Export to Excel - Export Tasks on the Project Pull Plans page - an error occurred if the project had more than one pull plan. | ||||
| Resolution |
This issue has been addressed, so it is now possible to export details of a project's pull plans and their tasks to a Microsoft Excel workbook when the project has multiple pull plans.
More information on viewing a project's pull plans
More information on exporting information from a list to a Microsoft Excel workbook |
||||
| Work Item | 9811 | ||||
| Category | Users | ||||
| Summary | Error occurs when entering a search phrase on the Users page that returns no matches. | ||||
| Description | Before this release, if you entered an alphanumeric string in the Search... field at the top of the Users page that returned no matches, an error occurred. | ||||
| Resolution |
This issue has been addressed, so it is now possible to enter alphanumeric strings in the Search... field at the top of the Users page that return no matches, without an error occurring.
More information on working with users
|
||||
| Work Item | 9829 | ||||
| Category | Pull plan activities | ||||
| Summary | Progress is not updated correctly on pull plan activities that are associated with one or more tasks. | ||||
| Description | Before this release, in certain circumstances, the percentage progress of pull plan activities that are associated with one or more tasks was not being updated correctly when the progress of the associated tasks was updated. This could also happen if more tasks were associated with the activity, or if some tasks were disassociated from the activity. | ||||
| Resolution |
This issue has been addressed, so the percentage progress of pull plan activities that are associated with one or more tasks is now updated correctly in all circumstances.
|
||||
Display a project team legend in the whiteboard
You can view a legend that shows the project teams that the colours used in the whiteboard represent. This is particularly useful if the whiteboard swimlanes currently represent build locations.
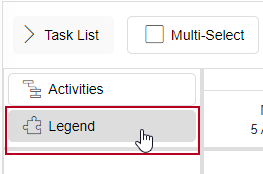
To view a project team legend, click the Legend button at the top-left of the whiteboard:
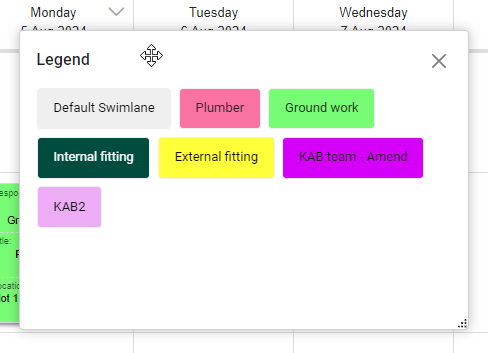
The legend appears in a popup. You can move the popup around the screen by clicking and dragging its title bar:
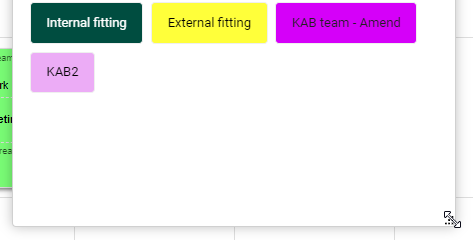
You can resize the popup by clicking and dragging its bottom-right corner:
To hide the legend popup, click  .
.
More information on using a whiteboard to manage pull plans
Access the Edit Task dialog from the whiteboard with a single click
Before this release, to access the Edit Task dialog from the whiteboard, you had to click  at the bottom-right of the task and select Edit Task.
You can now access the Edit Task dialog from the whiteboard with a single click: simply left-click the task you want to edit to display the dialog:
If you are using a touchscreen device, you can now access the Edit Task dialog by tapping a task.
Note that if you are in multi-select mode, left-clicking a task still selects the task for subsequent editing using the Edit Multiple Tasks dialog, rather than displaying the Edit Task dialog.
More information on using a whiteboard to manage pull plans
Hover over tasks to display a summary of task information
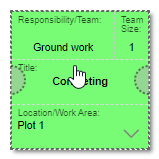
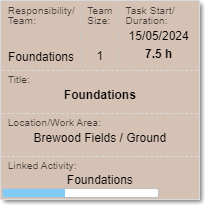
You can now display a summary of each task's details by hovering the mouse pointer over a task.
To view a summary of a task's details, hover the mouse pointer over the task. A popup appears, showing you key information about the task:
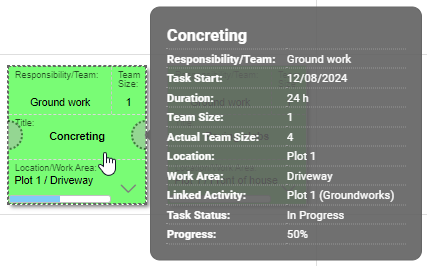
These popups are particularly useful when you are working with the whiteboard zoomed out to such a degree that very little information is displayed on each task.
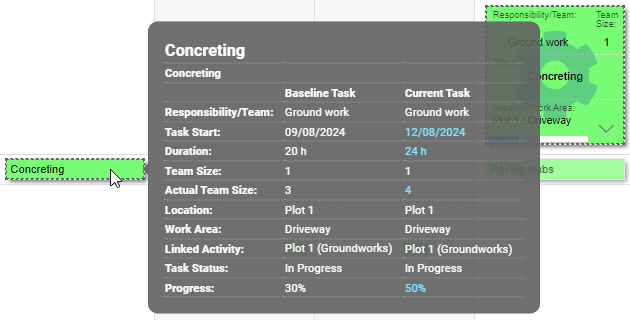
If you are currently displaying baseline information in the whiteboard and hover over a baseline task, the popups display information about the 'live' task, information about the task as it was when the baseline was created, and the variance between the two, highlighted in blue:
More information about using a whiteboard to manage pull plans
Display additional information on tasks when the whiteboard is fully zoomed out
When the whiteboard is fully zoomed out, each task on the whiteboard appears at its smallest so that as many tasks as possible can be displayed on the screen. The name of each task is displayed. You can display one additional item of information on each task to make it easier to identify each task. You can choose one item of information to display when swimlanes represent build locations, and one item of information to display when swimlanes represent project teams.
You do this using the new Display additional field on Whiteboard Tasks when zoomed out fields that have been added to the Project Settings page - you can specify different settings for each of your projects:

If you select an item of information in one of these fields, it appears on the lower half of each task when the whiteboard is zoomed out to its fullest extent, as illustrated below:
More information on configuring project settings
Issues addressed in this release
| Work Item | 9004 | ||||
| Category | Pull plan Gantt chart | ||||
| Summary | Tasks associated with activities are not displayed in the pull plan Gantt chart view. | ||||
| Description | Since the last version of Asta Connect was released, tasks that are associated with activities were not being displayed in the pull plan Gantt chart view. | ||||
| Resolution |
This issue has been addressed, so tasks that are associated with activities are now displayed in the pull plan Gantt chart view as they should be.
|
||||
| Work Item | 9027 | ||||
| Category | Dashboard | ||||
| Summary | Dashboard filter settings are not retained when you leave the Dashboard. | ||||
| Description | Before this release, if you used filters to specify the data that is displayed in the dashboard widgets, then clicked away from the Dashboard, your filter settings were not retained. This meant that you had to reset your dashboard filter settings each time you used the Dashboard. | ||||
| Resolution |
Your Dashboard filter settings are now retained when you click away from the Dashboard, so the next time you use the Dashboard, your previous filter settings are applied automatically.
|
||||
New version of the Asta Connect export add-in available
A new version of the Asta Connect export add-in is now available for download. If you export Asta Powerproject projects for use in Asta Connect, you must install the new version of the add-in to be able to import build locations from Asta Powerproject.
To install the new version of the add-in:
- Click here to download the add-in installer.
- When the file has finished downloading onto your computer, double-click it to launch the add-in installer.
- Follow the instructions in the installer to install the add-in.
Use build locations to identify where tasks take place
You can use build locations to categorise pull plan tasks according to the place at which they are carried out. For example, you could have locations that represent different plot numbers, or different floors of a multistorey building. When using a whiteboard to manage pull plans, you can create a swimlane for each build location, then move the tasks on the whiteboard into the appropriate swimlane to group tasks by build location.

You can use location groups to categorise build locations and to restrict locations to particular projects. If you import projects from Asta Powerproject in which code libraries are used to identify the location of tasks, the location groups correspond to the code libraries in the project, and the build locations correspond to individual codes.
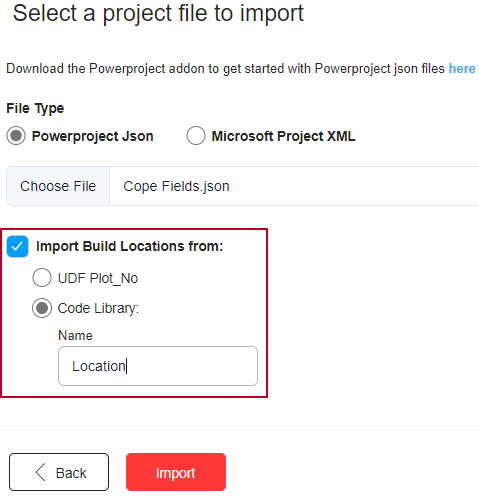
When you import a project from Asta Powerproject, you can import build location information based on one of the following:
- Entries that have been recorded against the 'Plot_No' bar-level, string-type, user-defined field.
- The names of the codes in a specified code library. If the code libraries in the project are structured in a hierarchy, the code library from which build location information is imported must be at the top level of the code library hierarchy.
Note that only one code from the specified code library can be used to identify location, so if you use this method to identify the location of tasks, do not assign more than one code from the 'location' code library to each task. If more than one code from the specified code library has been assigned, Asta Connect uses the most recent code to be assigned to identify location.
You specify whether you want to import build location information, and the way in which build locations have been specified in the project, using the new Import Build Locations from fields that have been added to the Import Project page:
Build location information is displayed in the following places:
- In the spreadsheet on the Project Master Plan page.
- On the New Activity dialog - which has been revised to fit the new Activity Location field, and is now divided into two tabs.
- On the Edit Activity dialog - which has been revised to fit the new Activity Location field, and is now divided into three tabs.
- In the spreadsheet on the Pull Plan Gantt page.
- In a column on the Pull Plan Tasks page.
- On the New Task dialog.
- On the Edit Task dialog.
- On the Edit Multiple Tasks dialog. The Move All to Swimlane check box has been removed from the Move Tasks tab of this dialog; to move multiple tasks to a different swimlane, you now specify either a different project team or a different build location on the Task Details tab of this dialog - depending on whether swimlanes currently represent project teams or build locations.
If you associate a task with an activity in a project's master plan, the location of the task is taken automatically from the activity's build location and cannot be edited.
To enable the new build locations feature, the following new user permission groups have been added:
- Pages - Build Location Groups: used to specify whether users can view, create, edit and delete build location groups.
- Pages - Build Locations: used to specify whether users can view, create, edit and delete build locations.
More information on working with build locations
More information on importing projects into Asta Connect
More information on available user permissions
Use swimlanes in the whiteboard to represent build locations
Before this release, the swimlanes in the whiteboard always represented project teams. You can now configure the whiteboard so that swimlanes represent build locations rather than project teams. You do this using the new Swimlanes control that has been added to the top of the whiteboard:
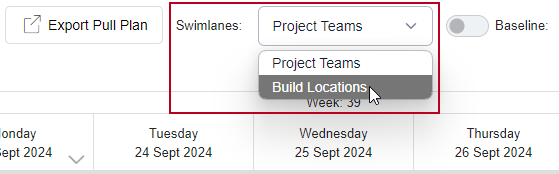
If you click this control and select Build Locations:
- Each swimlane represents a build location at which the pull plan's tasks take place.
- Moving a task from one swimlane to another changes the task's build location to that of the destination swimlane.
- The task list contains those tasks to which a build location has not yet been assigned.
- Moving a task from the task list to a swimlane assigns the swimlane's build location to the task.
- Moving a task from a swimlane to the task list removes the swimlane's build location assignment from the task.
If a task has taken its build location from a master plan activity to which it is linked and swimlanes represent build locations, you cannot click and drag the task from one swimlane to another, or to the task list, as its build location is not editable.
More information on using a whiteboard to manage pull plans
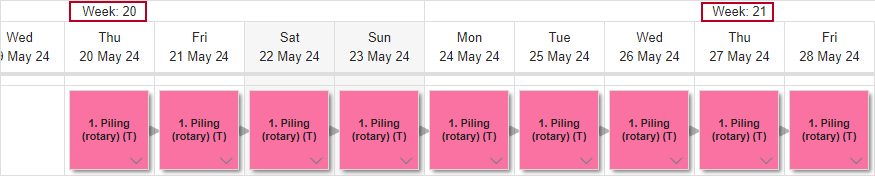
Week numbering displayed at the top of the whiteboard
Week numbers are now displayed at the top of the whiteboard. This makes it easier to identify the week in which tasks take place:
You can specify how to number weeks for each project, using the new Use Project Start Date for Week Numbering toggle that has been added to New Project page, and to the Details tab of the Project Details page:
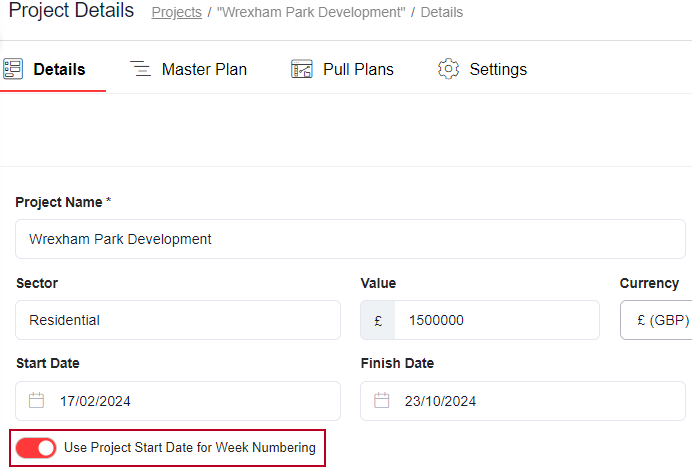
Click the Use Project Start Date for Week Numbering toggle to start week numbering on the project start date - as specified on this page - or turn off the toggle to number weeks according to the ISO week date system.
Week numbering is included in the resulting PDF file when you export a pull plan's whiteboard in PDF format.
More information on creating projects
More information on viewing and editing project details
Links now included when you export a pull plan's whiteboard in PDF format
Before this release, when you exported a pull plan's whiteboard in PDF format, the PDF showed the pull plan's tasks in their swimlanes, but did not show any links.
Now, links are included in the resulting PDF file when you export a pull plan's whiteboard in PDF format - provided you have not turned off the display of links using the Links toggle at the top of the whiteboard - making it easier to identify the relationships between various tasks.
More information on exporting a pull plan's whiteboard in PDF format
Information on each user's last sign in displayed on the Users page
Information on the date and time that each user last attempted to sign into Asta Connect, and whether the user's last sign in was successful, has been added to the Users page:
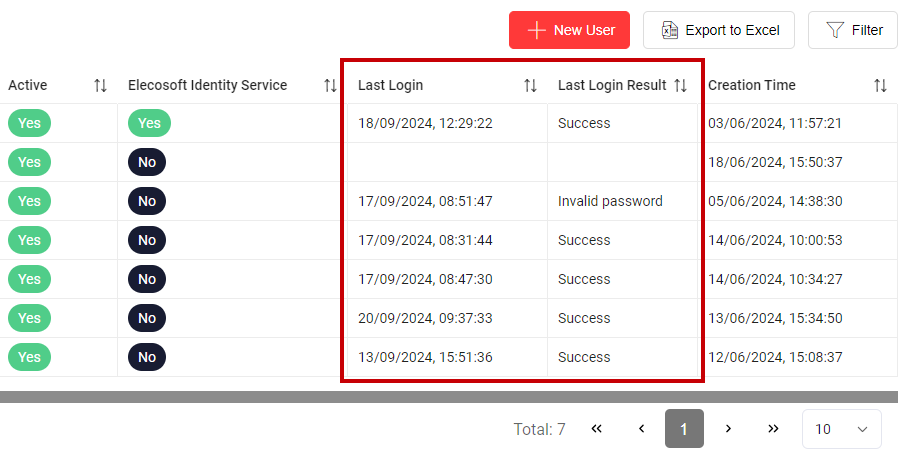
Elecosoft is able to track successful sign ins from all user types, but can only track unsuccessful sign in attempts from Non-Elecosoft Identity Service users.
Create baselines of pull plans and compare your live data against them
A baseline is a snapshot - a complete copy - of a pull plan at a particular point in time. You can create as many baselines as you want for a pull plan. Once you have created a baseline, you can display it in the whiteboard and compare the 'live' pull plan against it to track changes that have been made to the pull plan since the baseline was created.
Baselines are useful for tracking the progress of a pull plan. For example you could:
- Baseline the pull plan before work gets underway so that you have a record of the planned schedule. When work starts on the pull plan, you can compare the actual progress against the baseline of the original plan.
- Baseline the pull plan regularly throughout its duration, for example at the end of every week or at major milestones, so that you have a history of the pull plan's progress. By comparing the baselines to the live pull plan, you can see exactly when a pull plan becomes behind or ahead of schedule.
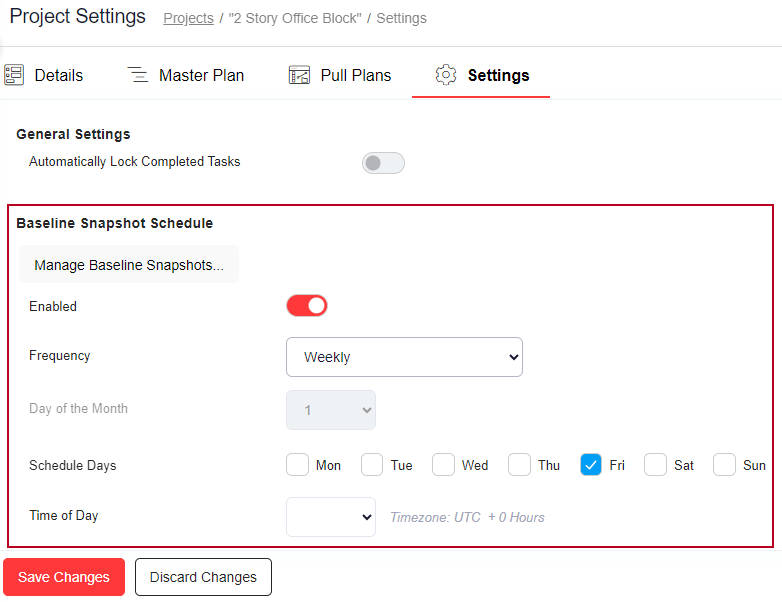
You can configure Asta Connect to create baselines of a project's pull plans automatically, using the fields in the new Baseline Snapshot Schedule group that has been added to the Project Settings page:
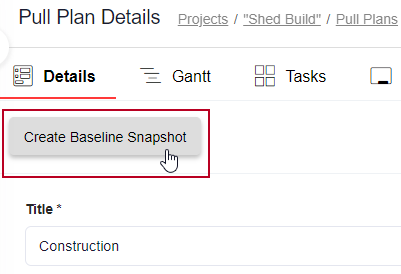
Regardless of whether or not you configure Asta Connect to create baselines automatically, you can create a baseline of a pull plan at any time, giving you a snapshot of the pull plan at that exact moment, by clicking the Create Baseline Snaphot button that has been added to the Pull Plan Details page:
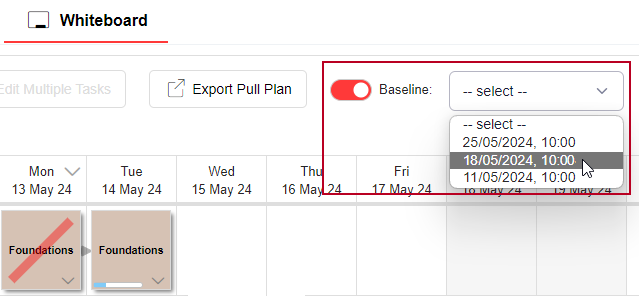
Once a pull plan baseline has been created, you can display information from the baseline in the whiteboard, using the Baseline control that has been added to the Pull Plan Whiteboard page:
If you display a baseline in the whiteboard, a new, narrow, swimlane appears underneath each swimlane, displaying information from the selected baseline. These swimlanes are highlighted in red below - although in the whiteboard, the red highlighting does not appear:
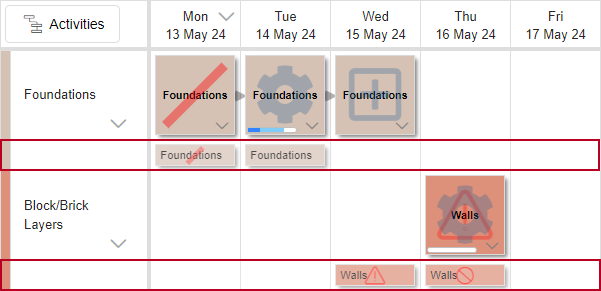
You can compare the tasks in the 'live' swimlanes against the corresponding tasks in the baseline swimlanes to identify changes that have been made to a pull plan since the baseline was created.
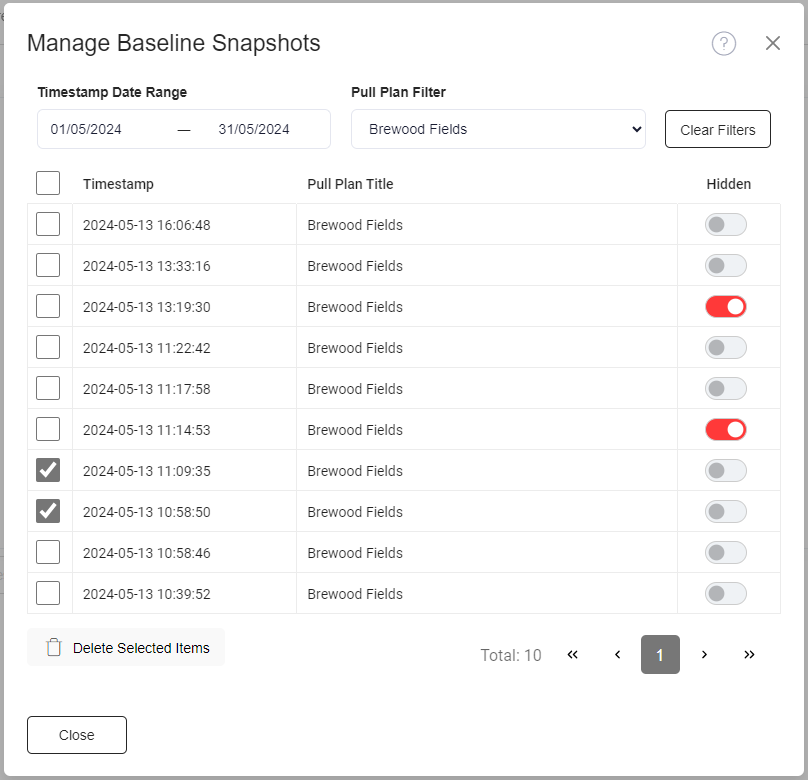
You can specify which individual baselines are available to be displayed on the whiteboard, and delete any baselines that you no longer need, using the new Manage Baseline Snapshots dialog, which is accessible via the Manage Baseline Snapshots dialog on the Project Settings page:
If a baseline is currently displayed in the whiteboard and you export a pull plan's whiteboard in PDF format, the baseline will appear in the PDF as well as the 'live' pull plan data.
To enable the new baseline feature, new 'Pages - Baseline Snapshot Schedules' and 'Pages - Baseline Snapshots' user permissions have been added. These permissions, which allow users to configure how often baselines are created automatically and to view, create, edit and delete baselines, are assigned to the 'Admin' and 'Project Manager' user roles by default. You should assign these permissions to any users you want to be able to configure and use baselines.
More information on creating baselines and comparing pull plans against them
More information on configuring Asta Connect to create baselines automatically
More information on managing a project's baselines
More information on available user permissions
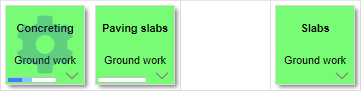
Progress bar displayed on tasks to give a graphical indication of recorded progress
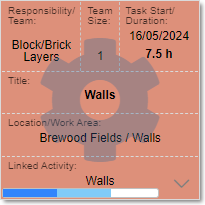
A progress bar is now displayed on all tasks that have more than 0% but less than 100% progress, giving a graphical indication of the amount of progress that has been recorded against the tasks:
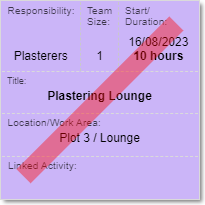
Once a task is 100% complete, the progress bar disappears and the task appears with a diagonal line drawn across it:
The progress bar is displayed against all tasks with a status of 'At Risk/Blocked', giving you an instant indication of the amount of progress that has been recorded against them - even if this is 0% or 100%:
If you display baseline information in the whiteboard and a task's progress has been changed since the baseline was created, the amount of progress that was recorded against the task when the baseline was created is shown in dark blue, and any subsequent progress is shown in light blue:
More information on viewing and editing task details in a pull plan
Specify the amount of actual effort that has been expended on each task and the actual team size
The amount of time it takes to complete a task may differ from the task's planned duration. For example, a task that has a planned duration of 7 hours may actually take 6 or 8 hours to complete. Similarly, the number of people that are needed to carry out a task may differ from the planned team size. For example, a task that was planned with a team size of 3 may actually need a team of 2 or 4 to complete.
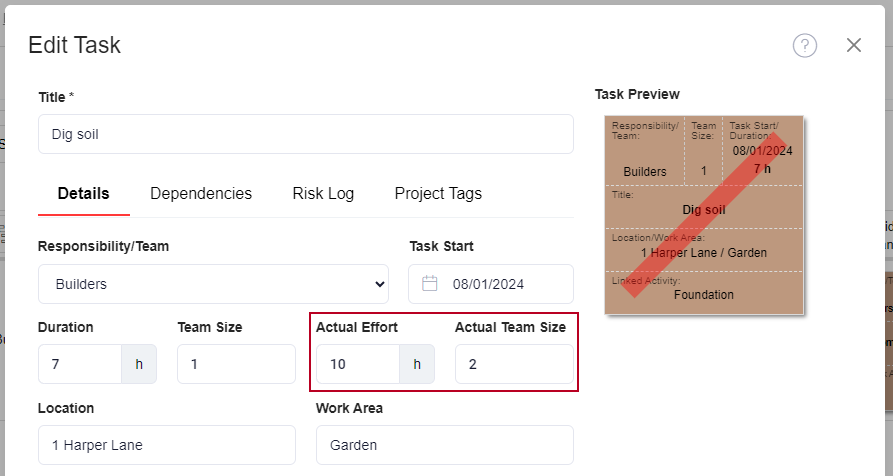
Before this release, there was no way of recording actual effort or actual team size against tasks in Asta Connect. You can now specify the amount of actual effort that has been expended on each task and the actual team size, using the new Actual Effort and Actual Team Size fields that have been added to the New Task and Edit Task dialogs:
You can use these fields to record actual effort and actual team size against a task at any time; but it probably makes most sense to record this information against a task when it is either partially complete, or fully complete.
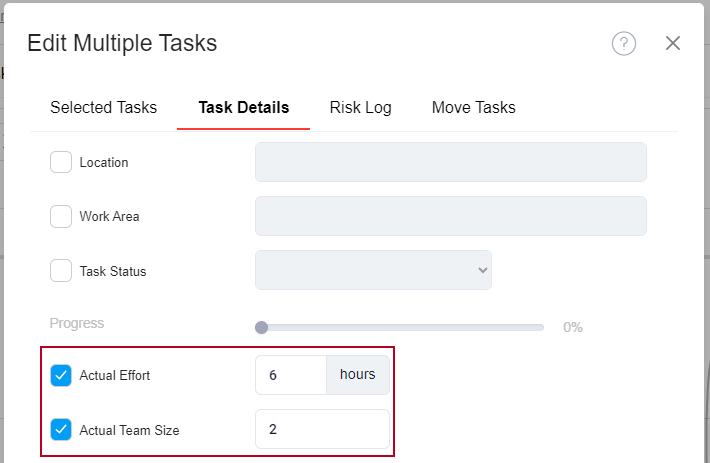
You can apply the same amount of actual effort or the same actual team size to multiple tasks at the same time, using the new Actual Effort and Actual Team Size fields that have been added to the Task Details tab of the Edit Multiple Tasks dialog:
New Actual Effort and Actual Team Size columns have been added to the Pull Plan Tasks page:
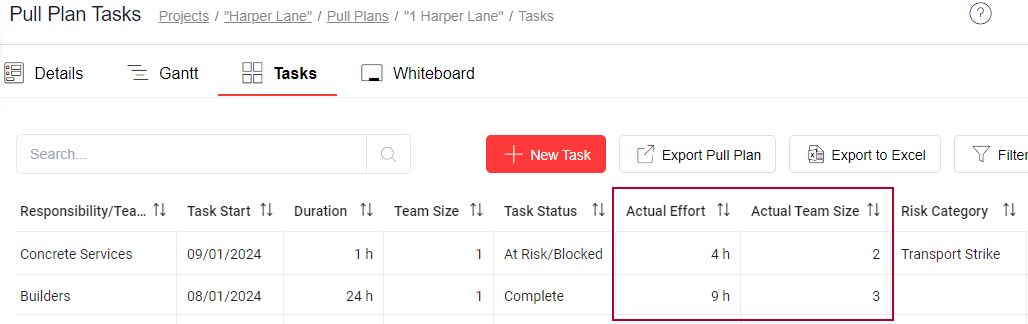
These columns display the amount of actual effort and the actual team size that has been recorded against each task. You can use the columns to sort the tasks in the list by actual effort and actual team size.
More information on viewing and editing task details
More information on editing and moving multiple tasks in a pull plan at the same time
More information on working with tasks in a pull plan
Toggle the display of links in the whiteboard on and off
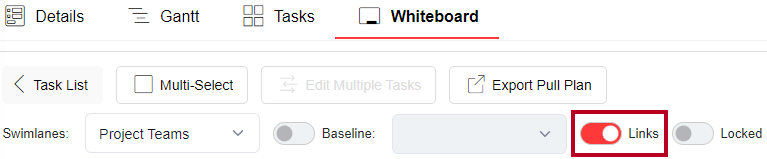
You can now toggle the display of links in the whiteboard on and off, using a new Links toggle that has been added to the Pull Plan Whiteboard page:
You may want to turn off the display of links in the whiteboard to make it less cluttered and easier to read. Turning off the display of links can be especially useful if you are displaying a baseline in the whiteboard, when you may be more interested in the relationships between tasks in the live data and their corresponding baseline tasks than in the relationships between different live tasks.
To display links that indicate the relationships between tasks in the whiteboard, click the Links toggle at the top of the whiteboard. To turn off the display of links in the whiteboard, turn off the Links toggle.
The Links toggle also affects whether links are included when you export a pull plan's whiteboard in PDF format: with the toggle turned on, links are displayed in the resulting PDF file; with the toggle turned off, links are omitted from the PDF
More information on links in the whiteboard
Menu remains minimised and task list remains hidden after zooming out of the whiteboard
When you zoom out of the whiteboard to the fullest extent, the task list is hidden automatically and the main Asta Connect menu is contracted so that it displays only icons. Before this release, when you zoomed back in, the menu was expanded again and the task list reappeared.
Now, following customer requests, when you zoom back into the whiteboard after zooming out to the fullest extent, the task list remains hidden and the menu remains contracted. You can redisplay the task list and expand the menu at any time.
More information on zooming in and out of the whiteboard
Removal of pull plan revisions functionality
In this release, the ability to work with different revisions of a pull plan has been removed - this functionality has been replaced with the new ability to create baselines of a pull plan.
The removal of pull plan revisions has resulted in the following changes to Asta Connect:
- The Revision and Active columns have been removed from the Pull Plans page.
- The Revision and Active fields, and the New Revision button, have been removed from the Pull Plan Details page.
New Elecosoft Identity Service sign in method
We have added a new Microsoft Entra ID/Elecosoft Identity Service sign in system. This will allow you to sign into Asta Connect using your organisation's Microsoft sign in credentials. Users will also have the option to sign in using the Elecosoft Identity Service (EIS), a centralised sign-in service which allows you to sign into all available Elecosoft products using the same sign in information (provided a user has been set up on each application) as opposed to having separate user names and passwords for each product.
The new system holds minimal information; only holding user names and business email addresses associated with the account, improving data security.
This affects the following areas:
- Updated Sign in dialog: the Sign in dialog has been updated with the option to sign in using the Elecosoft Identity Service (EIS).
- Change password: a user cannot change their password in Asta Connect if they are using Microsoft Entra ID to sign in; this is handled in their Microsoft account.
- Add User: when adding a user in Asta Connect, you can now select whether the user will use the Elecosoft Identity Service to sign in. You can also select the type of user you want to create.
- Editing User Details: you can retroactively allow users to sign in using EIS.
More information on signing into Asta Connect using Microsoft Entra ID credentials
List filter, sort and page settings now remembered
Before this release, if you filtered or sorted a list, these settings were lost when you moved to a different page in Asta Connect. This meant that you had to reset the filter and sort settings for a list each time you wanted to use them.
The filter and sort settings you set for each list are now remembered, and are applied to the list automatically the next time you access that page.
For example, if you apply a filter to the project list on the Projects page so that only projects that started on or after 1 October 2023 appear in the list, and click the Start Date column to sort the projects in the list according to their start date, then move away from that page, these filter and sort settings are applied to the project list the next time you access the Projects page.
In addition to this, if a list comprises more than one page, the page of the list you were last looking at is now remembered, and you are taken automatically to that page of the list the next time you access that page.
For example, if you are looking at page 4 of the project team list on the Project Teams page, then move away from that page, page 4 of the project team list is displayed the next time you access the Project Teams page.
More information on working with lists in Asta Connect
Whiteboard scroll position and zoom level now remembered
Before this release, if you scrolled to a particular area of a pull plan's whiteboard, or zoomed into or out of the whiteboard, these settings were lost when you moved to a different page in Asta Connect. This meant that you had to use the scroll bars and zoom control to set the whiteboard display each time you accessed a pull plan's whiteboard.
The scroll position and zoom level you apply to each pull plan's whiteboard are now remembered, and are applied to the whiteboard automatically the next time you access it. These settings are remembered for each individual pull plan, so you can apply different scroll positions and zoom levels to each pull plan whiteboard and they are each remembered.
Change the width of list columns
Some Asta Connect pages comprise lists of objects. For example, the Projects page comprises a list of your projects; the Users page comprises a list of your Asta Connect users.
You can now change the width of columns in lists, allowing each column more or less space to display the information it contains. You do this by positioning the mouse pointer over the heading of the column that you want to resize until you see two parallel, dotted, vertical lines on the right-hand side of the heading, then clicking and dragging these vertical lines to the left or to the right:

You can change the width of the columns on the Selected Tasks tab of the Edit Multiple Tasks dialog - which you use to edit and move multiple tasks - in the same way:

More information on changing the width of columns in a list
More information on editing and moving multiple tasks at the same time
New topic that explains how to use the Asta Connect Help
The Asta Connect Help now includes a topic that explains how to use the Help. It includes the following information:
- Accessing the Asta Connect Help.
- Displaying the Asta Connect Help in its own window.
- Moving between topics in the Asta Connect Help.
- Searching for information in the Asta Connect Help.
- Tips on how to search for information effectively.
- What to do if the table of contents is not visible.
Lock a pull plan's whiteboard to prevent it from being edited
You can lock a pull plan's whiteboard to prevent it from being edited. You may wish to do this to prevent contractors and subcontractors from changing the details of pull plans without your consent.
Locking a pull plan's whiteboard prevents users from:
- Creating, editing and removing swimlanes.
- Creating tasks in the pull plan.
- Clicking and dragging tasks around the whiteboard.
- Duplicating tasks.
- Drawing links between tasks to show dependencies.
- Editing task details.
- Editing and moving multiple tasks at the same time.
- Removing tasks from the whiteboard.
- Deleting tasks.
- Adding and removing date columns at either edge of the whiteboard.
Once a pull plan's whiteboard is locked, users can view the whiteboard and can view details of tasks on the Edit Task dialog, but they cannot make any changes.
You lock a pull plan's whiteboard using the new Locked toggle that has been added to the Pull Plan Whiteboard page:

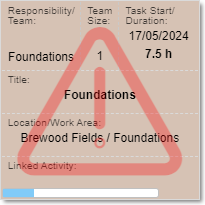
If you lock a pull plan's whiteboard, a warning is displayed wherever you normally edit tasks, informing you that you cannot edit tasks as the pull plan's whiteboard is locked:
To enable the new whiteboard locking feature, a new 'Pages - Whiteboards - Lock/Unlock Whiteboard' user permission has been added. This permission which allows users to lock and unlock pull plan whiteboards, is assigned to the 'Admin' and 'Project Manager' user roles by default. You should assign this permission to any users you want to be able to lock and unlock whiteboards.
More information on locking and unlocking a pull plan's whiteboard
More information on available user permissions
Improved Search facility in Asta Connect Help
The Search facility in the Asta Connect Help has been improved in this release: wherever possible, as well as pointing you towards Help topics that provide useful information on the things you are querying, it will now display information that answers your search query directly in the Search pane.
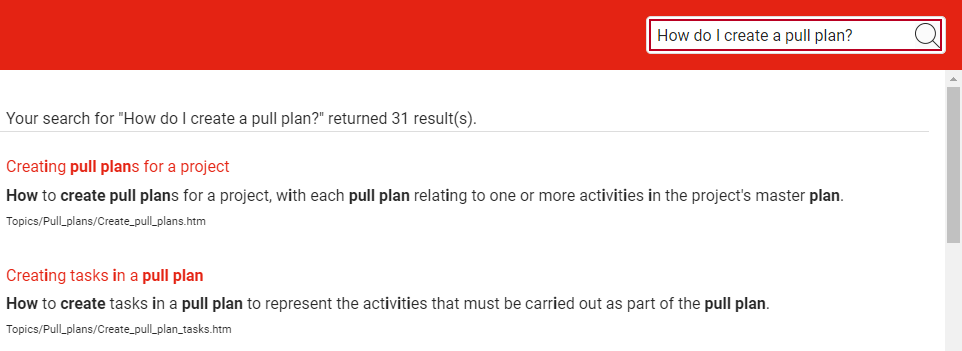
For example, in the previous version of the Asta Connect Help, if you searched for How do I create a new pull plan?, How do you copy tasks?, or How can I change my password?, you got a list of useful search results that point you towards topics that answer your questions.
If you try these searches in the new version of the Help, you now see information above the topic list in the search results that answers your query directly:

Issues addressed in this release
| Work Item | 3701 | ||||
| Category | Whiteboard | ||||
| Summary | Improved whiteboard performance for large pull plans. | ||||
| Description | Before this release, the whiteboard operated slowly if you used it with medium to large pull plans - those comprising a large number of activities, spread over several months, with a large number of tasks generated from the activities. | ||||
| Resolution | The whiteboard has now been optimised so that its performance is much improved when working with medium to large pull plans. | ||||
Lock tasks to prevent them from being edited or deleted
You can lock tasks to prevent them from being edited, deleted, and moved around the whiteboard. You may wish to do this to prevent contractors and subcontractors from changing the details of tasks that you have created without your consent. Once a task is locked, users can view details of the task on the Edit Task dialog, but they cannot edit the task's details, delete it, or move it around the whiteboard.
You lock tasks using the new Locked toggle that has been added to the Edit Task and New Task dialogs:

You can lock more than one task in a pull plan at the same time by editing multiple tasks and selecting the Locked toggle that has been added to the Task Details tab of the Edit Multiple Tasks dialog:

Locked tasks are identified on the Pull Plan Tasks page with a  symbol:

You can also use the Locked toggles to unlock tasks, making them available for editing again.
You can also configure Asta Connect to lock tasks automatically as soon as they are completed, on a per-project basis. You may wish to do this to preserve an accurate record of work that has been done, by preventing users from changing details of tasks that have been completed. To configure Asta Connect to lock tasks automatically as soon as they are completed, you use the Automatically lock completed tasks toggle, on the new Project Settings page:

If you turn this toggle on, all tasks in the project that are completed are locked, and all tasks that are currently incomplete are locked as soon as they are completed.
To enable the new task locking feature, the following new user permissions have been added:
- Pages - Project Settings - Edit Project Setting: allows users to edit project settings on the new Project Settings page.
- Pages - Pull Plan Tasks - Lock/Unlock Pull Plan Task: allows users to lock and unlock tasks.
Both of these permissions are assigned to the 'Admin' and 'Project Manager' user roles by default. You should assign these permissions to any users you want to be able to lock and unlock tasks.
Details of individual tasks displayed underneath activities on the Pull Plan Gantt page
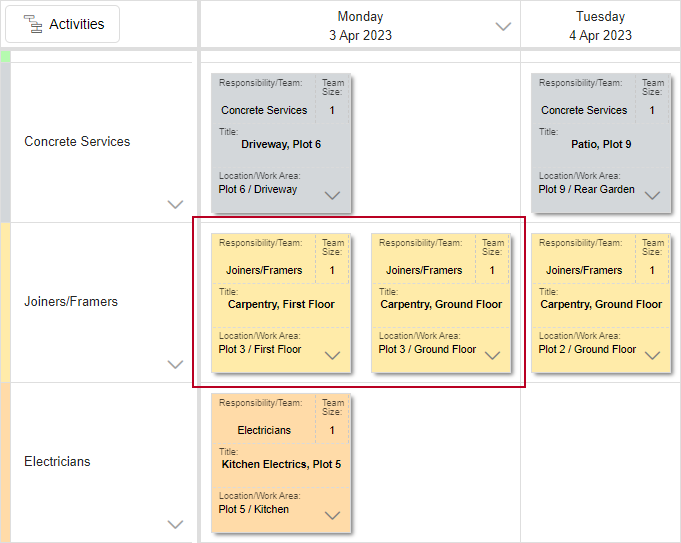
The Pull Plan Gantt page displays pull plans in the form of a Gantt chart, with the activities that are included in a pull plan displayed on its own row. Each activity can have one or more pull plan tasks associated with it. Before this release, you could view details of these individual tasks on the Pull Plan Whiteboard page, but you could not view pull plan activities and their associated tasks on the same page.
You can now view details of individual tasks that are associated with pull plan activities on the Pull Plan Gantt page. The tasks appear immediately beneath the associated activities, on rows, relating to project teams, that you can expand and contract as required:

The task rows are similar to the swimlanes on the Pull Plan Whiteboard page.
Tasks are shown as follows:
| Task type | Appearance |
|---|---|
| Task |

|
| Completed task |

|
| 'At risk/blocked' task |

|
Each task is coloured according to the project team responsible for the task.
For task rows, the spreadsheet displays information relating to all of the tasks on the row unless you expand the row to view details of individual tasks. If you expand a project team's row, a row relating to the project team appears above the individual task rows, showing details of the project team and the extent of the time period taken up by the tasks - highlighted in red in the illustration below:

You can click individual tasks in the Gantt chart to edit them using the Edit Task dialog.
More information on viewing a pull plan as a Gantt chart
Expand and contract all summary tasks at once on the Project Master Plan page
You can now expand and contract all summary tasks at once on the Project Master Plan page, using the 'Expand all' and 'Contract all' controls that have been added to the page:
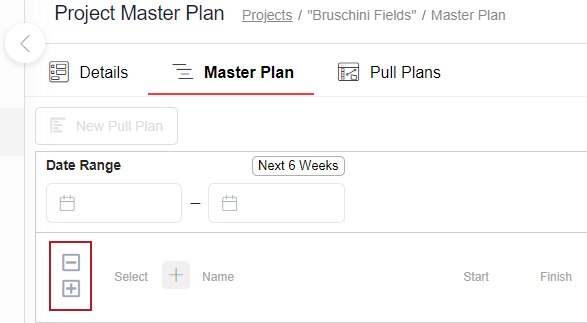
To expand all summary tasks, click  at the top-left of the spreadsheet; to contract all summary tasks, click
  .
.
Similar controls appear on the Pull Plan Gantt page, which enable you to expand and contract all pull plan rows.
More information on viewing and editing a project's master plan
Delete multiple project teams, project tags and risk categories
Before this release, if you wanted to delete a number of project teams, project tags or risk categories, you had to edit the details of each item individually and delete them one-by-one. This could take a long time if you had a large number of project teams, project tags or risk categories to delete.
You can now delete multiple project teams, project tags or risk categories at the same time, by selecting the items you want to delete using the new check boxes that have been added to the Project Teams, Project Tags and Risk Categories pages, then clicking Delete Selected Items:

You cannot delete project teams if they are being used as a swimlane in the whiteboard of one or more pull plans; you cannot delete project tags or risk categories if they have been assigned to any items. If any of the selected items are in use, those specific items are not deleted, but the other items in your selection are deleted.
More information on deleting multiple project teams
Edit and move multiple tasks on the whiteboard at the same time
Before this release, you could only edit one task at a time on the whiteboard. This meant that if you wanted to apply the same changes to multiple tasks, you had to edit each task individually.
You can now select multiple tasks on the whiteboard, and apply edits to all of the selected tasks at the same time. For example, you may want to apply the same location and work area to a number of tasks; assign the same status to a number of tasks; or apply the same amount of progress to a number of tasks. You can also move multiple tasks forwards or backwards in time together by a specified number of days or weeks, and move them to a different swimlane.
To select multiple tasks, you click the new Multi-Select button that has been added to the Pull Plan Whiteboard page, then click the tasks you want to select. A tick appears on the selected tasks to show that they are selected:

You can select all the tasks in a swimlane or column with a single click, by clicking the swimlane or column header rather than the individual tasks.
When you have finished selecting the tasks you want to edit or move, click the new Edit Multiple Tasks button to display the new Edit Multiple Tasks dialog, which you use to edit or move the selected tasks:

More information on editing and moving multiple tasks at the same time
Descriptions of all user permissions added to the Help
The Asta Connect Help now includes a full description of each available user permission, and shows which permissions are assigned to the user roles that are initially provided in Asta Connect. You may find this helpful when setting up new user roles, or when applying special permissions to individual users.
More information on available user permissions
Issues addressed in this release
| Work Item | 3370 | ||||
| Category | Task progress/Task status | ||||
| Summary | Changing the percentage progress of an 'At Risk/Blocked' task changes its status to 'In Progress'. | ||||
| Description | Before this release, if you changed the percentage progress of a task with a status of 'At Risk/Blocked', the task status was changed to 'In Progress'. This status change should not happen, as a task with a status of 'At Risk/Blocked' needs to have its risk resolved before its status can be changed. | ||||
| Resolution | Changing the percentage progress of a task with a status of 'At Risk/Blocked' no longer changes the task's status to 'In Progress'; the task status remains 'At Risk/Blocked' until the risk has been resolved. | ||||
'Edit mode' and 'pull plan mode' removed from Asta Connect
Before this release, if you wanted to edit items such as projects, master plans and pull plans, you first had to toggle the appropriate page into 'Edit mode'; and if you wanted to create a pull plan, you first had to toggle the Project Master Plan page into 'Pull Plan mode'.
In this release, the Edit Mode toggle has been removed from the following pages, so you can now edit fields as soon as you access these pages, provided you have appropriate permissions:
- Project Details page.
- Project Master Plan page.
- Pull Plan Details page.
- Pull Plan Whiteboard page.
The Pull Plan Mode toggle has been removed from the Project Master Plan page, so you can now create pull plans as soon as you access this page.
Simplified dashboard configuration controls
The dashboard configuration controls have been simplified in this release: the previous controls have been replaced by an Edit Dashboard drop-down menu:

You use these controls as follows:
| Control | Description |
|---|---|
| Toggle Filters | Click to switch between displaying filters at the top of the Dashboard page, and hiding them. |
| Toggle Layout | Click to switch between displaying the dashboard in layout mode, in which you can resize widgets, move them around the dashboard and remove them from the dashboard, and in standard mode, in which the widgets are fixed. |
| Add Widget | Click to display the Add Widget dialog, which you use to add widgets to the dashboard. |
| Add Page | Click to display the Add Page dialog, which you use to add pages to the dashboard. |
| Rename Page | Click to display the Rename Page dialog, which you use to rename dashboard pages. |
| Delete Page | Click to remove the current page from the dashboard; this control appears only when the dashboard comprises more than one page. |
More information on configuring the dashboard
Specify whether users are able to view the dashboard
Before this release, it was not possible to specify whether users were able to view the project performance dashboard.
You can now specify whether users are able to view the project performance dashboard, using the new Dashboard check box that has been added to the Permissions tab of the New Role and Edit Role dialogs:

Permission to view the dashboard has been given to the 'Guest', 'Project Manager' and 'Site Manager' user roles that are available in Asta Connect by default.
In addition to this, permissions to view pull plans and risk categories have been given to the 'Guest' user role.
View pull plans in the form of a Gantt chart
You can now view pull plans in the form of a Gantt chart, using the new Pull Plan Gantt page. This page displays the elements of the project's master plan that are included in the pull plan in the form of a spreadsheet and Gantt chart. Each activity in the pull plan appears on its own row in the spreadsheet and Gantt chart. This makes it simple to identify which activities are included in a pull plan:

More information on viewing pull plans in the form of a Gantt chart
Use risk categories to define why tasks are at risk or blocked
You can define risk categories in Asta Connect to describe the different types of risk that can affect tasks in a project. For example, you may want to create risk categories such as 'Adverse weather', 'Transport delays', and 'Staff illness'. You create, edit and delete risk categories using the new Risk Categories page:

Once you have created a risk category, you can apply it to tasks in your pull plans, to define why those tasks are at risk or blocked. You do this using the new Risk Log tab that has been added to the New Task and Edit Task dialogs, the fields on which become available when you set the status of a task to 'At Risk/Blocked':

Once you have entered information into the fields on the Risk Log tab, information appears in the new Risk Category, Risk Resolve By Date and Risk Owner columns on the Pull Plan Tasks page, and a warning triangle is displayed on the Risk Log tab, highlighting the fact that the task is at risk or blocked.
Once a risk has been resolved, you can also use the fields on the Risk Log tab to give details of the resolution.
When duplicating tasks in the whiteboard, if the task you are duplicating has a status of 'At Risk/Blocked' - or if it has had that status in the past - an Include Task Risk Log check box appears on the Duplicate Task dialog:

Select this check box to copy information from the fields on the Risk Log tab of the Edit Task dialog to the new duplicate task, or clear the check box to duplicate the task without copying over the risk log information.
More information on using risk categories to define why tasks are at risk or blocked
Issues addressed in this release
| Work Item | 2575 | ||||
| Category | Whiteboard | ||||
| Summary | Unable to create tasks directly from a pull plan activity if one or more tasks have already been created from the activity. | ||||
| Description | Before this release, if you created one or more tasks directly from a pull plan activity - by clicking the control to the right of the activity name on the Pull Plan Whiteboard page and selecting Create Tasks from Activity - you could not subsequently create further tasks from that activity, as the Create Tasks from Activity menu command became unavailable. |
||||
| Resolution | You can now repeatedly create tasks directly from a single pull plan activity, as the Create Tasks from Activity menu command no longer becomes unavailable after it is first used for a particular activity. | ||||
| Work Item | 3163 | ||||
| Category | General | ||||
| Summary | Scroll bars are narrow and it can be difficult to click them; remove the footer from the main pane. | ||||
| Description |
Before this release, the scroll bars that appear on many pages in Asta Connect were rather narrow, which meant that it could be difficult to click them.
Also, a request was made that the footer be removed from Asta Connect's main pane, to make more of the screen available for displaying data. |
||||
| Resolution |
Asta Connect's scroll bars are now significantly wider, which means that it is much easier to click them.
The footer has been removed from Asta Connect's main pane, maximising the amount of usable screen. |
||||
| Work Item | 3189 | ||||
| Category | Pull plans | ||||
| Summary | Internal error occurs when creating a pull plan. | ||||
| Description | Before this release, when creating a pull plan, 'An internal error occurred during your request' appeared if the first activity to be included in the pull plan had a name comprising more than 50 characters. This was because pull plan titles are restricted to a maximum of 50 characters, but activity names can have up to 100 characters. | ||||
| Resolution | When you create a pull plan, a New Pull Plan dialog now appears, in which you can specify the title of the pull plan. The title defaults to the name of the first activity to be included in the pull plan, truncated to 50 characters if necessary, but you can edit this to give the pull plan a different title if you like. | ||||
Print and share information from the whiteboard
Each task is represented on the Pull Plan Whiteboard page by a card - you can think of the whiteboard as a pin board attached to a wall, and each card as a sticky note on the pin board.
You can export a pull plan's whiteboard in PDF format, which means that you can share the whiteboard and its tasks with other stakeholders, either by printing the PDF or by attaching the PDF to an email.
To export a pull plan's whiteboard, click Export Pull Plan on the Pull Plan Whiteboard page to display the Export Pull Plan dialog, click the PDF Document radio button and specify your paper options in the Export Options fields that have been added to the dialog:

More information on printing and sharing information from the whiteboard
Improved Search facility in Asta Connect Help
The Search facility in the Asta Connect Help has been improved in this release: it will now handle natural language search queries that, before this release, would result in no search results.
For example, in the previous version of the Asta Connect Help, if you searched for How do I create a new pull plan?, How do you copy tasks?, or How can I change my password?, you got zero results.
If you try these searches in the new version of the Help, you get useful search results that point you towards topics that answer your questions.
Issues addressed in this release
| Work Item | 3129 | ||||
| Category | Whiteboard | ||||
| Summary | Location and work area information lost when duplicating cards in the whiteboard. | ||||
| Description | Before this release, if you duplicated a task in the whiteboard to create a series of similar tasks for a project team without having to create each task individually, the location and work area information was not copied across from the original task to the new tasks. | ||||
| Resolution | The location and work area information is now retained when you duplicate tasks in the whiteboard. | ||||
| Work Item | N/A | ||||
| Category | Project tags/Project teams | ||||
| Summary | Unable to delete project tags and project teams that had been assigned to projects that had then been deleted. | ||||
| Description | Before this release, it was not possible to delete project tags or project teams that had been assigned to projects that had then been deleted, even if the project tags or project teams were not assigned to any other projects. Asta Connect mistakenly reported that the project tags or project teams were still in use. | ||||
| Resolution | It is now possible to delete project tags and project teams that had been assigned to projects that had then been deleted, provided they are not assigned to any other projects. | ||||
Export information from lists to a Microsoft Excel workbook
You can export information from some lists to a Microsoft Excel workbook. You may want to do this to access the information using another application. For example, you may want to construct a spreadsheet containing information about each of your projects.
Before exporting information, you may want to filter the items that appear in the list, so that only information on certain items is exported. For example, you may want to filter the list on the Projects page so that it includes only projects that start after a certain date, or that finish before a certain date.

View a project performance dashboard
You can display a dashboard view of your projects, which provides you with a quick indication of how your projects are progressing.

The different elements of the dashboard are known as 'widgets'. Each widget displays a different type of project performance information.
You can configure the dashboard to display information on more than one page. For example, you may want to set up a number of dashboard pages, with each one displaying a different selection of widgets - one displaying information on activities; one displaying information on project progress; and so on.
More information on viewing a project performance dashboard
Position more than one task in each whiteboard cell
You can now position more than one task in each whiteboard cell. This helps you to arrange the tasks in your pull plans in a more realistic way: previously, if a project team had more than one task scheduled on a particular day, it was not possible to model this using the whiteboard.
You position more than one task in a whiteboard cell by clicking and dragging a task - either from the task list or from another cell - into a cell that already contains one or more tasks. If you add a second task to a cell, the width of the cell is increased automatically so that both tasks can be displayed, as illustrated below:
If you add a third task to a cell, the height of the cell is increased automatically so that all three tasks can be displayed, as illustrated below:

If you continue adding subsequent tasks to a cell, the width or height of the cell is increased automatically as required so that all tasks can be displayed.
You can change the order of tasks in a single whiteboard cell by clicking and dragging them around within the cell: if you click and drag one task on top of another task in the same cell, the position of the two tasks is switched.
More information on clicking and dragging tasks around the whiteboard
Create new tasks by clicking a blank cell in the whiteboard
You can now create new tasks in a pull plan by clicking a blank cell in the whiteboard.
If you hover the mouse pointer over a blank cell, a plus symbol appears in the cell:

Click this plus symbol to display the New Task dialog, in which you can enter details of the new task. If you create a new task in this way, the project team corresponding to the swimlane in which you clicked is assigned responsibility for the task by default, and the start date of the task defaults to the date of the cell you clicked.
More information on creating new tasks using the whiteboard
Duplicate tasks in the whiteboard
You can duplicate tasks in the whiteboard. This is an easy way of creating a series of similar tasks for a project team or build location - depending on what swimlanes represent - without having to create each task individually.
To duplicate a task in the whiteboard, you use the Duplicate task command that has been added to the whiteboard task menu:

Selecting this command displays the Duplicate Task dialog, in which you specify the number of days you want the new task to span, and whether you want the task to include Saturdays and Sundays:

When you duplicate a task, it appears in the whiteboard in the cell(s) immediately to the right of the original task. If you specify that the task spans more than one day, that is the number of duplicate tasks that are created to the right of the original task.