Editing and moving multiple pull plan tasks at the same time
You use the Edit Multiple Tasks dialog to edit more than one task in a pull plan at the same time and to move them forwards or backwards in time together by a specified number of days or weeks. The tasks in a pull plan represent the activities that must be carried out as part of the pull plan. Any changes that you make using this dialog are applied to all of the tasks you have selected.
Be careful when editing or moving multiple tasks, as Asta Connect has no 'Undo' function. This means that if you make a mistake when editing or moving multiple tasks, it can be difficult to reverse your changes.
You cannot edit tasks in a pull plan if the whiteboard is locked. If you access the Edit Multiple Tasks dialog when the whiteboard is locked, the dialog is read-only - you cannot save any changes.
To select the tasks you want to edit or move and access the Edit Multiple Tasks dialog:
- Click Pull Plans in the left pane. The Pull Plans page appears.
- Click a pull plan in the list.
- Click Whiteboard. The Pull Plan Whiteboard page appears.
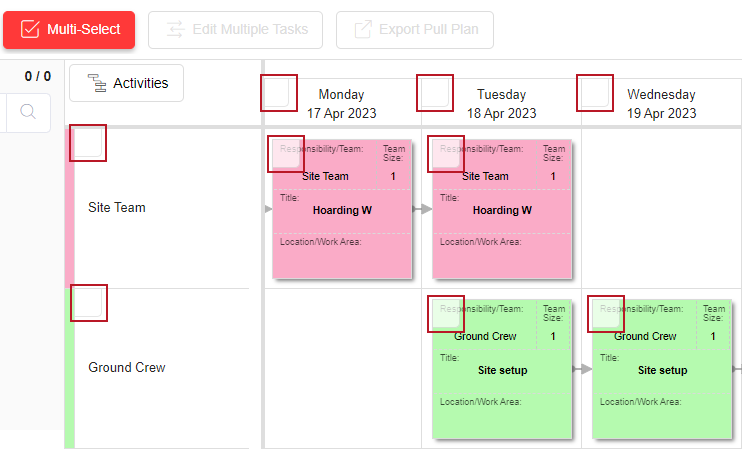
- Click the Multi-Select button. Small squares appear at the top-left corner of each swimlane, column and task in the whiteboard:
- Select the tasks you want to edit or move as follows:
- To select all tasks in a swimlane, click the swimlane. A tick appears on the swimlane, and on every task in the swimlane, to show that the swimlane's tasks have been selected:

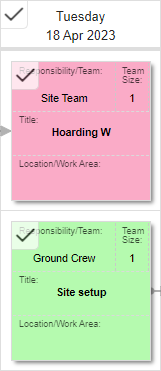
- To select all tasks in a column, click the column heading. A tick appears on the column heading, and in every task in the column, to show that the column's tasks have been selected:
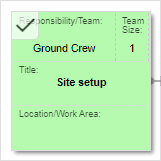
- To select an individual task, click the task. A tick appears on the task to show that it is selected:
- To deselect a swimlane, column or task, click it again; the tick is removed.
- To select all tasks in a swimlane, click the swimlane. A tick appears on the swimlane, and on every task in the swimlane, to show that the swimlane's tasks have been selected:
- When you have finished selecting the tasks you want to edit or move, click the Edit Multiple Tasks button to display the Edit Multiple Tasks dialog; if you click Multi-Select again at any point before accessing the Edit Multiple Tasks dialog, you are taken out of multi-select mode.
Note the following points about selecting multiple tasks:
- If you select an individual task and that task is the only task in its swimlane or column, a tick is added to the swimlane or column as well as to the task.
- If you select a swimlane and a task in the swimline is the only task in its column, a tick is added to that column as well as to the swimlane and task.
- If you select a column and a task in the column is the only task in its swimlane, a tick is added to that swimlane as well as to the column and task.
- If you select one or more tasks that are currently locked, they will not be updated with any changes that you make unless you turn off the Locked toggle on the Task Details tab of the Edit Multiple Tasks dialog to unlock all of the selected tasks.
The fields on the Edit Multiple Tasks dialog are divided into four tabs: Selected Tasks, Task Details, Risk Log and Move Tasks. The Selected Tasks tab displays a list of the tasks you have selected, with a check box to the left of each task:
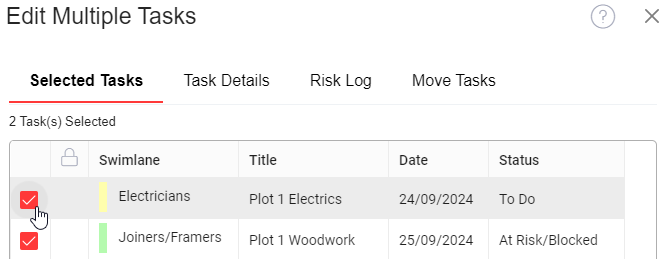
To deselect a task and remove it from the current selection, clear the check box to the left of the task. Any edits you make on this dialog will apply only to the tasks that are selected on the Selected Tasks tab.
To edit the details of the selected tasks:
- On the Edit Multiple Tasks dialog, review the list of selected tasks on the Selected Tasks tab, and clear the check boxes to the left of any tasks you do not want to edit. You can change the width of the columns on this tab, in the same way that you can change the width of the columns in a list.
- Click the Task Details tab.
- To apply the same project team to the selected tasks, select the Responsibility/Team check box and select the project team that is responsible for carrying out the tasks in the field to the right. The colours of the selected project team will be applied to the tasks' cards in the whiteboard and, if swimlanes currently represent project teams, the cards will be moved into that project team's swimlane when you save your changes.
To clear any information that has been entered into the Responsibility/Team field for the selected tasks, select the Responsibility/Team check box and leave this field blank. If swimlanes currently represent project teams, the tasks' cards will be moved to the task list, to the left of the whiteboard when you save your changes. - To apply the same build location to the selected tasks, select the Location check box and select the physical location at which the tasks will take place in the field to the right. This could be a town, a city, a full address or a plot number. When you click in the field, global build locations - ones that can apply to any project - are shown by default. Click Project Specific if you want to select a build location that is restricted to the current project. If swimlanes currently represent build locations, the cards will be moved into that build location's swimlane when you save your changes.
If one or more tasks have been associated with an activity in the project's master plan, the location of the tasks is taken automatically from the activity's build location and cannot be edited.
To clear any information that has been entered into the Location field for the selected tasks, select the Location check box and leave this field blank. - To apply the same work area to the selected tasks, select the Work Area check box and enter details of the work area in the field to the right. For example, if you specify a plot number in the Location field, you might specify a floor number or a room name in this field.
To clear any information that has been entered into the Work Area field for the selected tasks, select the Work Area check box and leave this field blank. - To apply the same status to the selected tasks, select the Task Status check box and specify the current status of the tasks, for example 'To Do' or 'In Progress', in the field to the right.
If you specify that the tasks are 'Complete', their cards appear with a diagonal line drawn across them on the whiteboard; if you specify that the tasks are 'At Risk/Blocked', their cards appear with a warning triangle drawn across them on the whiteboard and you use the Risk Log tab of the dialog to enter details of why the tasks are at risk or blocked (see below for details); if you change the status of any 'Complete' tasks to 'To Do' or 'In Progress', their percentage progress is reset to zero. - To apply the same percentage progress to the selected tasks, set their status to 'In Progress' and use the Progress field slider to indicate the percentage progress that has been carried out.
If you indicate that 100% progress has been carried out on the selected tasks, they may be locked to prevent editing when you save your changes, depending on whether tasks in this project are locked automatically as soon as they are completed. - To apply the same amount of actual effort to the selected tasks, select the Actual Effort check box and enter the amount of time that has been expended on the tasks in the field to the right.
You can use this field to record actual effort against tasks at any time; but it probably makes most sense to record actual effort against tasks when they are either partially complete, or fully complete.
To clear any information that has been entered into the Actual Effort field for the selected tasks, select the Actual Effort check box and leave this field blank. - To apply the same actual team size to the selected tasks, select the Actual Team Size check box and enter the number of people that were actually needed to carry out the task in the field to the right.
You can use this field to record the actual team size against tasks at any time; but it probably makes most sense to record the actual team size against tasks when they are either partially complete, or fully complete.
To clear any information that has been entered into the Actual Team Size field for the selected tasks, select the Actual Team Size check box and leave this field blank. - To associate the selected tasks with an activity in the project's master plan, select the Link to Master Plan Activity check box and select the activity in the field to the right. You can select any activity that is included in the pull plan.
Once you have associated one or more pull plan tasks with an activity in the master plan, the progress of the activity is taken directly from the task - or tasks - that are associated with it, and you cannot edit the progress of the activity directly using the Edit Activity dialog.
If a build location is specified against a master plan activity, the location information is applied automatically to any tasks that you associate with the activity, and the location information cannot be edited on these individual tasks.
To disassociate the selected tasks from any master plan activities with which they are currently associated, select the Link to Master Plan Activity check box and select '-- not linked --' in the field to the right. - To record any free text information relating to the selected tasks:
- Select the Notes check box.
- Use the Append and Replace radio buttons to specify whether you want to add free text information to any existing notes that have been recorded against the tasks, or replace any existing notes with new information.
- Use the Notes field to record any free text information relating to the task. You can use the controls at the top of the Notes field to format the text.
- To create a hyperlink to an external website, select the text that you want to hyperlink in the Notes field and click
 , then enter the URL of the website in the Enter link field that appears and click Save:
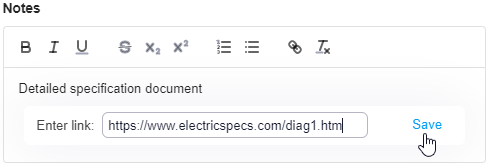
The selected text appears underlined in the Notes field:
Click the text to activate the hyperlink and view the specified website.
- To lock or unlock the selected tasks, select the Task Locking check box and turn the Locked toggle on or off. Unless you turn this toggle off, unlocking all of the selected tasks, the changes you make on this dialog will not be applied to any tasks that are currently locked.
- If you specified that the selected tasks have a status of 'At Risk/Blocked', you use the fields on the Risk Log tab to enter details of why the tasks are at risk or blocked:
- Specify the date on which the risk was identified in the Risk Identified Date field.
- Select a risk category that describes the reason for the tasks' status in the Risk Category field. For example, a task may be at risk or blocked as a result of adverse weather, transport issues or staff illness.
- Select the user who has responsibility for managing the risk in the Risk Owner field.
- Specify the date by which the risk should be resolved in the Risk Resolve By Date field.
- Select the Risk Notes check box and enter details of the risk in the Risk Notes field. You can choose whether to append or replace existing risk information with the information you enter in this field.
- Once a risk has been resolved, click the Risk Has Been Resolved toggle, specify the date on which the risk was resolved in the field to the right and enter details of what was done to resolve the risk in the Risk Notes field. Once you have resolved a risk, the status of the tasks changes to 'To Do', 'In Progress' or 'Complete', depending on the amount of progress that has been recorded against each task.
- Click Update. You are asked to confirm whether you want to update the selected tasks with your changes. If you click Yes, your changes are saved and you are returned to the Pull Plan Whiteboard page, where your changes are reflected on the whiteboard.
To move the selected tasks forwards or backwards in time by a specified number of days or weeks:
- On the Edit Multiple Tasks dialog, review the list of selected tasks on the Selected Tasks tab, and clear the check boxes to the left of any tasks you do not want to edit. You can change the width of the columns on this tab, in the same way that you can change the width of the columns in a list.
- Click the Move Tasks tab.
- Select the Number of Days check box.
- Use the fields to the right of the check box to specify how far you want to move the selected tasks:
- To move the tasks forwards in time, enter a positive integer in the field to the right of the check box. For example, to move the tasks 3 days forwards in time, enter '3'.
- To move the tasks backwards in time, enter a negative integer in the field to the right of the check box. For example, to move the tasks 4 days backwards in time, enter '-4'.
- To move the tasks backwards in time by 1 week (7 days), click -1 week.
- To move the tasks backwards in time by 1 day, click -1 day.
- To move the tasks forwards in time by 1 day, click +1 day.
- To move the tasks forwards in time by 1 week (7 days), click +1 week.
- Click Update. You are asked to confirm whether you want to update the selected tasks with your changes. If you click Yes, your changes are saved and you are returned to the Pull Plan Whiteboard page, where your changes are reflected on the whiteboard.
Using a whiteboard to manage pull plans
Working with tasks in a pull plan
Using risk categories to define why tasks are at risk or blocked