Using a whiteboard to manage pull plans
You use the Pull Plan Whiteboard page to arrange the tasks in a pull plan in the order in which they are to be carried out, grouped together in a way that suits you. Each task is represented by a card, and you can click and drag the cards around the whiteboard to arrange them in any way you like. Think of the whiteboard as a pin board attached to a wall, and each card as a sticky note on the pin board. Once you have arranged the tasks in a pull plan on the whiteboard, you can draw links between them to show dependencies.
To access the Pull Plan Whiteboard page:
- Click Pull Plans in the left pane. The Pull Plans page appears.
- Click a pull plan in the list.
- Click Whiteboard.
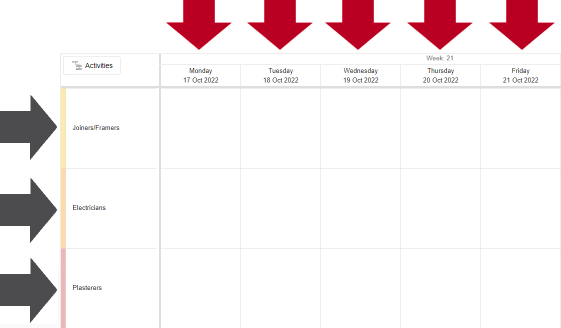
The whiteboard has vertical columns, with each column representing a date, and horizontal rows - known as 'swimlanes' - which you can use to group the tasks by project team or build location. Use the scrollbars to the below and to the right of the whiteboard to move around the whiteboard, displaying different dates and swimlanes.
Week numbers are displayed at the top of the whiteboard. Depending on how you have configured the current project, weeks are numbered either from the project start date, or according to the ISO week date system.
In the following illustration, the date columns are highlighted with red arrows and the swimlane rows are highlighted with grey arrows.
You can create as many swimlanes as you like, with each swimlane corresponding either to a project team that is to work on the tasks in the pull plan, or to a build location at which the pull plan's tasks take place. You can toggle the whiteboard between having project team-based swimlanes and build location-based swimlanes.
When swimlanes represent project teams, there may be one swimlane for carpenters; one for electricians; one for plumbers; and so on. When swimlanes represent build locations, there may be one swimlane for each plot on a site; one for each floor in a building; one for each room in a building; and so on.
You click and drag tasks into the appropriate project team's swimlane to indicate the project team that is to carry out each task, or the build location in which each task takes place. Each cell in the whiteboard can contain more than one task, which allows you to represent situations in which a project team has more than one task on a single day, or more than one task takes place in a build location on a single day.
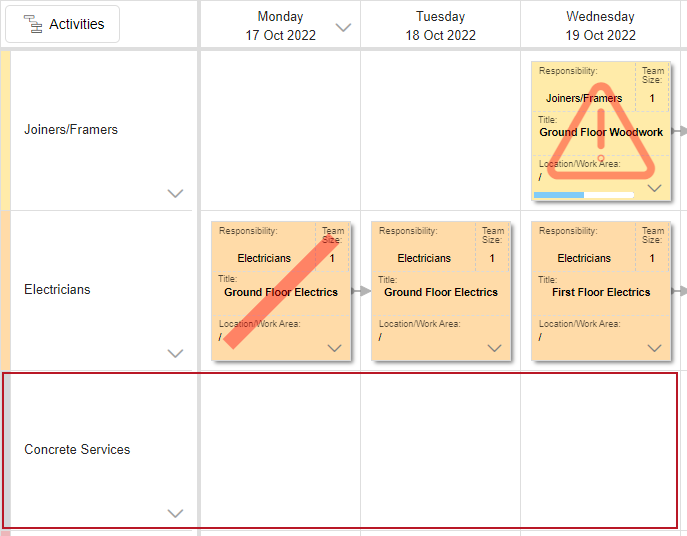
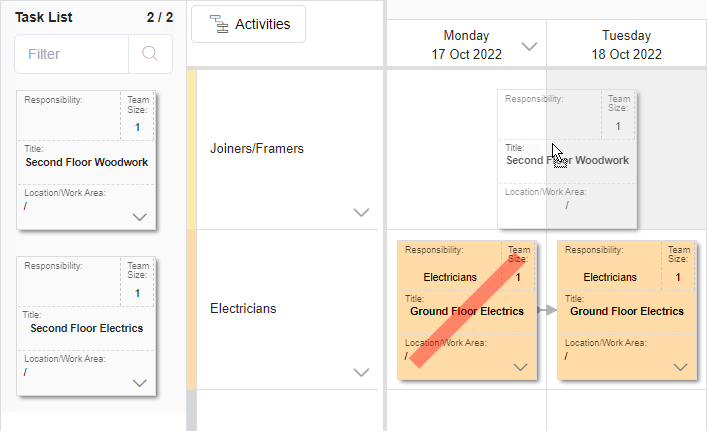
In the following illustration, two swimlanes have been created - 'Joiners/Framers' and 'Electricians'; the cards relating to woodwork tasks have been positioned in the 'Joiners/Framers' swimlane and the cards relating the electrical tasks have been positioned in the 'Electricians' swimlane:
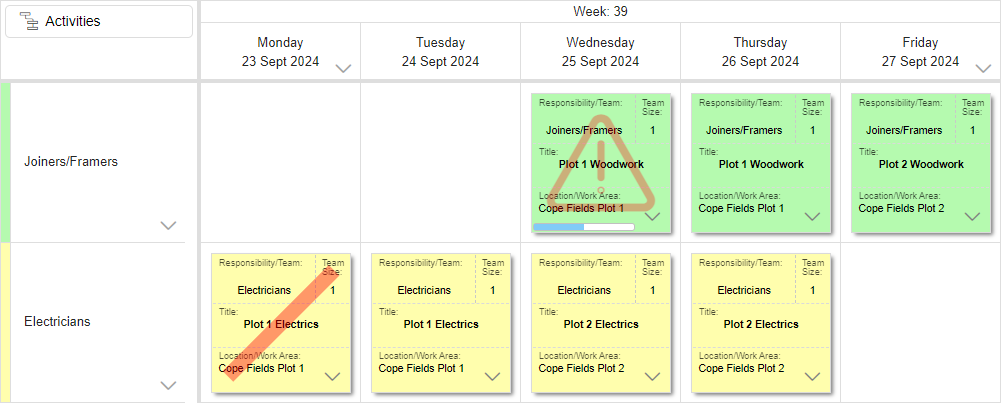
Note that one task has a diagonal line drawn across it, indicating that the task is 100% complete, and that one has a warning triangle drawn across it, indicating that it is at risk or blocked.
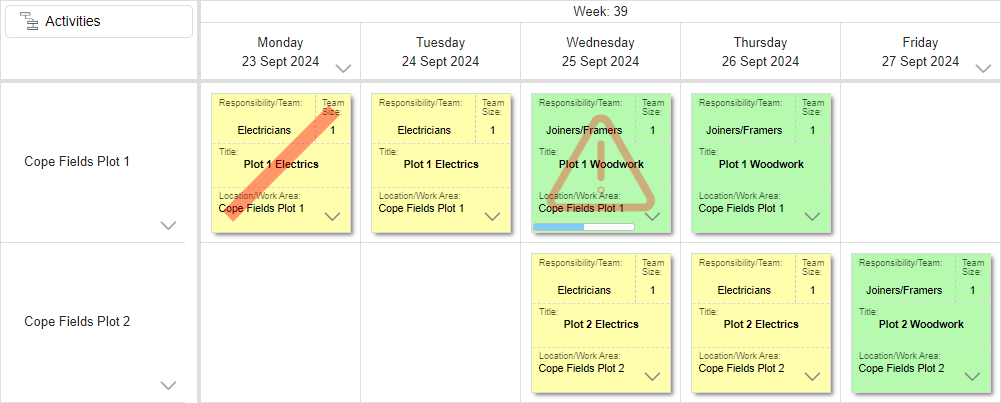
In the following illustration, the swimlanes represent build locations, and the same tasks appear as follows - they are grouped by build location rather than by project team:
In the following illustration, in which the swimlanes represent project teams, one cell contains three individual cards, representing three separate tasks that the project team is scheduled to carry out on that day:

Note that the width and height of the cell that contains three tasks is increased so that all three tasks can be displayed.
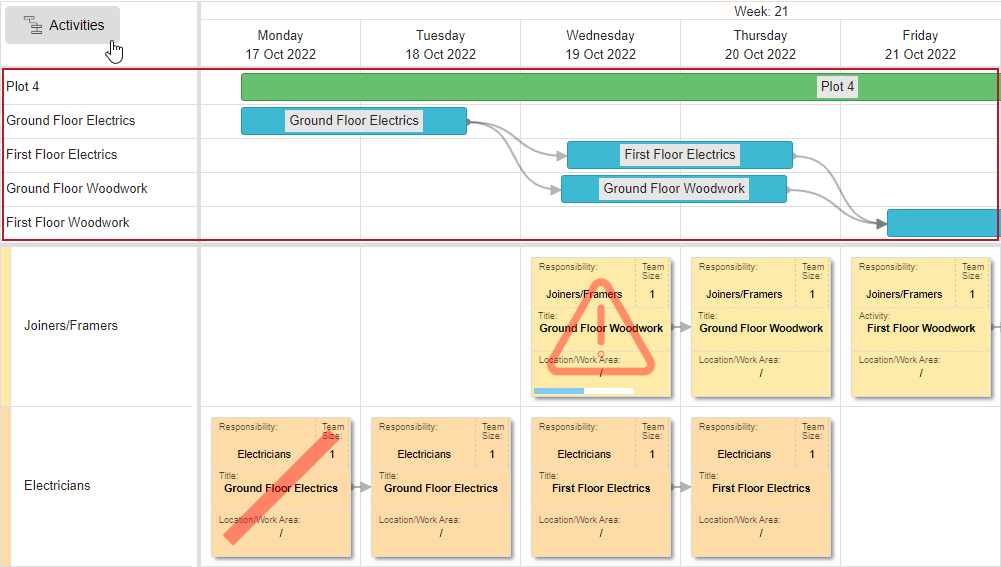
In addition to the swimlanes that correspond to project teams or build locations, you can display an 'Activities' swimlane at the top of the whiteboard that displays the activities in the pull plan. Displaying the 'Activities' swimlane can help you to manage the tasks in a pull plan, as it enables you to see which activities are in the pull plan, the dates on which the activities are planned and the links between the activities. To display the 'Activities' swimlane, click the Activities button at the top-left of the whiteboard. To hide the 'Activities' swimlane, click the Activities button again.
In the following illustration, the 'Activities' swimlane that appears at the top of the whiteboard is highlighted:
Any tasks that have not yet been positioned on the whiteboard appear in a task list to the left of the whiteboard. If swimlanes represent project teams, the task list contains those tasks to which a project team has not yet been assigned; if swimlanes represent build locations, it contains those tasks to which a build location has not yet been assigned.
In the following illustration, in which swimlanes represent project teams, the task list that appears to the left of the whiteboard is highlighted; it contains any tasks that have not yet been positioned on the whiteboard - it those tasks to which a project team has not yet been assigned:

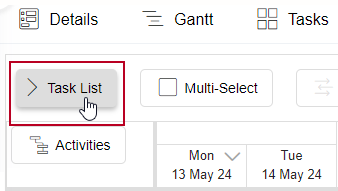
You can use the Task List control, positioned above the task list, to hide and display the task list:
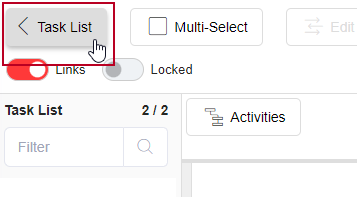
You might want to hide the task list at times to display more of the whiteboard on the screen.
Use the Swimlanes control on the Pull Plan Whiteboard page to specify whether swimlanes represent project teams or build locations:
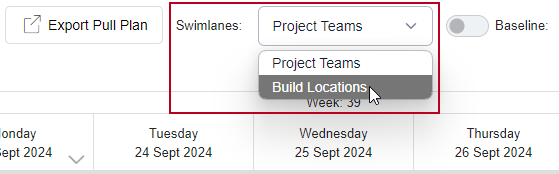
- Click the control and select Project Teams to display a swimlane for each project team. When you do this, the task list displays those tasks to which a project team has not yet been assigned.
- Click the control and select Build Locations to display a swimlane for each build location. When you do this, the task list displays those tasks to which a build location has not yet been assigned.
Use the Zoom control on the Pull Plan Whiteboard page to zoom in and out of the whiteboard:

- Click
 to zoom into the whiteboard, displaying fewer tasks, but displaying each task larger.
 - Click
 to zoom out of the whiteboard, displaying more tasks, but displaying each task smaller.
When you zoom out of the whiteboard to the fullest extent, the task list is hidden automatically and the main Asta Connect menu is contracted so that it displays only icons. The task list remains hidden and the menu remains contracted when you zoom back in.
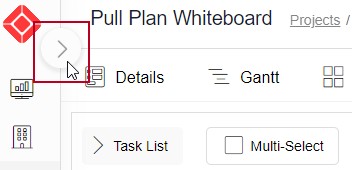
To redisplay the task list, click the Task List control, at the top-left of the whiteboard:
When the Asta Connect menu is contracted so that it displays icons only, a right-pointing arrow is displayed at its top-right:
Click this arrow to expand the menu so that it displays icons and menu descriptions.
When the menu is expanded, a left-pointing arrow is displayed at its top-right:

Click this arrow to contract the menu so that it displays icons only. You may want to contract the menu at times to display more of the whiteboard on the screen.
Asta Connect remembers your zoom level and the position of the scroll bars and applies these settings automatically the next time you access the pull plan's whiteboard. Your zoom and scroll settings are saved for each individual pull plan in the settings of the web browser you are currently using. If you switch to using a different web browser, or a different computer, all whiteboards revert back to their default zoom and scroll settings.
To create a new swimlane:
- On the Pull Plan Whiteboard page, click
 at the bottom-right of an existing swimlane to display the swimlane menu:
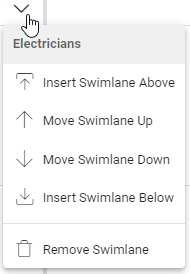
- Click Insert Swimlane Above to insert a new swimlane immediately above the existing swimlane, or click Insert Swimlane Below to insert a new swimlane immediately beneath the existing swimlane. The Insert Swimlane Above or Insert Swimlane Below dialog appears.
- Depending on whether swimlanes represent project teams or build locations, either a Project Team field or a Build Location field is displayed in the dialog. Select the project team or build location for which you want to create a swimlane - for example 'Bricklayers' or 'Plot 3' - and click Insert. A new swimlane for the selected project team or build location appears on the whiteboard:
If you want to create a swimlane for a project team or build location that has not yet been created, you can click New Project Team or New Build Location in the Insert Swimlane Above or Insert Swimlane Below dialog to create the new project team or build location. Once you have created the new project team or build location, a swimlane for that team or location is added to the whiteboard.
To change the position of a swimlane:
- On the Pull Plan Whiteboard page, click at the bottom-right of the swimlane you want to move to display the swimlane menu.
- Click Move Swimlane Up to move the swimlane up one position - moving it closer to the top of the whiteboard - or click Move Swimlane Down to move it down one position - moving it closed to the bottom of the whiteboard.
To remove a swimlane from the whiteboard:
- On the Pull Plan Whiteboard page, click at the bottom-right of the swimlane you want to remove to display the swimlane menu.
- Click Remove Swimlane. If any tasks are positioned on the swimlane, a popup appears, asking if you are sure that you want to remove the swimlane and move any tasks on the swimlane back to the task list.
- Click Yes to remove the swimlane. Any tasks that were positioned on the swimlane are moved back to the task list, from where you can reposition them on the whiteboard.
You cannot create, edit or remove swimlanes if the whiteboard is locked. You cannot remove a swimlane from the whiteboard if one or more of the tasks on the swimlane are locked.
To create a task in a pull plan, on the Pull Plan Whiteboard page, click  at the bottom-right of the task list. Once you have created a task, a card representing the task appears in the task list, and you can click and drag it onto the whiteboard.
You can also create tasks directly from the pull plan activities that are displayed in the 'Activities' swimlane at the top of the whiteboard. If you do this, one task is created for each day in the whiteboard that is covered by the duration of the activity - you can choose whether to create tasks for Saturdays and Sundays, or omit tasks from weekend days.
To do this:
- On the Pull Plan Whiteboard page, click the control to the right of the name of the activity for which you want to create tasks.
- Click Create Tasks from Activity:

- The Create Tasks from Activity dialog appears. This dialog displays the name of the activity and the activity's build location, if one has been specified. If a location has been specified against an activity, it is applied automatically to the tasks that you create from the activity.
- If you want to specify the project team that is responsible for the task, select one in the Responsibility/Team field. If swimlanes currently represent project teams, the task will be added to that project team's swimlane. If you do not specify a project team when swimlanes represent project teams, the task will be added to the task list.
- If you want to specify the location at which the task will take place, select one in the Location field; if you do not want to specify a location, select '(unallocated)' in this field. If swimlanes currently represent build locations, the task will be added to that build location's swimlane. If you do not specify a build location when swimlanes represent build locations, the task will be added to the task list.
If a location has been specified against the activity, it is applied automatically to the task and you cannot change this. - Use the Include Saturdays and Include Sundays check boxes to specify whether or not to create tasks on weekend days, if the activity encompasses one or more weekends. If you select these check boxes, tasks are created on any Saturdays and/or Sundays that are within the period covered by the activity; if you clear these check boxes, tasks are created only for days from Monday to Friday within that period.
- Click Create. The tasks are added to the task list or to the specified swimlane, with one task added for each day within the period covered by the corresponding activity - except for Saturdays and/or Sundays, if you cleared the Include Saturdays and/or Include Sundays check boxes. If you added the tasks to a swimlane, links are drawn between the tasks automatically:
You can also create tasks on particular cells in the whiteboard by clicking a blank cell.
To do this:
- On the Pull Plan Whiteboard page, hover the mouse pointer over a blank cell in the whiteboard. A plus symbol appears in the cell:

- Click the plus symbol to display the New Task dialog, in which you can enter details of the new task. If you create a new task in this way, the project team or build location corresponding to the swimlane in which you clicked is assigned to the task by default, and the start date of the task defaults to the date of the cell you clicked.
You cannot create tasks if the whiteboard is locked.
If you have a large number of tasks in a pull plan, you can enter an alphanumeric string in the Search... field at the top of the list to filter the tasks that appear in the list. The list is filtered instantly as you enter text into the field, so that it displays only tasks that contain the text you are entering:
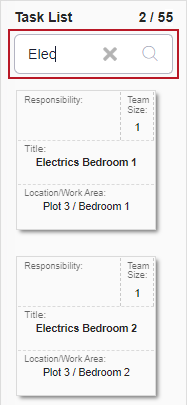
To clear the filter and return to the default list view, delete any text you have entered into the Search... field.
To click and drag a task from the task list onto the whiteboard:
- On the Pull Plan Whiteboard page, in the task list, locate the task that you want to add to the whiteboard.
- Position the mouse pointer over the task that you want to add to the whiteboard. The cursor changes to
 .
. - Holding down the left mouse button, click and drag the task from the task list onto the whiteboard:
- Position the task on the appropriate date and in the appropriate swimlane, then release the mouse button. The task is positioned on the whiteboard on the appropriate date and the date of the task is updated to match the date on which it has been positioned. The swimlane's project team or build location is assigned to the task and - if swimlanes represent project teams - it is displayed in the project team's colours.
You can drag tasks onto empty cells in the whiteboard, or onto cells that already contain one or more tasks. If you click and drag a task onto a cell that already contains a task, the width or height of the cell is increased automatically so that all of the tasks can be displayed.
Once you have moved a task from the task list onto the whiteboard, you can click and drag it around the whiteboard to any position you like. Again, you can click and drag tasks onto empty cells, or onto cells that already contain one or more tasks. You cannot click and drag locked tasks around the whiteboard. If a task has taken its build location from a master plan activity to which it is linked and swimlanes represent build locations, you cannot click and drag the task from one swimlane to another, or to the task list, as its build location is not editable.
You can change the order of tasks in a single whiteboard cell by clicking and dragging them around within the cell: if you click and drag one task on top of another task in the same cell, the position of the two tasks is switched.
A control appears at the bottom-right of each task when it appears on the whiteboard. Click this control to display a menu.
You cannot click and drag tasks around the whiteboard if the whiteboard is locked.
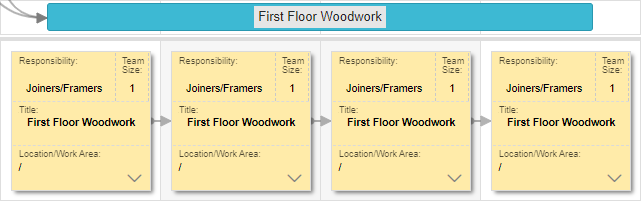
You can duplicate tasks in the whiteboard. This is an easy way of creating a series of similar tasks for a project team or build location - depending on what swimlanes represent - without having to create each task individually.
To duplicate a task:
- On the Pull Plan Whiteboard page, click at the bottom-right of the task and select Duplicate Task. The Duplicate Task dialog appears.
- Enter the number of days you want the new task to span in the Number of Days field.
- Use the Include Saturdays and Include Sundays check boxes to specify whether or not to create tasks on weekend days, if the activity encompasses one or more weekends. If you select these check boxes, tasks are created on any Saturdays and/or Sundays that are within the period covered by the activity; if you clear these check boxes, tasks are created only for days from Monday to Friday within that period.
- If the task you are duplicating has a status of 'At Risk/Blocked' - or if it has had that status in the past - an Include Task Risk Log check box appears on the dialog. Select this check box to copy information from the fields on the Risk Log tab of the Edit Task dialog to the new duplicate task, or clear the check box to duplicate the task without copying over the risk log information.
- Click Create. One or more duplicate tasks appear in the project team or build location's swimlane immediately to the right of the original task - one task for each day spanned by the task. If one of the cells in which a duplicate task is created already contains one or more tasks, the width or height of the cell is increased automatically so that all of the tasks can be displayed.
You can now edit the duplicate tasks as required - once created, they are completely separate from the original task. For example, you may want to specify a different team size for the duplicate tasks, or click and drag them around the whiteboard to change their date or to assign them to a different project team or build location.
You cannot duplicate tasks if the whiteboard is locked.
You can draw links between tasks to show dependencies between them. The links show the logical order in which tasks should be carried out. If two tasks are linked together, the task at the start of the link must be completed before the task at the end of the link can start.
For example, if you have 'Plaster Lounge' and 'Electrics Lounge' tasks, you can draw a link between the two tasks to show that the 'Plaster Lounge' task must be completed before the 'Electrics Lounge' task can be started:
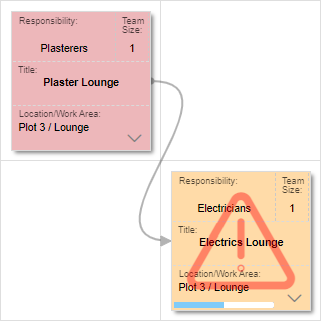
In this example, 'Plaster Lounge' is a 'predecessor' task - the task from which a link starts - and 'Electrics Lounge' is a 'successor' task - the task at which a link ends. If one link ends at a task and another link starts from it, the task is both a 'predecessor' and a 'successor' task.
To draw a link between two tasks:
- On the Pull Plan Whiteboard page, position the mouse pointer over the middle of the right edge of the task at which you want the link to start. A semi-circular area appears beneath the mouse pointer:
- Holding down the left mouse button, click and drag the mouse pointer away from the task. A link appears, and follows the mouse pointer as you move it. The cursor appears as
 until you position the mouse pointer over another task:
- When the mouse pointer is positioned over the task at which you want the link to end, release the mouse button. The link is fixed between the two tasks:
You can also create links between tasks by viewing and editing a task's details and specifying predecessor and/or successor tasks.
You cannot draw links between tasks if the whiteboard is locked.
You can toggle the display of links in the whiteboard on and off, using the Links toggle at the top of the whiteboard:
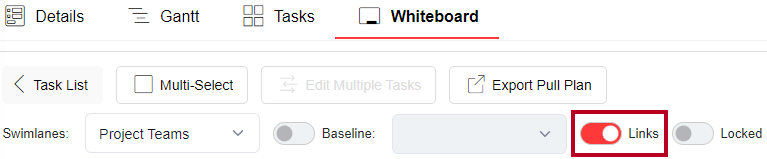
You may want to turn off the display of links in the whiteboard to make it less cluttered and easier to read. Turning off the display of links can be especially useful if you are displaying a baseline in the whiteboard, when you may be more interested in the relationships between tasks in the live data and their corresponding baseline tasks than in the relationships between different live tasks.
To display links that indicate the relationships between tasks in the whiteboard, click the Links toggle at the top of the whiteboard. To turn off the display of links in the whiteboard, turn off the Links toggle.
The Links toggle also affects whether links are included when you export a pull plan's whiteboard in PDF format: with the toggle turned on, links are displayed in the resulting PDF file; with the toggle turned off, links are omitted from the PDF
To view and edit a task's details, click the task. You can also click at the bottom-right of the task and select Edit Task.
To record that a task is 100% complete, click at the bottom-right of the task on the Pull Plan Whiteboard page and select Mark as Complete. If you want to record an amount of progress less than 100%, you must edit the task's details and record the progress using the Progress slider on the Edit Task dialog. Once a task is 100% complete, it may be locked to prevent editing, depending on whether tasks in this project are locked automatically as soon as they are completed.
If you record that a task in the task list is 100% complete, it is moved to the bottom of the task list.
To view a summary of a task's details, hover the mouse pointer over the task. A popup appears, showing you key information about the task:
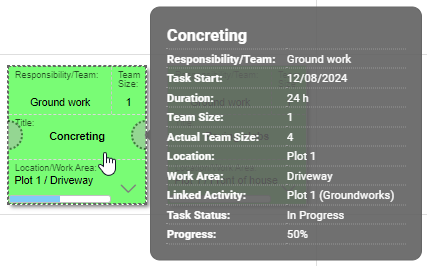
These popups are particularly useful when you are working with the whiteboard zoomed out to such a degree that very little information is displayed on each task.
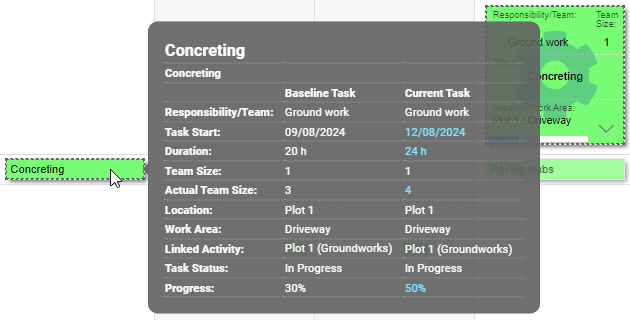
If you are currently displaying baseline information in the whiteboard and hover over a baseline task, the popups display information about the 'live' task, information about the task as it was when the baseline was created, and the variance between the two, highlighted in blue:
To view and edit a task's details, click the task. You can also click at the bottom-right of the task and select Edit Task.
You cannot edit task details if the whiteboard is locked. If the whiteboard is locked, a View Task Details menu command appears in place of Edit Task.
You can edit multiple tasks in the whiteboard at the same time. For example, you may want to apply the same work area to a number of tasks; assign the same status to a number of tasks; or apply the same amount of progress to a number of tasks. You can also move multiple tasks forwards or backwards in time together by a specified number of days or weeks.
To edit or move multiple tasks at the same time, on the Pull Plan Whiteboard page, click the Multi-Select button, select the tasks you want to edit or move, then click the Edit Multiple Tasks button to display the Edit Multiple Tasks dialog, which you use to edit or move the selected tasks.
You cannot edit or move multiple tasks at the same time if the whiteboard is locked.
To remove a task from the whiteboard without deleting it:
- On the Pull Plan Whiteboard page, locate the task that you want to remove.
- Position the mouse pointer over the task that you want to remove from the whiteboard. The cursor changes to .
- Holding down the left mouse button, click and drag the task from the whiteboard onto the task list, then release the mouse button. The task is removed from the whiteboard and reappears in the task list.
You can also remove a task from the whiteboard by clicking the control at the bottom-right of the task and selecting Remove Task from Whiteboard.
If a task has taken its build location from a master plan activity to which it is linked and swimlanes represent build locations, you cannot remove the task from the whiteboard, as its build location is not editable.
You cannot remove locked tasks from the whiteboard, and you cannot remove any task if the whiteboard is locked.
To delete a task and remove it from the whiteboard or task list:
- On the Pull Plan Whiteboard page, in the whiteboard or in the task list, locate the task that you want to delete.
- Click the control at the bottom-right of the task and select Delete Task. A popup appears, asking if you are sure that you want to delete the task.
- Click Yes to delete the task. The task is removed from the whiteboard or task list and deleted.
You cannot delete locked tasks, and you cannot delete any task if the whiteboard is locked.
To display baseline information in the whiteboard, enabling you to compare 'live' data in the pull plan against the data as it was when the baseline was created:
- On the Pull Plan Whiteboard page, click the Baseline toggle at the top of the whiteboard. The drop-down field to the right of it, which displays baselines that have been taken of the pull plan, becomes available.
The drop-down field displays all of the pull plan's baselines, except any that are hidden or have been deleted. - Select the baseline against which you want to compare the live data from the drop-down field.
You can view a legend that shows the project teams that the colours used in the whiteboard represent. This is particularly useful if the whiteboard swimlanes currently represent build locations.
To view a project team legend, click the Legend button at the top-left of the whiteboard:
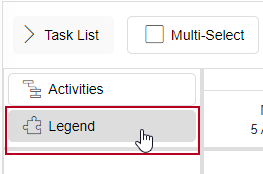
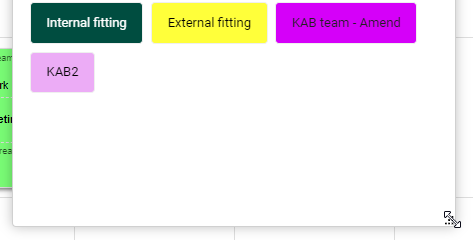
The legend appears in a popup. You can move the popup around the screen by clicking and dragging its title bar:
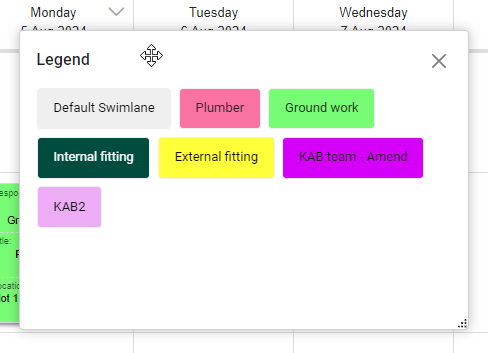
You can resize the popup by clicking and dragging its bottom-right corner:
To hide the legend popup, click  .
.
You can add further date columns to the left and right-hand edges of the whiteboard. You may need to do this to display additional columns to represent dates in which you need to position tasks. You can also remove unneeded date columns from the left and right-hand edges of the whiteboard.
To add a date column to the left or right-hand edge of the whiteboard:
- On the Pull Plan Whiteboard page, scroll to the left so that the leftmost date column is visible, or to the right so that the rightmost date column is visible. Notice that the leftmost or rightmost date column has a control in its header.
- Click the control and select Add Date Column to Start or Add Date Column to End, depending on which edge of the whiteboard you are adding to. A new date column is added to the whiteboard, showing the previous or next consecutive date.
To remove a date column from the left or right-hand edge of the whiteboard:
- On the Pull Plan Whiteboard page, scroll to the left so that the leftmost date column is visible, or to the right so that the rightmost date column is visible. Notice that the leftmost or rightmost date column has a control in its header.
- Click the control and select Remove Date Column. The leftmost or rightmost date column is removed from the whiteboard.
You cannot add or remove date columns if the whiteboard is locked.
You can export a pull plan's whiteboard in PDF format, which means that you can share the whiteboard and its tasks with other stakeholders, either by printing the PDF or by attaching the PDF to an email.
When exporting a whiteboard in PDF format, you can specify the size of paper to use, the orientation in which to present the information and the percentage scale to be applied. If the whiteboard contains more cards than will fit on a single sheet of paper, the information is presented on as many pages as necessary. If a baseline is currently displayed in the whiteboard, the baseline will appear in the PDF as well as the 'live' pull plan data.
To export a pull plan's whiteboard in PDF format:
- Click Export Pull Plan. The Export Pull Plan dialog appears.
- Click the PDF Document radio button.
- Select the size of paper you want to apply to the PDF file in the Paper Size field. If you are planning to print the resulting PDF, select a paper size that can be handled by the printer you are going to use.
- Specify whether you want the output to be in portrait or landscape format in the Orientation field.
- Specify the percentage scale to be applied to the whiteboard in the Scale field. The smaller the scale you apply, the more whiteboard tasks can be fitted onto each page.
- Click Export. When the PDF file has been prepared, it appears as a download in your web browser window, and is saved in your 'Downloads' folder. You can now open the PDF file and print it, or share it in another way - for example, by attaching it to an email.
You can lock a pull plan's whiteboard to prevent it from being edited. You may wish to do this to prevent contractors and subcontractors from changing the details of pull plans without your consent.
Locking a pull plan's whiteboard prevents users from:
- Creating, editing and removing swimlanes.
- Creating tasks in the pull plan.
- Clicking and dragging tasks around the whiteboard.
- Duplicating tasks.
- Drawing links between tasks to show dependencies.
- Editing task details.
- Editing and moving multiple tasks at the same time.
- Removing tasks from the whiteboard.
- Deleting tasks.
- Adding and removing date columns at either edge of the whiteboard.
Once a pull plan's whiteboard is locked, users can view the whiteboard and can view details of tasks on the Edit Task dialog, but they cannot make any changes.
To lock a pull plan's whiteboard, click the Locked toggle at the top of the whiteboard. To unlock the whiteboard, making it available for editing again, turn off the Locked toggle.
Creating pull plans for a project
Viewing and editing pull plan details
Viewing a pull plan as a Gantt chart
Working with tasks in a pull plan
Editing and moving multiple pull plan tasks at the same time
Creating baselines and comparing pull plans against them