Creating tasks in a pull plan
You use the New Task dialog to create tasks in a pull plan. The tasks in a pull plan represent the activities that must be carried out as part of the pull plan. When you create a new task, it appears in the task list on the Pull Plan Tasks page, and also on the other task-related pages that display the pull plan tasks in different ways. For example, each task is represented by a card on the Pull Plan Whiteboard page.
You cannot create tasks in a pull plan if the whiteboard is locked.
To access the New Task dialog:
- Click Pull Plans in the left pane. The Pull Plans page appears.
- Click a pull plan in the list. The Pull Plan Details page appears.
- Click either Tasks or Whiteboard.
- Click New Task; on the Pull Plan Whiteboard page, click
 at the bottom-right of the task list.
The fields on this dialog are divided into four tabs: Details, Dependencies, Risk Log and Project Tags.
To enter details of a new task:
- On the New Task dialog, enter a descriptive name for the task in the Title field.
- On the Details tab, select the project team that is responsible for carrying out the task in the Responsibility/Team field. The colours of the selected project team are applied to the task's card in the whiteboard.
The available list of project teams is limited to those teams that have a swimlane in the pull plan whiteboard.
If you do not yet know which project team will be responsible for the task, leave this field blank. If the whiteboard is configured so that swimlanes represent project teams, the appropriate project team is assigned to the task automatically when you drag the task into the project team's swimlane in the whiteboard or when you create a new task by clicking a blank cell in the whiteboard. - Enter the date on which the task will start in the Task Start field. If you create a new task by clicking a blank cell in the whiteboard, the start date of the task defaults to the date of the cell you clicked.
- Enter the duration of the task in hours in the Duration field.
- Enter the number of people that will be needed to carry out the task in the Team Size field.
- Enter the amount of effort that has been expended against the task - the amount of time that has been spent on the task - in the Actual Effort field. The amount of time it takes to complete a task may differ from the task's planned duration. For example, a task that has a planned duration of 7 hours may actually take 6 or 8 hours to complete.
You can use this field to record actual effort against a task at any time; but it probably makes most sense to record actual effort against a task when it is either partially complete, or fully complete. - Enter the number of people that were actually needed to carry out the task in the Actual Team Size field. This may differ from the planned team size. For example, a task that was planned with a team size of 3 may actually need a team of 2 or 4.
You can use this field to record the actual team size against a task at any time; but it probably makes most sense to record the actual team size against a task when it is either partially complete, or fully complete. - Enter the physical location at which the task will take place in the Location field. This could be a town, a city, a full address or a plot number. When you click in the field, global build locations - ones that can apply to any project - are shown by default. Click Project Specific if you want to select a build location that is restricted to the current project.
If you use the Link to Master Plan Activity field on the Dependencies tab of this dialog to associate a task with an activity in the project's master plan, the location of the task is taken automatically from the activity's build location, overwriting any information you enter in this field, and cannot be edited. - Enter further details relating to the task's location in the Work Area field. For example, if you specify a plot number in the Location field, you might specify a floor number or a room name in this field.
- If the task is partially or fully complete, use the Progress field slider to indicate the percentage progress that has been carried out.
Once a task has more than 0% but less than 100% progress, a progress bar appears on the task on the whiteboard, giving a graphical indication of the amount of progress that has been recorded against it: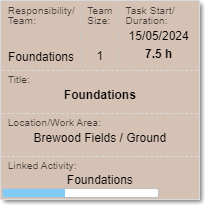
Once a task is 100% complete, the progress bar disappears and the task appears with a diagonal line drawn across it on the whiteboard: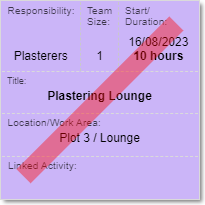
Once a task is 100% complete, it may be locked to prevent editing when you save your changes, depending on whether tasks in this project are locked automatically as soon as they are completed.
You can also record that a task is 100% complete by clicking the control at the bottom-right of the task in the whiteboard or task list and selecting Mark as Complete.
 - Specify the current status of the task, for example 'To Do' or 'In Progress', in the Task Status field.
If you specify that a task is 'Complete', it appears with a diagonal line drawn across it on the whiteboard:
If you specify that a task is 'At Risk/Blocked', it appears with a warning triangle drawn across it on the whiteboard and you are taken directly to the Risk Log tab of the dialog to enter details of why the task is at risk or blocked (see below for details):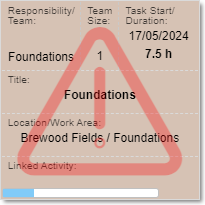
The progress bar is displayed against all tasks with a status of 'At Risk/Blocked', giving you an instant indication of the amount of progress that has been recorded against them - even if this is 0% or 100%.
If you change the status of a 'Complete' task to 'To Do', its percentage progress is reset to zero and the progress bar is no longer displayed on the task. If you change the status of a 'Complete' task to 'In Progress', its percentage progress is reset to zero but the progress bar remains displayed. - Use the Notes field to record any free text information relating to the task. You can use the controls at the top of the Notes field to format the text.
To create a hyperlink to an external website, select the text that you want to hyperlink in the Notes field and click , then enter the URL of the website in the Enter link field that appears and click Save:
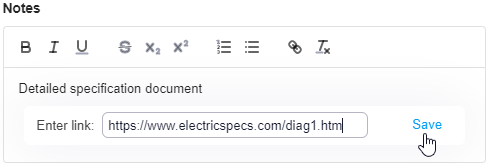
The selected text appears underlined in the Notes field:
Click the text to activate the hyperlink and view the specified website. - Click the Dependencies tab.
- To associate the task with an activity in the project's master plan, select the activity in the Linked to Master Plan Activity field. You can select any activity that is included in the pull plan, and you can associate more than one task with each activity.
Once you have associated one or more pull plan tasks with an activity in the master plan, the progress of the activity is taken directly from the task - or tasks - that are associated with it, and you cannot edit the progress of the activity directly using the Edit Activity dialog.
If a build location is specified against a master plan activity, the location information is applied automatically to any tasks that you associate with the activity, and the location information cannot be edited on these individual tasks. - Use the Predecessor Tasks and Successor Tasks fields to link the task with other tasks in the pull plan. These links are drawn graphically between the tasks on the Pull Plan Whiteboard page. Use the Predecessor Tasks field to create links that start at another task and end at this task, showing that this task cannot start until the predecessor task has been completed; use the Successor Tasks field to create links that start at this task and end at another task, showing that this task must be completed before the successor task can start.
- To create a link from or to another task, click
 in the Predecessor Tasks or Successor Tasks field, select the task to which you want to link this task in the drop-down field, then click
  .
. - To edit an existing link, click
 to the right of the link, select a different task to which you want to link this task in the drop-down field, then click .
 - To delete an existing link, click
 to the right of the link. The name of the predecessor or successor task is crossed-out, and the link from or to that task will be deleted when you click Save.
- To create a link from or to another task, click
- Click the Project Tags tab.
- Click the Project Tags dropdown and select any project tags that are applicable. You can select any number of project tags.
Any tags that you select are added to the list of assigned tags beneath the Project Tags field. Click to the right of a project tag to unassign it.
 - If you specified that the task had a status of 'At Risk/Blocked', you use the fields on the Risk Log tab to enter details of why the task is at risk or blocked:
- Select a risk category that describes the reason for the task's status in the Risk Category field. For example, a task may be at risk or blocked as a result of adverse weather, transport issues or staff illness.
- Specify the date on which the risk was identified in the Risk Identified Date field.
- Select the user who has responsibility for managing the risk in the Risk Owner field.
- Specify the date by which the risk should be resolved in the Risk Resolve By Date field.
- Enter details of the risk in the Risk Notes field.
- If you want the task to be locked after its creation, preventing anyone from editing its details or deleting it, click the Locked toggle at the bottom-right of the dialog.
- Click Save. The task is created and added to the pull plan.
Working with tasks in a pull plan
Viewing and editing task details in a pull plan
Using a whiteboard to manage pull plans
Locking tasks to prevent them from being edited or deleted
Using risk categories to define why tasks are at risk or blocked