Formatting a calendar view
To format a calendar view:
- Display the calendar view.
- On the Format tab, in the Format group, click Format Calendar. The Format Calendar View dialog appears.
- Click Close when you have finished formatting the calendar view.
Specifying the day on which weeks start
You use the General tab of the Format Calendar View dialog to specify the day on which weeks start in the calendar view. Weeks start on Sunday by default, but you may want to change this to another day - Monday, for example. The day you select will appear at the far left of each week in the calendar view.
To specify the day on which weeks start, select a day in the Week start day field and click Apply.
Specifying how tasks are coloured
You use the General tab of the Format Calendar View dialog to specify the way in which tasks are coloured. You can colour tasks according to the appearance of the codes that have been assigned to them, or using a standard appearance for each type of task.
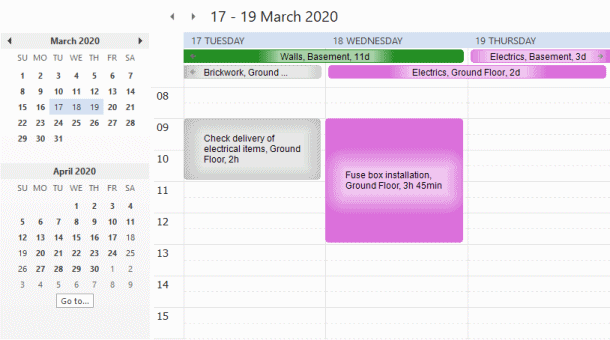
Two illustrations of the same calendar view are shown below. In the first, tasks are coloured according to the appearance of codes:
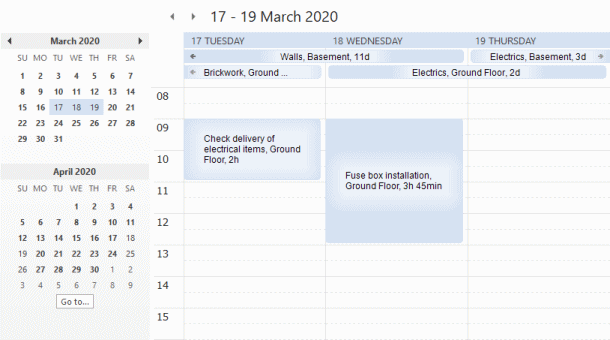
In the second, tasks are coloured using a standard appearance for each type of task, according to the currently selected colour scheme:
Colouring tasks according to the appearance of the codes that have been assigned to them provides an additional level of information in the calendar view.
To colour tasks according to the appearance of the codes that have been assigned to them:
- Select the Code library check box.
- Click Display Libraries. The Multiple Display Libraries dialog appears.
- Select the code libraries that you want to use to colour tasks by adding them to the Show libraries in this order field.
- Determine the order in which code libraries are used to colour tasks by moving the code libraries up or down in the list in the Show libraries in this order field.
Code libraries at the top of the list take priority over those lower down the list. If a task is assigned a code from more than one display library, its appearance is taken from the library that appears nearest the top of this list. - Click OK to return to the Format Calendar View dialog.
- Click Apply.
To colour tasks using a standard appearance for each type of task:
- Clear the Code library check box.
- For each type of task, click the Option column in the Default appearance grid and select one of the following colouring options:
- Theme - select this option to colour tasks according to the colour scheme that is currently selected.
- Pattern - select this option to colour tasks according to the foreground and background colours and pattern that you select in the columns to the right.
- Blend - select this option to colour tasks with the foreground and background colours that you select in the columns to the right, with the foreground colour at the top of each task graduating into the background colour at the bottom of each task.
- If you have selected either the Pattern or Blend colouring option, select the foreground and background colours to apply to each type of task in the Foreground and Background columns; if you have selected the Pattern colouring option, select the pattern to apply to each type of task in the Pattern column.
- Click Apply.
Specifying which spreadsheet fields to display on each task in the calendar view
You use the General tab of the Format Calendar View dialog to specify which spreadsheet fields are displayed on each task in the calendar view. You can display up to three spreadsheet fields on each task in the calendar view, to identify the tasks.
In the following illustration, three fields - Name, Parent name and Duration - are displayed on each task in the calendar view:

In the following illustration, two fields - Unique task ID and the 'Contractor' code library name - are displayed on each task:

Select the fields you want to display on each task in the Task data display fields.
You can configure the information that some fields display by specifying parameters. For example, if you choose to display certain cost-related fields, you can select a specific cost centre and a specific range of dates. If the field that you select supports parameters, the  button to the right becomes enabled. Click this button to access the Attributes dialog, in which you can specify the parameters.
Click Change Font to specify the font in which to display the information and use the Opacity slider to specify the transparency of the text in front of the background of each task. If text is difficult to see, moving this slider to the right will improve its visibility.
The text that you display on each task is truncated if necessary to fit within the bounds of the task in the calendar view. If text is truncated in this way, you can view the complete text by hovering the mouse pointer over the task.
Specifying how allocations are coloured
You use the Allocations tab of the Format Calendar View dialog to specify the way in which allocations are displayed in the active calendar view, when the calendar view is displaying resource or cost allocations from a RBS or CBS view. You can specify whether to display allocations according to the appearance of their parent tasks, according to the appearance of the appropriate resource or cost centre, according to the appearance of the codes that have been assigned to them from a particular code library, or using a standard appearance for each type of allocation.
To colour allocations using the current appearance of the tasks to which they are assigned:
- Click the From task radio button.
- Click Apply.
To colour allocations using the appearance of the appropriate resource or cost centre:
- Click the From resource radio button.
- Click Apply.
To colour allocations using the appearance of a code library that has been assigned to the allocation:
- Click the From library radio button.
- Select the code library whose appearance you want to display in the calendar view in the field to the right of the radio button.
- Click Apply.
To colour allocations using a standard appearance for each type of allocation:
- Click the From type default radio button.
- For each type of allocation, click the Option column in the Default appearance grid and select one of the following colouring options:
- Theme - select this option to colour allocations according to the colour scheme that is currently selected.
- Pattern - select this option to colour allocations according to the foreground and background colours and pattern that you select in the columns to the right.
- Blend - select this option to colour allocations with the foreground and background colours that you select in the columns to the right, with the foreground colour at the top of each allocation graduating into the background colour at the bottom of each allocation.
- If you have selected either the Pattern or Blend colouring option, select the foreground and background colours to apply to each type of allocation in the Foreground and Background columns; if you have selected the Pattern colouring option, select the pattern to apply to each type of allocation in the Pattern column.
- Click Apply.
Specifying what is displayed in a calendar view
Specifying how calendar views are printed