Adding tasks to a project timeline
You can add tasks,
To add a task or milestone to the timeline, either:
- Right-click the task and select Show in timeline. You can CTRL-select multiple tasks to add them all to the timeline at once. For example, you may want to CTRL-select all summary tasks at the top level of the project hierarchy and add them all to the timeline in one step.
- Select the Show in timeline check box, in the Details group of fields, on the Task tab of the Bar and Task Properties dialog.
- Display the 'Displayed in timeline' field in a spreadsheet column and select the check box in that column.
- Click and drag the task from the bar chart into the timeline pane.
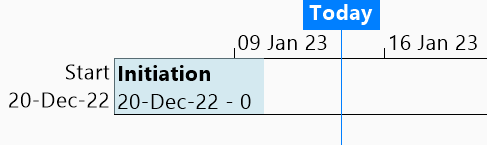
When you add a task to the timeline, it appears initially as a simple bar, either with a default colour of blue or, if you are colour-coding tasks in the timeline according to the codes that have been assigned to them, with the appearance of the appropriate code. The task is drawn from the start date of the task to the finish date of the task - even if the task has been split by progress. The task name and start and finish dates are displayed in the bar. Here, an 'Initiation' task has been added to the timeline:
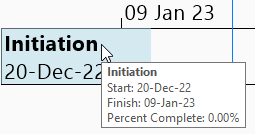
If the task name or dates are too long to be displayed, they are truncated. Hover over the bar in the timeline to display the full name and dates in a tooltip, along with the task's percentage complete value:
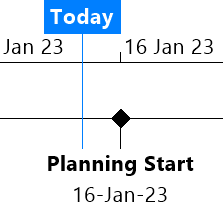
When you add a milestone to the timeline, it is displayed on the timeline's bottom line. All milestones are displayed as diamonds - the timeline does not display different milestone appearances:
Configuring the appearance of tasks
Tasks in the project timeline are displayed in blue by default. You can colour tasks in the timeline according to the codes that have been assigned to them from one or more code libraries. If you use code library entries to colour-code tasks in the bar chart, choosing to colour-code tasks in the project timeline as well makes it easier to differentiate between tasks, and to identify which tasks in the project timeline correspond to which specific tasks in the bar chart.
To colour tasks in the timeline according to the codes that have been assigned to them from one or more code libraries:
- Click in the timeline pane.
- On the Format tab, in the Style group, click Timeline Appearance. The Timeline Appearance dialog appears.
- Select the Code library check box to colour tasks in the project timeline according to one or more code libraries, which you can select by clicking the Display Libraries button, or clear the check box to display tasks in the project timeline using the default timeline task colour.
- Click the Display Libraries button to display the Multiple Display Libraries dialog, which you can use to specify which code libraries to use to colour tasks in the project timeline. You can use more than one code library at a time to colour tasks. Tasks are coloured according to the codes from the selected libraries that have been assigned to them.
If a task has no code assignments from any of the selected libraries, it is coloured using the default timeline task colour, unless a background colour override has been specified for the task, using the Background Colour control, in the Style group, on the Format tab of the Timeline Tools Ribbon. - Having specified one or more code libraries in the Multiple Display Libraries dialog, click OK to return to the Timeline Appearance dialog, then click OK to close the Timeline Appearance dialog.
You can change the background colour and font colour of individual tasks in the project timeline. You may want to apply different colours to specific tasks to help differentiate between them in the timeline. Changing the colour of individual tasks overrides both the default blue colour, and any code library appearance settings.
To change the background colour and font colour of a task in the timeline:
- In the timeline pane, click the task to select it.
- On the Format tab, in the Style group, use the Background colour and Font colour dropdown controls to specify colours for the selected task.
Specifying whether tasks are displayed as bars or as callouts in the timeline
You can specify whether to display tasks as bars or as callouts in the timeline.
In the following illustration, two tasks are displayed as bars:

In the following illustration, the tasks are displayed as callouts:
If you display a task as a callout, progress is not displayed against it, even if you select the Task Progress check box.
To specify whether a task should be displayed as a bar or as a callout in the timeline:
- In the timeline pane, click the task to select it.
- On the Format tab, in the Current Selection group, click Display as Bar to display the task as a bar, or click Display as Callout to display it as a callout.
Displaying progress on tasks in the timeline
You can indicate the percentage complete of each task in the timeline by applying shading to the top half of the tasks. Progress is indicated on tasks when they are displayed as bars, but not when they are displayed as callouts.
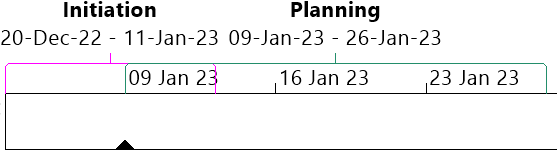
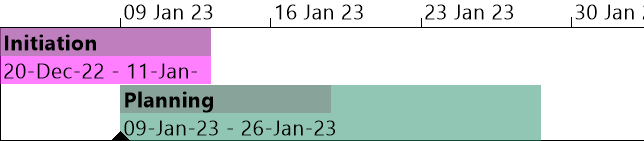
In the following illustration, the 'Initiation' task is shown to be 100% complete and the 'Planning' task is shown to be 50% complete:
To specify whether progress should be displayed on tasks in the timeline:
- Click in the timeline pane.
- On the Format tab, in the Show/Hide group, select the Task Progress check box to indicate the percentage complete of each task in the timeline by applying shading to the top half of the tasks, or clear the check box to omit the progress indicator from tasks in the timeline.
Specifying how overlapping tasks are displayed
If tasks in the timeline overlap each other, by default, the timeline height is increased and tasks are displayed on multiple rows to separate them. Tasks are displayed on as few rows as possible. If you prefer, you can configure the timeline to display all tasks in a single row, even if they overlap.
In the following illustration, two overlapping tasks are displayed on the same row:

In the following illustration, the two overlapping tasks are displayed on multiple rows:
To specify whether overlapping tasks should be displayed on a single row or on multiple rows in the timeline:
- Click in the timeline pane.
- On the Format tab, in the Show/Hide group, select the Multiple Rows check box to display tasks that overlap each other on separate rows in the timeline, or clear the check box to display tasks on a single row even if they overlap each other.
Removing tasks from the project timeline
To remove a task from the project timeline, either:
- Right-click the task in the timeline and select Remove from Timeline.
- Clear the Show in timeline check box, in the Details group of fields, on the Task tab of the Bar and Task Properties dialog.
- Display the 'Displayed in timeline' field in a spreadsheet column and clear the check box in that column.
Introduction to project timelines
Using the timeline scroll area
Configuring a project timeline