Using progress periods
Progress periods are library objects; you create them in the same way as other library objects.
A progress period consists of:
- A date up to which you are reporting progress: the report date.
- A line style for the report date.
- An appearance (colours and pattern) used for shading progress on the bar chart.
You can work with a single progress period, changing the report date each time that you report progress, or you can work with multiple progress periods, shading each progress period differently.
When using multiple progress periods, you can set up a hierarchy of progress periods. For example, within a project each department might have their own progress period, then within each department's progress period there might be further progress periods for individual teams.
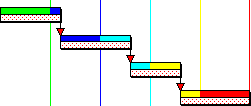
You could set up a different progress period for each month of the year. Then when you assign progress for January, the progress shading uses January's appearance; when you assign progress for February, the progress shading uses February's appearance, and so on. This enables you to identify the month in which tasks were completed, as illustrated below:

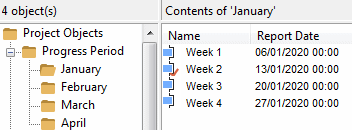
You can record progress more than once in each progress period. For example, if you want to report progress on a weekly basis, you could use monthly progress periods and report progress at the end of each week within the appropriate progress period. Alternatively, you could create a hierarchy of progress periods with each monthly progress period containing subordinate progress periods for the individual weeks within that month, as illustrated below:

The progress period that is used by default each time you mark progress is known as the progress entry period. If you use multiple progress periods in this way, it is important to update the progress entry period each week or month before you report progress, to ensure that progress is reported using the correct progress period. If you forget to update the progress entry period before reporting progress, progress will be reported against the wrong progress period, making it difficult to ascertain when tasks were carried out.
The progress period hierarchy is displayed in the project view - although you can hide the hierarchy from display if you want. You can specify which progress period is the progress entry period - ie the progress period that you want to use by default when marking progress - by right-clicking a progress period in the project view and selecting Progress Entry Period.
If you want to prevent users from marking progress against tasks and allocations using certain progress periods, you can 'lock' such progress periods to prevent their use. For example, you may want to lock historic progress periods, or future progress periods that have been entered into a project but that should not yet be used.
How tasks are split by progress
Changing the report date of progress periods
Locking progress periods to prevent their use
Turning the progress display on and off
Displaying progress lines and shading in the date zone
Displaying and hiding completed and uncompleted tasks and allocations
Recording the actual start and finish dates of tasks per progress period
Working with progressed tasks and allocations
Removing progress according to the progress period in which it was recorded