Creating a calendar with complex work patterns
You use the Calendar Wizard to create calendars with complex work patterns. 'Complex' calendars in this context are calendars in which not all working days have the same amount of working time, and those in which working time cannot be divided simply into two shifts each day: one in the morning and one in the afternoon. You can also create a simple calendar that does conform to these constraints.
Complex calendars derive their working and non-working time from one or more work patterns. You can create work patterns independently from calendars, or you can define a work pattern as part of the process of creating a complex calendar.
As part of the calendar creation process, you can choose to copy exceptions to the normal working week, such as holidays and overtime, from an existing calendar to the new calendar. Copying exceptions from an existing calendar is a good way of populating new calendars with public holidays without having to enter them manually in every calendar that you create. Note that once you have created a calendar, you can edit it subsequently to add details of new exceptions as and when they occur.
To create a calendar with complex work patterns:
- Open Library Explorer.
- Click Calendar in the tree view.
- Right-click a blank area of the list view and select New Calendar. The first screen of the Calendar Wizard appears.
If the Calendar Wizard does not appear, select the Use Calendar Wizard to create new Calendars check box on the Calendars tab of the Options dialog. - Click the My Calendar will use work patterns radio button, then click Next. The second screen of the wizard appears.
- Enter a name for the calendar in the Name field, then click Next. The third screen of the wizard appears.
- Select the Assign a work pattern to the new calendar check box, then click Next. The fourth screen of the wizard appears. You use this screen to specify whether you want to assign an existing work pattern to the calendar, assign a copy of an existing work pattern to the calendar, or create a completely new work pattern and assign it to the calendar.
- Click the Re-use an existing work pattern radio button and select a work pattern to assign an existing work pattern to the calendar. Note that if you do this, any edits that you make to the work pattern will be applied to all other calendars that also use the work pattern.
- Click the Copy an existing work pattern radio button and select a work pattern to copy an existing work pattern, name the copy of the work pattern after the new calendar, and assign the copy to the calendar. Note that if you choose to do this, you can edit the copy of the selected work pattern without affecting any other existing calendars.
- Click the Create a new work pattern radio button to create a new work pattern, the details of which you specify in the following screens of the wizard, and assign the new work pattern to the calendar. The new work pattern will be named after the calendar.
- Click Next. If you have chosen to create a new work pattern, a screen appears on which you can define the work pattern, as described in the bullet points below; if you have chosen to re-use or copy an existing work pattern, this screen does not appear and you move directly to the next screen.
- Click the Do you want to base your new pattern on a typical five day working week radio button to create a fairly standard work pattern in which the days from Monday to Friday include one period of working time in the morning and another in the afternoon and in which no work takes place on Saturday and Sunday. Enter the number of weeks for which you want the work pattern to run in the How many weeks are there in your pattern field. Asta Powerproject will create a work pattern with one shift per day for the number of weeks you specify.
- Click the Create another number of shifts radio button to create a different type of work pattern in which working time does not simply take place between Monday and Friday. Enter the number of shifts (days) to include in the work pattern, then specify a prefix to apply to the name of each shift. If you want to apply fairly standard morning and afternoon working times to each shift, select the Assign each new shift typical working day times check box; clear the check box to create the shifts without any working time - you will need to edit each shift within the work pattern afterwards and specify the working and non-working periods within each day.
- Click Next.
- The fifth screen of the wizard appears. You use this screen to specify whether you want to copy the exceptions, such as holidays and overtime, from an existing calendar to the new calendar. If you want to do this, select the Copy some default exception assignments check box and select the calendar from which you want to copy exceptions.
- Click Next. The sixth screen of the wizard appears. You use this screen to specify the way in which the cells representing each day of the year are numbered on the Calendar tab of the Calendar Properties dialog. Choose whether to number these cells by their dates, whether to show only the week numbers on the first day of each week, or whether to have no numbering.
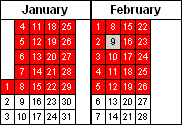
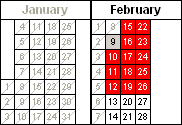
- Click Next. The seventh screen of the wizard appears. You use this screen to specify whether to display past dates on the Calendar tab of the Calendar Properties dialog. Select the Show past dates on the Calendar Properties dialog check box to enable dates earlier than today's date and make them editable, or clear the check box to grey-out dates earlier than today's date so that past dates cannot be edited accidentally.
- Click Next. The final screen of the wizard appears. You use this screen to specify the circumstances in which you want to use the new calendar.
- Click the Default for each new task I create check box to apply the calendar to new tasks by default as you create them.
- Click the Date zone folding calendar in all my existing user views check box to fold away non-working time in the date zone according to the calendar in all of the user views you have created.
- Click the Subheading calendar in all my existing user views check box to display non-working time on subheading bars (bars without tasks) according to the calendar.
- Click Finish. The new calendar appears in Library Explorer.
|
|
|
|
|
Cells numbered by date |
Cells numbered by week number |
No cell numbering |
|
|
|
|
Past dates shown |
Past dates greyed-out |
If you have chosen to create a new work pattern for the calendar or copy an existing work pattern, you should now edit the shifts within the work pattern to ensure that each one comprises the correct periods of working and non-working time.
Creating a calendar without using a wizard


