Setting default options for new calendars
To set default options for new calendars:
- Click the File tab, then click Options. The Options dialog appears. Click the Calendars tab.
- Use the Use Calendar Wizard to create new Calendars check box to choose whether you want to use the Calendar Wizard each time you create a new calendar. The Calendar Wizard takes you through the process of setting up a calendar step-by-step. If you use the Calendar Wizard, your previous choices are pre-selected for you when you next run it. If you clear this check box, the Calendar Wizard is never invoked when you create a new calendar.
- Specify whether you want new calendars to use an existing work pattern by default, or whether you want to create a copy of an existing work pattern for each new calendar, which will be named after the new calendar. If you use an existing work pattern for new calendars, any edits you make to the work pattern in a calendar will be applied to all other calendars that also use the work pattern. If you choose to copy an existing work pattern and apply this to each new calendar, any edits to the work pattern in a calendar will not affect any other existing calendars.
- Select the work pattern on which you want to base new calendars by default, or which you want to create a copy of for each new calendar. You can edit the selected work pattern by clicking the Properties button to display the Work Pattern Properties dialog.
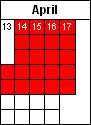
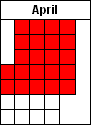
- On the Calendar tab of the Calendar Properties dialog, each day of the year is displayed in a separate cell. Choose whether to number these cells by their dates, whether to show only the week numbers on the first day of each week, or whether to have no numbering.
- If you choose to number the cells by week number, use the Week 1 contains first Thursday in January check box to specify the way in which you want to number weeks - according to ISO 8601, whereby week 1 is the week containing the first Thursday in January, or according to Asta Powerproject's traditional method, whereby week 1 is the week containing the first Monday in January.
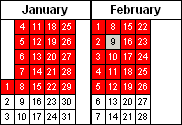
- Select the Show past dates check box to enable dates earlier than today's date and make them editable on the Calendar tab of the Calendar Properties dialog, or clear the check box to grey-out dates earlier than today's date so that past dates cannot be edited accidentally.
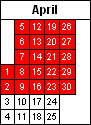
- On the Calendar tab of the Calendar Properties dialog, shading is used to indicate the amount of working time each day. You can set the number of hours over which you want the shading intensity to increase. For example, if this is set to 8 hours, then a day with 2 hours working time will be shaded lighter than a day with 4 hours working time, but a day with 10 hours working time will be shaded the same as a day with 8 hours working time because 8 hours is the maximum shading intensity. Enter the period for maximum shading intensity in the Colour display threshold box, then choose the colours you want to use for shading working time and no working time.
- The days in the first week each have 2 hours working time.
- The days in the second week each have 4 hours working time.
- The days in the remaining weeks each have 8 hours or more working time.
- The days in the weekends have no working time.
- Close the Options dialog when you have finished setting your calendar defaults.
|
|
|
|
|
Cells numbered by date |
Cells numbered by week number |
No cell numbering |
|
|
|
|
Past dates shown |
Past dates greyed-out |
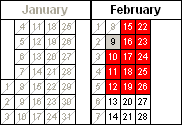
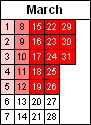
With the colour display threshold set to 8 hours, shading indicates that the days in the above month have the following working time:
You can override the default settings for individual calendars using the options on the Details tab of the Calendar Properties dialog.