Drawing links with lead/lag time
Lead/lag time enables you to set periods of minimum delay between two linked tasks, ensuring that the successor task does not start before the end of the lead/lag period. For example, you might have to complete half of one task before its successor task can commence, or you might need to leave a delay between the end of one task and the start of its successor.
|
|
|
|
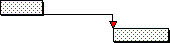
lead time indicated by blue arrow |
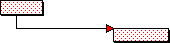
lag time indicated by blue arrow |
Lead/lag time is an attribute of the link between the tasks. You can change the lead/lag time by editing the link's properties.
To draw a link with lead/lag time:
- Move the mouse pointer so that it is on a corner or edge of the predecessor task.
- Hold down SHIFT and do either of the following:
- From the start or end of a task, drag the pointer horizontally for the lead/lag period, then drag up or down onto the successor task and release. You can release the link on the successor task's bar to create lead/lag time going into the successor task. If there are multiple tasks on the successor bar, the shape of the link cursor indicates the task to which the link is being attached:
- From along the duration of the task, drag the pointer up or down to the successor task's bar, then release. If there are multiple tasks on the successor bar, the shape of the link cursor indicates the task to which the link is being attached:
When you draw a lead/lag link that does not start at the start or end of a task, if you hover the pointer over the task at the approximate point at which you want the link to start, the lead/lag is displayed in a popup. Move the pointer along the task until you see the correct amount of lead/lag time. You can prevent this popup from being displayed by clearing the Show Lead/Lag popup check box on the General tab of the Options dialog.
The lead/lag section of the link is drawn as a horizontal line and the remaining section of the link is drawn as a normal link, possibly with slope:
![]()
When the horizontal line is attached to the predecessor task, then the lead/lag time is on the start of the link; when the horizontal line is attached to the successor task, then the lead/lag time is on the end of the link.
Normally, a link only has lead/lag at one end of the link, but it is possible for a link to have lead/lag at both ends. The lead/lag at the start of a link is calculated according to the predecessor task's calendar and the lead/lag at the end of a link is calculated according to the successor task's calendar.
If a link is attached part way along a task, then the link has lead/lag time although no horizontal line is drawn. A link can have lead/lag time on both the start and end of the link:
![]()
Whether the lead/lag time is on the start or end of the link makes no difference to how the tasks are rescheduled.
When you select a link, the time period over which the link slopes is displayed in the Duration field in the Object Edit toolbar. You can edit this figure to add or remove lead/lag time on the link. For example, the link below has no lead/lag and slopes forward across 5 days. If you select this link, the Duration field in the Object Edit toolbar shows 5 days:
![]()
If you edit the Duration figure to 3 days, 2 days lead/lag time is created and added to the end of the link:
![]()
Normally, if you create lead/lag links between tasks and then move the tasks, rescheduling the project will rearrange the tasks so that the gaps between them are as prescribed by the lead/lag logic of the links - and by any other constraints. In some circumstances, you may want to ensure that the offsets between tasks that are created when you move the tasks are maintained, and that the lead/lag is updated accordingly as and when you drag tasks from one point in time to another. You can do this by configuring links to ensure that task offsets are maintained when tasks are moved.
Editing lead/lag type and time
Lead/lag links between tasks on the same bar
Lead/lag links between tasks with different calendars
How lead/lag is handled when you export to another project management application