Numbering tasks in a project
Asta Powerproject generates a unique identification number for each task in a project automatically. This unique task ID can be a combination of an alphanumerical prefix - which you can define - and a number. As each new task is created in a project, the number is incremented by an amount specified by you. You can use unique task IDs to identify tasks in a project with certainty - which can be very useful if a project contains tasks that may share names. You can specify whether the ID numbers are unique within the whole project, within a sub-project, or are not unique at all.
Ideally, you should configure the way in which you want unique task IDs to be applied to tasks before you start creating tasks in a project. If, as is the case here, you have created some tasks before you configure unique task IDs,
Configuring unique task ID numbering
To configure unique task ID numbering:
- On the Project tab, in the Properties group, click
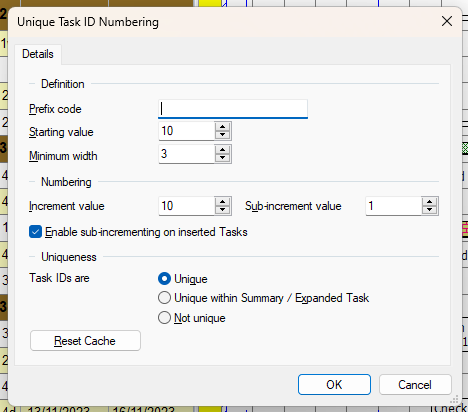
- In the Prefix code field, enter the alphanumeric string of characters with which you want to prefix the unique task ID number, for example AA, A2B or IH8T. To use a prefix, you must specify it before you create any tasks: once you have started to create tasks, although you can amend the prefix using this dialog, the change is not reflected in the unique task IDs that are assigned to the tasks
- In the Starting value field, enter the number that should be added to the prefix and applied to the first task in a chart to create the unique task ID number. For example, if you enter 1 and your prefix is AA, the first number will be AA1
- In the Minimum width field, enter the minimum number of characters that you want your unique task ID numbers to comprise (excluding the prefix). Task ID numbers smaller than the minimum width are padded out with zeros. For example, if you specify a minimum width of 5 and a prefix of AA, typical task IDs would be AA00001, AA00010 and AA00020.
- As each new task is created, its unique task ID is incremented on from the previous task by the number you specify in the Increment value field. For example, if you want the IDs to be sequential, enter 1; if you want the IDs to increment by 10 each time you create a task, enter 10.
- When you add a new task in between two existing tasks in a view, rather than taking the next available ID, the new task is given the ID of the task immediately above it in the view, plus the number you specify in the Sub-increment value field. For example, if you enter a task in between two tasks that have IDs of AA100 and AA110 and your sub-increment value is 5, the ID of the new task will be AA105. If the sub-increment value would conflict with an existing ID, the next available fully-incremented ID is assigned to the task instead.
- Click the appropriate radio button in the Task IDs are field to specify whether you want these IDs to be totally unique, unique within each summary group
- Click OK.
Displaying unique task IDs in the spreadsheet
To display a column in the spreadsheet that shows each task's unique task ID:
- Right-click the heading of the Start column and click Add Column - Identification - Unique task ID from the menu that appears. A new column is added to the spreadsheet to the left of the Start column and the Table Definition Properties dialog appears.
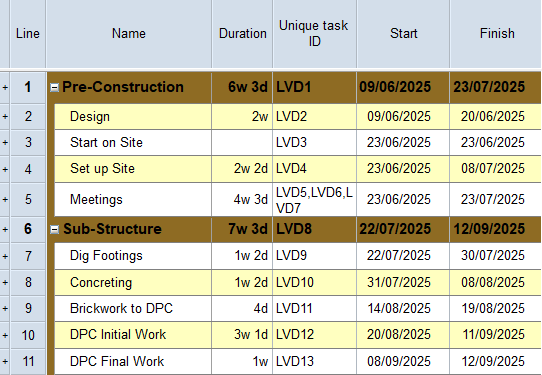
- Click Close to close the dialog and view the new column:
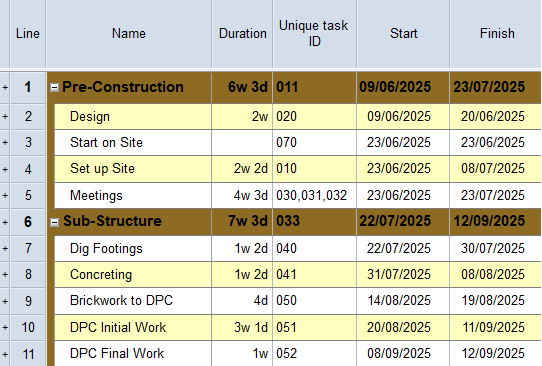
Notice that each task you have created so far has been assigned a unique task ID automatically. The unique task IDs in your project may be different to the ones illustrated above, depending on your unique task ID settings.
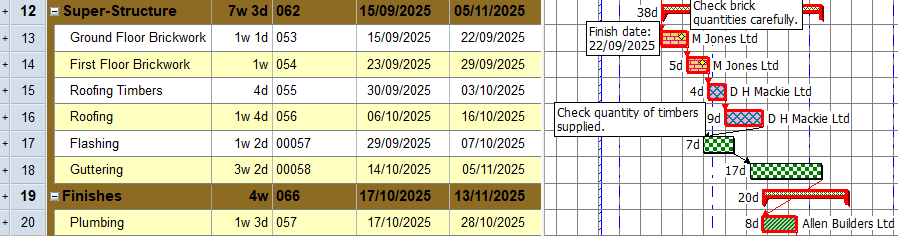
In the Super-Structure summary group, insert two new bars and create a new task on each; call these tasks "Flashing" and "Guttering". Link the new tasks up to other tasks in the project appropriately. Notice that these new tasks are assigned unique task IDs that conform to the numbering system you have just configured:
Renumbering unique task IDs to reflect the order of tasks
Once unique task IDs have been generated, you can renumber the unique task IDs of the tasks within the current view, or of a selection of tasks. You may want to do this if you have created a series of tasks in a sequence other than the order in which they are to take place and you want to renumber the unique task IDs so that they reflect the order in which the tasks are to be carried out or the order in which they appear on the bar chart. You can also change the unique task IDs of a series of tasks by searching for an alphanumeric string within their unique task IDs and replacing it with an alternative string.
To renumber unique task IDs:
- In the project view, click the Programme chart.
- Expand all of the summary groups so that the tasks within them are visible in the bar chart.
- On the Project tab, in the Properties group, click the Unique Task IDs dropdown and select Unique ID Renumbering. The Renumber Unique Task IDs dialog appears:
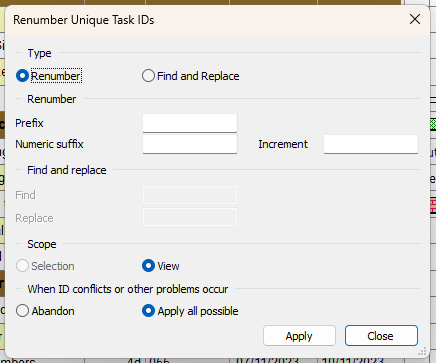
- In the Prefix field, enter the alphanumeric string of characters with which you want to prefix the unique task IDs that are to be applied to the tasks, for example AA, A2B or IH8T.
- In the Numeric suffix field, enter the number that should be added to the prefix and applied to the first of the tasks to create the unique task ID. For example, if you enter 1 and your prefix is LVD, the first unique task ID to be created will be LVD1.
- In the Increment field, enter the number by which each unique task ID should be incremented on from the previous unique task ID. For example, if you want the IDs to be sequential, enter 1; if you want the IDs to increment by 10 each time one is created, enter 10.
- Click Apply.
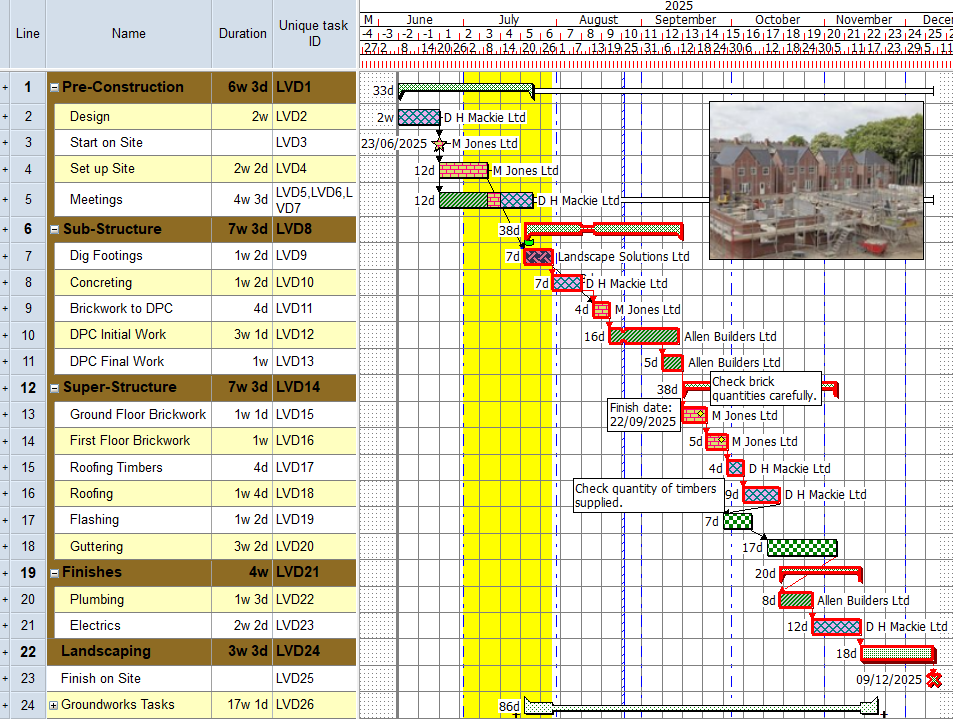
- Click Close. The unique task IDs in the view are renumbered according to the order of tasks in the project:
- Note that the tasks in the Landscaping chart have not been renumbered. You can check this by double-clicking the Landscaping expanded task in the bar chart. This is because the tasks in this chart were not visible in the view when you carried out the renumbering.
Before you continue, click the Programme chart in the project view.
Your project should now look something like this (note that the dates and durations of tasks, and the appearance of codes and annotations, may be different):
| Previous | Next |
| Annotating tasks in a project | Filtering tasks in a project |