Linking tasks
Usually tasks in a project have to take place in a particular order. For example, you cannot build a wall until you have dug the foundations. You specify the order in which tasks take place by drawing links from one task to another. The task at the start of the link is the predecessor, and the task at the end of the link is the successor. In the example above, Dig Foundations would be the predecessor task, and Build Wall would be the successor task. If you did not link your tasks, they might be scheduled to take place in the wrong order.
Types of link
You can link tasks in many different ways. The most common type of link is a Finish-to-Start link (FS), where the predecessor task must finish before the successor task can start:

Other common link types in Asta Powerproject are:
- Start-to-Start (SS):

- Finish-to-Finish (FF):

- Start-to-Finish (SF):

Drawing links between tasks
You can create links between tasks by drawing links in the bar chart. Try this now, by drawing a Finish-to-Start link between the Design task and the Start on Site milestone:
- Position the mouse pointer so that it is over the bottom-right of the Design task. The shape of the cursor changes to
 . This shows that you are going to draw a link from the finish of the task.
If you draw a link from the start of a task, the cursor changes to .
. - Hold down the left mouse button and drag the pointer onto the top-left of the Start on Site milestone. A link extends from the Design task and follows the mouse pointer as you drag. The shape of the cursor indicates the point on the Start on Site milestone to which you are linking and a popup displays where the link is being drawn from and to.
- Release the mouse button when the pointer is at the correct position on the Start on Site milestone. A link is drawn between the two tasks. The link is green, which shows that it is currently selected. Note that there is an arrowhead at one end of the link. The arrowhead points to the successor task, indicating the direction of the link:

- Click a blank part of the bar chart to deselect the link.
- Draw more links between the following tasks:
- A Finish-to-Start link from the bottom-right of the Start on Site milestone to the bottom-left of the Set up Site task.
- A Start-to-Start link from the bottom-left of the Set up Site task to the bottom-left of the first Meetings task.
- A Finish-to-Start link from the bottom-right of the Set up Site task to the bottom-left of the Dig Footings task.
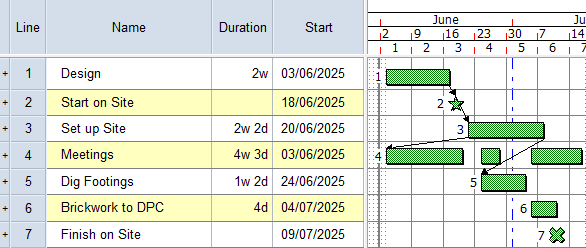
Your project should now look something like this (note that the dates and durations of tasks may be different):
| Previous | Next |
| Creating multiple tasks on the same bar | Block-linking tasks |