Assigning resources to tasks
Here you will assign a number of
Assigning demand resources to tasks
There are a number of ways in which you can assign
First, you will ensure that
- Right-click a blank area of the bar chart and select Format Bar Chart from the menu that appears. The Format Bar Chart dialog appears.
- Click the Allocations tab.
- In the
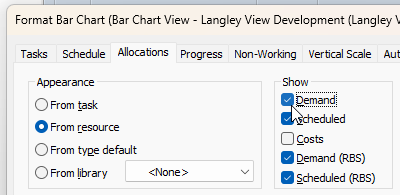
- Click Close.
To assign
- Click the Super-Structure summary in the project view to display its contents in the bar chart.
- Click the + symbol next to Permanent Resources in the project view to view the permanent resource
- Click the + symbol next to Site Resources in the project view to view the contents of this folder.
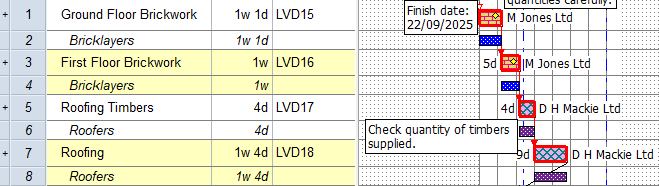
- Click and drag the Bricklayers permanent resource

- Click and drag the Bricklayers permanent resource
- Click and drag the Roofers permanent resource
Satisfying demand allocations
Once you have specified the skills that are required to carry out a number of tasks, you can satisfy the demand allocations by allocating specific resources to the tasks. This mirrors the later, more detailed stages of project planning.
To satisfy the demand allocations in the Super-Structure summary group:
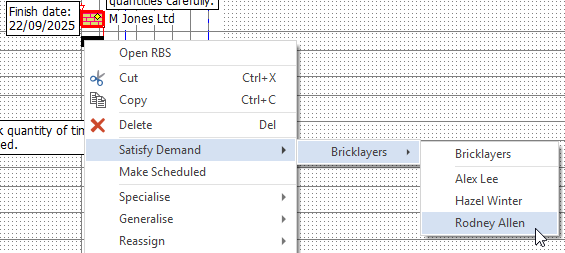
- Right-click the demand allocation bar below the Ground Floor Brickwork task, select the Satisfy Demand - Bricklayers submenu, then select Rodney Allen:
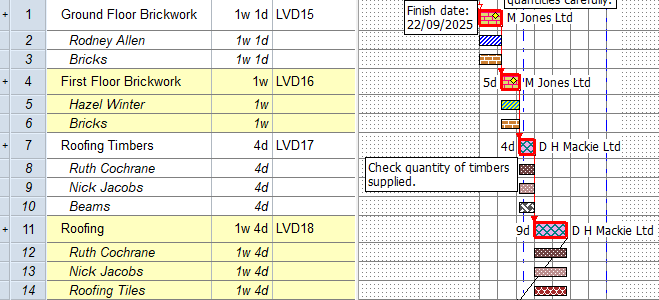
The Bricklayers demand allocation is replaced with a scheduled allocation of Rodney Allen, indicating that Rodney Allen has been allocated to satisfy the demand allocation:
- Repeat the above step to satisfy the demand allocation on the First Floor Brickwork task with a scheduled allocation of Hazel Winter.
- Right-click the demand allocation bar below the Roofing Timbers task, select the Satisfy Demand - Roofers submenu, then select Ruth Cochrane to satisfy the demand allocation with a scheduled allocation of Ruth Cochrane. Note that the Roofers demand allocation does not disappear in this case, but remains on the bar chart:

The demand allocation did not disappear in this case because unlike the Bricklayers resource folder, the Roofers folder has been configured with a default allocation of 2. This means that to satisfy the demand allocation of Roofers, two roofers need to be assigned to the task, rather than one. - Right-click the demand allocation bar below the Roofing Timbers task, select the Satisfy Demand - Roofers submenu, then select Nick Jacobs to satisfy the demand allocation with a scheduled allocation of Nick Jacobs. The demand allocation now disappears, as it is fully-satisfied:

- Satisfy the demand allocation on the Roofing task with two scheduled allocations: one of the Ruth Cochrane resource and one of the Nick Jacobs resource:

Assigning consumable resources to tasks
To assign consumable resources to tasks in the Super-Structure summary group:
- Click the + symbol next to Consumable Resources in the project view to view the consumable resources in the project.
- Click and drag the Bricks consumable resource from the project view and drop it onto the Ground Floor Brickwork task. A Bricks allocation bar appears underneath the Ground Floor Brickwork bar, mirroring the task:

- Click and drag the Bricks consumable resource from the project view and drop it onto the First Floor Brickwork task.
- Click and drag the Beams consumable resource from the project view and drop it onto the Roofing Timbers task.
- Click and drag the Roofing Tiles consumable resource from the project view and drop it onto the Roofing task.
- The first four tasks in the Super-Structure summary group should now each have a consumable resource allocation:
Specifying quantities for consumable resource allocations
You will now specify the quantity of each consumable resource that each allocation represents. There are a number of ways to do this. Here, you will use the spreadsheet to enter quantities:
- Right-click the heading of the Unique task ID column and click Field - Resource - Quantity from the menu that appears. The Unique task ID column is replaced by a Quantity column:

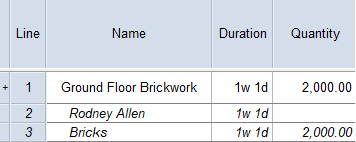
- Click in the Quantity column in the Bricks row underneath the Ground Floor Brickwork row and type "2,000.00" to indicate that 2,000 bricks will be used during the Ground Floor Brickwork task, then click away from the spreadsheet cell:
- Change the quantity of the Bricks consumable resource allocation underneath the First Floor Brickwork task to 2,000.00.
- Change the quantity of the Beams consumable resource allocation underneath the Roofing Timbers task to 30.00.
- Change the quantity of the Roofing Tiles consumable resource allocation underneath the Roofing task to 12,000.00.
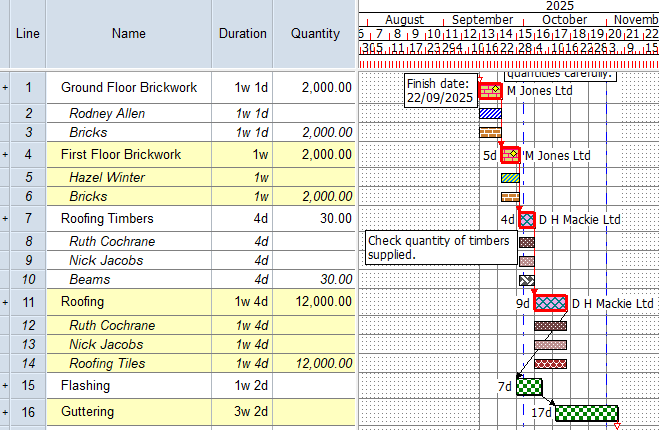
Your project should now look something like this (note that the dates and durations of tasks, and the appearance of codes, annotations and resources, may be different):
| Previous | Next |
| Creating resource libraries | Viewing a histogram of resource allocations |