Resource levelling
Resource levelling is the process of 'flattening' any over-allocation of permanent resources. Resource levelling does not apply to consumable resources but you can manually level consumable resources and costs by graphing the resources in a histogram and adjusting tasks and allocations until any over-allocation is eliminated.
Asta Powerproject levels permanent resources by doing any of the following:
- Delaying tasks - moving a task where over-allocation occurs to a time in which the resource is not used can solve the over-allocation.
- Delaying resource allocations on tasks - if a resource is only working on a task for a portion of the task duration, it may be possible to move the allocation so that it still performs the same amount of work on the task, but at a different date.
- Splitting resource allocations - if a resource is allocated to a task, but in the middle of the task another more important task needs doing, the allocation on the original task can be split.
- Stretching a task to increase its duration while reducing its resource allocation - if a resource is assigned to a task and its allocation can be reduced, the duration of the task can be increased to allow the resource more time in which to complete the task.
To level resources in the current project:
- On the Allocation tab, in the Tools group, click Level Resources. The Resource Leveller dialog appears.
- Specify the part of the project in which you want to level resources in the Levelling scope group.
- Select the time unit over which you want to level resources in the Granularity field. The smaller the time unit, the more detailed and accurate the resource levelling will be. For example, imagine that a Decorator is scheduled to complete two one day tasks (Paint Ceiling and Paint Floor) in the same day but he has nothing scheduled for the other three days of the week. If you choose a granularity of Week by Week, the resource leveller does not adjust these tasks because the Decorator can fit both tasks into his week. However if you select a granularity of Day by Day, the resource leveller moves one of these tasks onto the following day. If you select Week by Week, but your project is less than a week in length, resources are levelled on a Day by Day basis.
- Select the resource folders or individual resources that you want to level in the Resources to level field.
- Select the Treat folders as normal resources check box if you have chosen to level both a resource folder and the resources that it contains and you do not want demand allocations of the resource folder to be taken into account when the resource leveller calculates whether the allocation of resources in the project exceeds the available number of resources within the folder, or clear the check box if you do want demand allocations to be taken into account in this calculation. Clearing this check box can force scheduled allocations of individual resources to be moved in an undesirable way.
- From the Levelling range group, specify whether you want to level across the whole project or across a specific time period.
- Select the Extend project finish check box if you are happy for the project finish date to be moved forward as a result of the resource levelling, or clear the check box if you do not want the project finish date to be delayed (this may result in some over-allocation remaining, but resources will be levelled as much as possible within the confines of the project start and finish date). This check box always relates to the finish date of the latest task in the entire project, even if you only level the resources in part of a project, for example the current view or branch.
- Specify the types of resource allocation you want to level using the radio buttons in the Levelling options group.
- Specify the way in which you want tasks to be prioritised for resource levelling in the Levelling priority group. Choose a different field from one or more of the dropdowns. For example, if you choose Total Float from the first dropdown and Task Start Date from the second, the tasks will be levelled first according to the amount of total float they have and second according to their start date. Levelling on total float gives the best results, as the tasks with the most leeway are adjusted first.
- Click Level Now to proceed with the resource levelling.
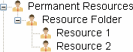
In this example, a resource folder contains two individual resources:
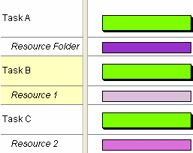
A project contains three tasks that share start and finish dates. A demand allocation of the Resource Folder has been assigned to Task A, a scheduled allocation of Resource 1 has been assigned to Task B and a scheduled allocation of Resource 2 has been assigned to Task C:
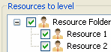
The resource leveller is used to level the resources in the project; both the Resource Folder and Resources 1 and 2 are selected in the Resources to level field:
If the Treat folders as normal resources check box is selected, the resource leveller does not move any of the allocations in the above example, because it does not take the demand allocation of the Resource Folder into account when calculating whether the allocation of resources in the project exceeds the available number of resources within the folder - it calculates that there are two allocations from the folder, and two resources available, meaning that no levelling is required:
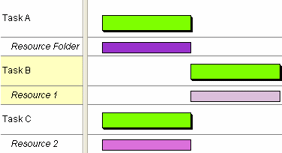
If the Treat folders as normal resources check box is cleared, the resource leveller moves the allocation of Resource 1, because it does take the demand allocation of the Resource Folder into account when calculating whether the allocation of resources in the project exceeds the available number of resources within the folder - it calculates that there are three allocations from the folder, but only two resources available, meaning that levelling is required:
The resource levelling process first undoes the effects of any previous levelling of the selected resources, then reschedules the project or selected tasks to calculate the correct float for each task. Float is one of the main criteria used for levelling tasks, so resource levelling cannot begin until the critical path and float have been calculated for all tasks. The resource leveller then steps through all the selected tasks detecting any over-allocation, resolving over-allocation then recalculating the critical path. This can be a lengthy process if your project is large and has many resource allocations.
Note that you may not be able to subsequently reschedule some of the tasks that are affected by resource levelling, as doing so could move tasks to positions that would result in over-allocation. If you find that this is a problem, you can undo your resource levelling operation, then reschedule the project as normal.
You can configure Asta Powerproject to check the availability of a resource - permanent or consumable - each time you assign a resource to a task. Configuring Asta Powerproject to check resource availability as and when you assign resources helps you to avoid over-allocating resources by assigning them to too many tasks at the same time.
How the resource leveller works
Resource levelling process flowchart
Setting resource levelling options
Setting the levelling priority of tasks