Animating site objects to reflect their movements on site
You can animate site objects, making them move from one position to another in an IFC group model, to reflect the movement of site objects in the real world. For example, if you have a site object representing a site hut that moves from one location to another during the build process, you can animate the site hut site object so that it moves from one location to another in the IFC group model during timeline simulations.
To animate a site object, you configure an 'action' for it, which has a start point and an end point, and associate the action with a task in the project. When a timeline simulation reaches the start of a task that is associated with an action, the site object starts moving from the action's start point, and continues moving in a straight line for the duration of the task. When the timeline simulation reaches the end of the task, the site object finishes moving, ending up positioned at the action's end point. For example, you could configure an action for a 'site hut' site object that moves it from one corner of a building to another, and associate the action with a 'Move Site Hut' task.
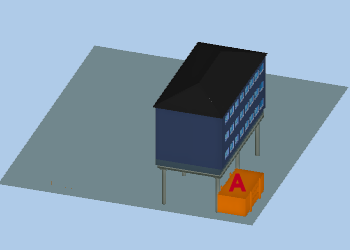
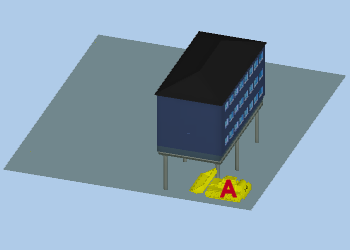
The following illustration shows a 'site hut' site object, positioned at one corner of a building - position 'A':
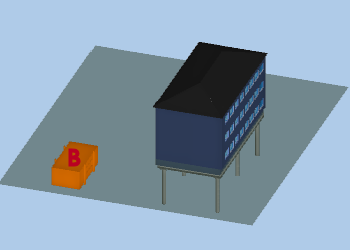
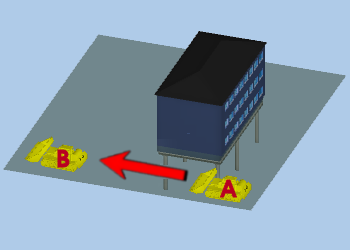
At some point during the project, the site hut may need to be moved from its initial position to a different position - position 'B':
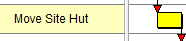
To reflect this in timeline simulations, you would configure an action for the site hut to move it from position 'A' to position 'B', and associate this action with a 'Move Site Hut' task with an appropriate duration:
Position 'A' would be the action's start point and position 'B' would be its end point. The action is illustrated by the red arrow below:
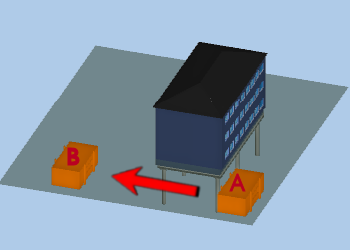
In a timeline simulation, when the 'Move Site Hut' task is encountered, the action will be carried out and the site hut will be moved from position 'A' to position 'B'. The movement will take as long as it takes the timeline simulation to run through the 'Move Site Hut' task, from start to finish.
Site object actions are not restricted to horizontal and vertical movements; you can also configure actions that animate site objects by rotating them, tilting them, or snapping them to a particular surface. For example, you could configure an action for a 'tower crane' site object that rotates it by 90 degrees, and associate the action with a 'Move Crane' task.
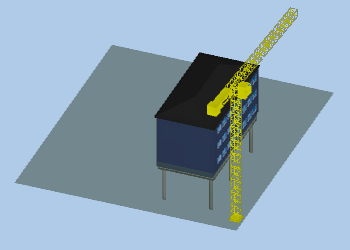
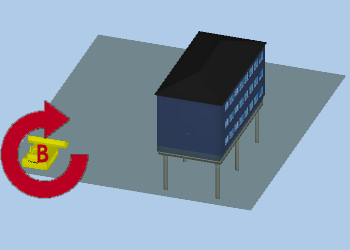
The following illustration shows a 'tower crane' site object, positioned at one corner of a building and pointing along one edge of the building:
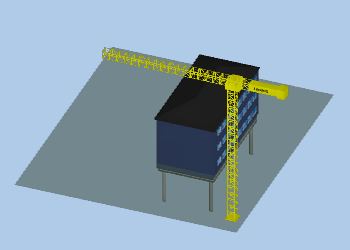
At some point during the project, the tower crane may need to be rotated from its initial position to point along a different edge of the building:
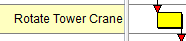
To reflect this in timeline simulations, you would configure an action for the tower crane to rotate it from its initial position by 90 degrees, and associate this action with a 'Rotate Tower Crane' task with an appropriate duration:
The crane's initial orientation would be the action's start point and its rotated orientation would be its end point. The action is illustrated by the red arrow below:
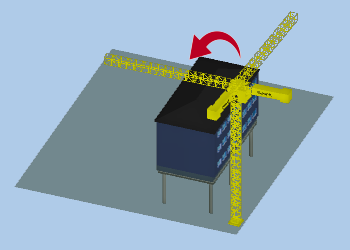
In a timeline simulation, when the 'Rotate Tower Crane' task is encountered, the action will be carried out and the tower crane will be rotated from its start point orientation to its end point orientation. The rotation will take as long as it takes the timeline simulation to run through the 'Rotate Tower Crane' task, from start to finish.
You can animate more than one site object at the same time, by defining actions for multiple site objects at the same time. This may be useful if, for example, you have two adjoining site huts or a series of linked hoardings that need to be moved from one part of a site to another at the same time.
If you need a site object to follow a path that is more complex than a straight line, you need to set up more than one action for the site object and associate each action with a separate task. For example, if you needed a 'site hut' site object to move from one corner of a building to a diagonally-opposite corner, you could configure two actions for the site hut:
- One action to move it along one side of the building, associated with a 'Move Site Hut A' task.
- A second action to move it along a second side of the building, with a start point identical to the first action's end point, associated with a 'Move Site Hut B' task that starts immediately after the 'Move Site Hut A' task finishes.
It is possible to achieve this movement with a single action, but it would result in the site object travelling through the building rather than around its perimeter, which would be unrealistic. There is no limit to the number of actions that you can configure for a site object, so you can represent quite complex paths of site object movement.
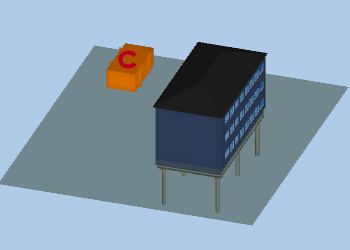
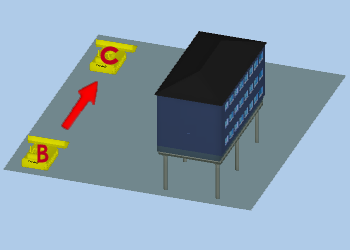
The following illustration shows a 'site hut' site object, positioned at one corner of a building - position 'A':
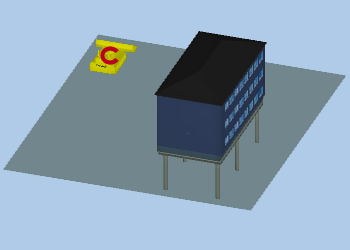
At some point during the project, the site hut may need to be moved from its initial position to a different position - position 'C':
If you configured a single action to reflect this movement, the action would cause the site hut to travel through the building, rather than around its perimeter:
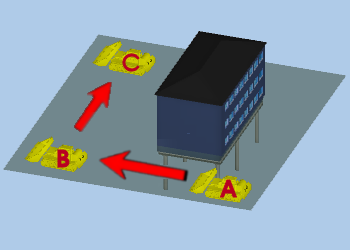
To avoid this, you could configure two actions:
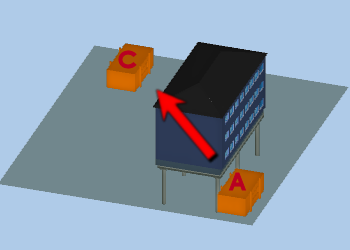
- An action to move the site hut along one side of the building - from position 'A' to position 'B', associated with a 'Move Site Hut A' task. This action would have a start point of position 'A' and an end point of position 'B':

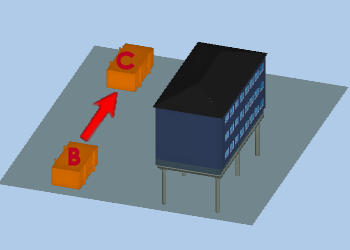
- An action to move the site hut along a second side - from position 'B' to position 'C', associated with a 'Move Site Hut B' task. This action would have a start point of position 'B' and an end point of position 'C':
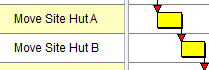
The tasks associated with the two actions might look like this:
In a timeline simulation:
- When the 'Move Site Hut A' task is encountered, the first action will be carried out and the site hut will be moved from position 'A' to position 'B'. The movement will take as long as it takes the timeline simulation to run through the 'Move Site Hut A' task, from start to finish.
- When the 'Move Site Hut B' task is encountered, the second action will be carried out and the site hut will be moved from position 'B' to position 'C'. The movement will take as long as it takes the timeline simulation to run through the 'Move Site Hut B' task, from start to finish.
The following illustration shows a 'digger' site object, positioned at one corner of a building - position 'A':
At some point during the project, the digger may need to be moved from its initial position to a different position - position 'C':
You could animate the digger using two actions, as in the above example: one to move the digger along one side of the building - from position 'A' to position 'B' - and another to move it along a second side - from position 'B' to position 'C':
However, if you animated the digger using just these two actions, it would travel from position 'B' to position 'C' sideways, which would not be realistic. To avoid this, you could configure an extra action that rotates the digger by 90 degrees when it reaches position 'B'. The three actions would therefore be :
- An action to move the digger from position 'A' to position 'B', associated with a 'Move Digger A' task. This action would have a start point of position 'A' and an end point of position 'B':
- An action to rotate the digger at position 'B' by 90 degrees, associated with a 'Rotate Digger' task. This action would have a start point of position 'B' and an end point of the digger at position 'B', but rotated by 90 degrees:
- An action to move the digger from position 'B' to position 'C', associated with a 'Move Digger B' task. This action would have a start point of position 'B' and an end point of position 'C':
The tasks associated with the three actions might look like this:
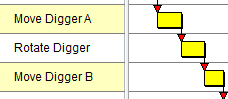
In a timeline simulation:
- When the 'Move Digger A' task is encountered, the first action will be carried out and the digger will be moved from position 'A' to position 'B'. The movement will take as long as it takes the timeline simulation to run through the 'Move Digger A' task, from start to finish.
- When the 'Rotate Digger' task is encountered, the second action will be carried out and the digger will be rotated by 90 degrees. The rotation will take as long as it takes the timeline simulation to run through the 'Rotate Digger' task, from start to finish.
- When the 'Move Digger B' task is encountered, the third action will be carried out and the digger will be moved from position 'B' to position 'C'. The movement will take as long as it takes the timeline simulation to run through the 'Move Digger B' task, from start to finish.
It is also possible to associate a series of actions with a single task, rather than having the create one task per action, by specifying when each action starts and finishes in relation to the duration of a task.
You can associate an action with more than one task in a project. This can be useful if a site object has to carry out the same action - or series of actions - more than once, at different times during a project. For example, if you configure two actions that move a 'digger' site object from one location to another then reverse it back again, and you need this movement to occur twice, at different times, during a project, you can associate each action with more than one task. Each time any task that has an associated action is encountered during a timeline simulation, the digger will move.
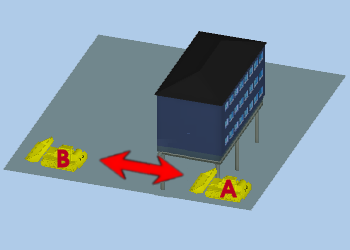
The following illustration shows a 'digger' site object, positioned at one corner of a building - position 'A':
At two different points during the project, the digger may need to be moved from its initial position to a different position - position 'B' - then moved back to its initial position:
You could animate the digger using the following two actions:
- One action to move it from position 'A' to position 'B'. This action would have a start point of position 'A' and an end point of position 'B':
- A second action to move it, in reverse, from position 'B' to position 'A'. This action would have a start point of position 'B' and an end point of position 'A':

These actions each could be associated with two different tasks - the first action could be associated with two 'Move Digger Forward' tasks, and the second with two 'Reverse Digger' tasks - that take place at different points during the project:
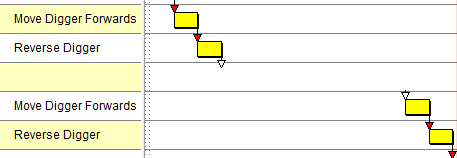
In a timeline simulation:
- When the first 'Move Digger Forwards' task is encountered, the first action will be carried out and the digger will be moved from position 'A' to position 'B'. The movement will take as long as it takes the timeline simulation to run through the first 'Move Digger Forwards' task, from start to finish.
- When the first 'Reverse Digger' task is encountered, the second action will be carried out and the digger will be reversed from position 'B' to position 'A'. The movement will take as long as it takes the timeline simulation to run through the first 'Reverse Digger' task, from start to finish.
- When the second 'Move Digger Forwards' task is encountered, the first action will be carried out again and the digger will be moved from position 'A' to position 'B'. The movement will take as long as it takes the timeline simulation to run through the second 'Move Digger Forwards' task, from start to finish.
- When the second 'Reverse Digger' task is encountered, the second action will be carried out again and the digger will be reversed from position 'B' to position 'A'. The movement will take as long as it takes the timeline simulation to run through the second 'Reverse Digger' task, from start to finish.
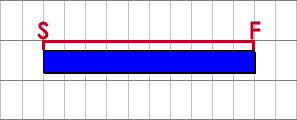
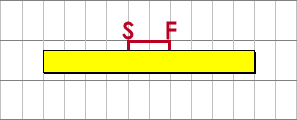
By default, as described in the examples above, site object actions start at the start of the task with which they are associated, and finish at the end of the task. This is illustrated below, where a site object action is represented by a red line above a task, with 'S' indicating the start of the action and 'F' indicating the finish:
However, you can specify that a site object action takes up only a percentage of the associated task's duration, by specifying start and finish percentages for the action. For example, you could specify that:
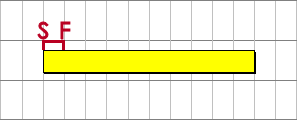
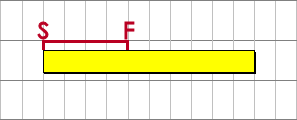
- A site object action starts at the start of the associated task, and finishes when 10% of the task's duration has been completed. This would mean that the site object action took up the first 10% of the task's duration:
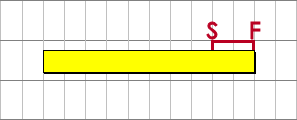
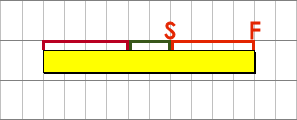
- A site object action starts after 80% of the associated task's duration has been completed, and finishes when 100% of the task's duration has been completed. This would mean that the site object action took up the last 20% of the task's duration:
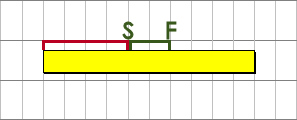
- A site object action starts after 40% of the associated task's duration has been completed, and finishes when 60% of the task's duration has been completed. This would mean that the site object action took up 20% of the task's duration, in the middle of the task:
Being able to specify when actions start and finish in relation to the duration of a task also enables you to associate a series of actions representing complex movement with a single task, rather than having to create a different task for each action in the series.
You could create three actions to animate a digger and associate them all with the same task:
- An action to move the digger from position 'A' to position 'B', associated with between 0% and 40% of a 'Move Digger' task. This action would have a start point of position 'A' and an end point of position 'B':
- An action to rotate the digger at position 'B' by 90 degrees, associated with between 41% and 60% of the same 'Move Digger' task. This action would have a start point of position 'B' and an end point of the digger at position 'B', but rotated by 90 degrees:
- An action to move the digger from position 'B' to position 'C', associated with between 61% and 100% of the same 'Move Digger' task. This action would have a start point of position 'B' and an end point of position 'C':
The single task associated with the three actions might look like this:

In a timeline simulation:
- When the 'Move Digger' task is encountered, the first action will be carried out and the digger will be moved from position 'A' to position 'B'. The movement will take as long as it takes the timeline simulation to run through the 'Move Digger' task, from 0% to 40%.
- When the 'Move Digger' task reaches 41%, the second action will be carried out and the digger will be rotated by 90 degrees. The rotation will take as long as it takes the timeline simulation to run through the 'Move Digger' task, from 41% to 60%.
- When the 'Move Digger' task reaches 61%, the third action will be carried out and the digger will be moved from position 'B' to position 'C'. The movement will take as long as it takes the timeline simulation to run through the 'Move Digger' task, from 61% to 100%.
To animate a site object to reflect its movements on site:
- Display the IFC group model of which the site object is a part in the IFC Model pane.
- If the tasks that you want to associate with the actions you are going to create do not already exist in the project, create them - giving them usefully descriptive names - and, if possible, ensure that they are displayed in the current view. If the tasks already exist in the project, display them in the current view, if possible.
It is possible to create these tasks after creating the actions with which they will be associated, but it is easier to create the tasks beforehand. - On the 4D tab, in the Model group, click Model Properties. The IFC Group Model Properties dialog appears.
- Click the Site Objects tab.
- Select the site object - or site objects - that you want to animate in the grid on the tab and click Movements. The Site Object Actions dialog appears. This dialog displays two grids. The grid on the left lists the actions that are configured for the selected site object(s). If you select one or more actions in the grid on the left, the grid on the right lists any tasks that are associated with the selected actions.
- Create a new action - a new straight-line movement or a rotation, for example - for the selected site object(s) in one of the following ways:
- To create an action that has no relation to any other actions, click the Add New button beneath the left grid and select Add New Action for <site object name>. The new action appears in the left grid. The start and end points of the new action are both set to the site object's initial position. Use this option to create actions for site objects that have a single movement, or to create the first action in a series of sequential actions.
- To create an action that should take place before an existing action, select the action before which the new action should take place in the left grid, click Add New, and select Add Prior Action(s). The new action appears in the left grid. The start and end points of the new action are both set to the start point of the existing action that you selected in the grid. Use this option to create actions for site objects in a series of sequential actions.
- To create an action that should take place after an existing action, select the action after which the new action should take place in the left grid, click Add New, and select Add Subsequent Action(s). The new action appears in the left grid. The start and end points of the new action are both set to the end point of the existing action that you selected in the grid. Use this option to create actions for site objects in a series of sequential actions.
- To create an action that is the direct opposite of an existing action, select the action of which the new action should be an opposite in the left grid, click Add New, and select Add Reverse Action(s). The new action appears in the left grid. The start point of the new action is set to the end point of the existing action that you selected, and the end point of the new action is set to the start point of the existing action. Use this option to create actions such as a lorry - having moved from one point to another - reversing back to its initial position.
- Click the new action twice in the Name column of the left grid to edit its name. Give the action a descriptive name that will enable you to identify the action it describes, for example 'Move Lorry Left', or 'Rotate Crane Right'.
Site object actions are ordered alphanumerically by name in the Site Object Actions dialog. If you want a series of actions to appear in the order in which they are carried out, give the actions names that will make the actions appear in the correct order, for example 'Move Tower Crane.1', 'Move Tower Crane.2', 'Move Tower Crane.3', and so on; or '1 Move Digger Forwards', '2 Rotate Digger', '3 Move Digger Left' etc. - You now need to set the start and end points of the new action - the points at which the site object is located at the start and end of the action:
- To set the start point of the action, select the new action in the left grid and click Set Start. The site object is moved automatically to the current start point and the Site Object Action - Set Start Position dialog appears. The positioning options are the same as those available when you set the initial position of a site object, except you cannot change the site object's size and there is an additional Set other end too check box. Use the controls on the dialog to set the start position of the site object and click OK.
You should not need to set the start point of 'new', 'subsequent' or 'reverse' actions, as these should be set correctly automatically - although you can change the start points of these types of action if you wish.
In some situations - for example when an action does not start with the site object at its initial position and you are not creating a 'new', 'subsequent' or 'reverse' action - you may find it helpful to set the end point to be temporarily the same as the start point that you set. To do this, select the Set other end too check box before clicking OK. If you do this, the site object will be moved automatically to the action's start point when you subsequently click Set End, making it easy for you to set an end point in relation to the start point. - To set the end point of the action, select the new action in the left grid and click Set End. The site object is moved automatically to the current end point and the Site Object Action - Set End Position dialog appears. The positioning options are the same as those available when you set the initial position of a site object, except you cannot change the site object's size and there is an additional Set other end too check box. Use the controls on the dialog to set the end position of the site object and click OK.
You should not need to set the end point of 'prior' or 'reverse' actions, as these should be set correctly automatically - although you can change the end points of these types of action if you wish.
In some situations - for example when an action does not start with the site object at its initial position and you are not creating a 'new', 'subsequent' or 'reverse' action - you may find it helpful to set the start point to be temporarily the same as the end point that you set. To do this, select the Set other end too check box before clicking OK. If you do this, the site object will be moved automatically to the action's end point when you subsequently click Set Start, making it easy for you to set a start point in relation to the end point.
- To set the start point of the action, select the new action in the left grid and click Set Start. The site object is moved automatically to the current start point and the Site Object Action - Set Start Position dialog appears. The positioning options are the same as those available when you set the initial position of a site object, except you cannot change the site object's size and there is an additional Set other end too check box. Use the controls on the dialog to set the start position of the site object and click OK.
- To remove an action from the list, select the action in the left pane and click Delete.
- Once you have set the start and end points of an action, select the action in the left grid and click Preview to view the action's effect on the site object. The site object moves in the IFC Model pane according to the action then returns to its initial position. If you are not happy with the effect of the action, edit the action's start and end points then preview the action again to make sure you are happy with it.
- Once you are happy with the action's start and end points, you need to associate the action with one or more tasks in the project. You can associate the action with existing tasks, or create a new task then associate it with the action:
- To associate the action with an existing task, select the action in the left grid, click the task in the bar chart to select it, then click Add Selected Tasks From View in the Site Object Actions dialog. If you need to associate the action with more than one task, repeat this step, selecting the task from a different subchart or summary group if required. You can associate an action with more than one task in one step, by CTRL-clicking the tasks then clicking Add Selected Tasks from View. Details of the task(s) appear in the right grid of the Site Object Actions dialog.
- To create a new task and associate it with the action, select the action in the left grid, draw a task in the bar chart and give it a name, then click Add Selected Tasks From View. If you need to associate the action with more than one new task, repeat this step. Details of the task(s) appear in the right grid of the Site Object Actions dialog.
You can associate more than one action with the same task. For example, if you have configured three actions to animate a digger - to move it, then rotate it, then move it again - you can associate all three actions with the same task. To do this, hold down SHIFT or CTRL when selecting the actions in the left grid, click the task in the bar chart to select it, then click Add Selected Tasks From View. If you associate more than one action with a task, you must edit the task's properties and specify start and finish percentages for each action, as described below. - If you associate an action with the wrong task, select the action in the left pane of the Site Object Actions dialog and select the task in the right pane, then click Remove. The task is removed from the list of tasks in the right pane, but the task itself is not deleted from the project.
- Click Close.
Specifying that actions take up only a percentage of a task's duration
If you have associated only one action with a task, you do not need to specify the percentage of the task's duration that the action takes up, unless you want the action to take up less than 100% of the duration; the action takes up 100% of the task's duration by default, so it will start at the start of the task, and finish at the end of the task.
If you have associated a single action with a task and you want the action to take up less than 100% of the task's duration, or if you have associated more than one action with the same task, you need to edit the task's properties and specify start and finish percentages for the actions that are associated with it.
To specify start and finish percentages for a single action that is associated with a task:
- In the bar chart, right-click the task with which the action has been associated and select Properties. The Bar and Task Properties dialog appears.
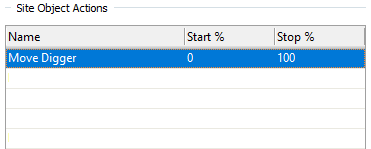
- In the left pane of the Task tab, click 4D. The Site Object Actions grid displays the site object action that has been associated with the task. Initially, the action has a start percentage of 0% and a finish percentage of 100%, meaning that the action takes up the entire duration of the task:
- Click in the Start % and Stop % columns and specify the percentage of the task's duration at which the action should start and finish. For example:
- To specify that the action takes up the first 10% of the task's duration, enter '0' in the Start % column and '10' in the Stop % column.
- To specify that the action takes up the last 20% of the task's duration, enter '81' in the Start % column and '100' in the Stop % column.
- To specify that the action takes up the middle 40% of the task's duration, enter '31' in the Start % column and '70' in the Stop % column.
- Click Close.
To specify start and finish percentages for actions when more than one action is associated with a task:
- In the bar chart, right-click the task with which the actions have been associated and select Properties. The Bar and Task Properties dialog appears.
- In the left pane of the Task tab, click 4D. The Site Object Actions grid displays the site object actions that have been associated with the task. Initially, each action has a start percentage of 0% and a finish percentage of 100%, meaning that each action takes up the entire duration of the task:
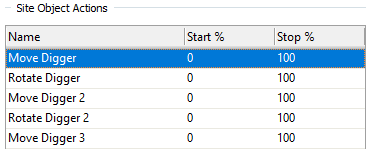
If you were to leave these percentages set to their default values, the actions would conflict with each other and only the first action would appear in timeline simulations. You need to specify appropriate start and finish percentages for each action, so that the actions take place in sequence.
The actions are ordered initally according to the date and time they were created, with the action that was created first appearing at the top of the list and the action that was created last appearing at the bottom. This order does not necessarily reflect the order in which the actions take place. You can sort the actions by name, start % or stop % by clicking the heading of the appropriate column. If you have named a series of actions so that they appear in the correct order on the SIte Object Actions dialog, sorting the actions by name on this dialog will make them appear in the same order on both dialogs. - For each action, click in the Start % and Stop % columns and specify the percentage of the task's duration at which the action should start and finish. Ensure that the percentages will make the actions follow on in a sequence and that they do not overlap.
The following illustration shows a series of percentages that would work well, as each action starts immediately after the end of the previous action: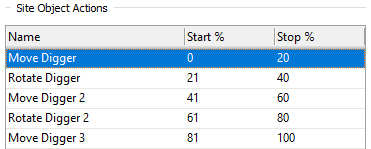
The following illustration shows a series of percentages that would not work well, as some percentages - highlighted in red - overlap: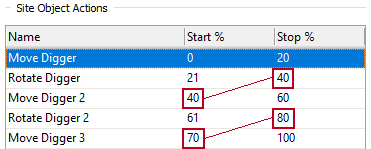
- Click Close.
Adding site objects to a 3D model
Positioning and resizing site objects