Aligning the 3D models in an IFC group model
Sometimes you may find that the 3D models that make up an IFC group model are not aligned correctly when they are overlaid and viewed as a single entity. This is caused by the coordinates of the various 3D models being set inconsistently in the application that was used to create the IFC files.
The IFC group model shown below comprises two individual 3D models. In the illustration on the left, the two 3D models are not aligned with each other correctly; in the illustration on the right, the two 3D models have been realigned with each other.
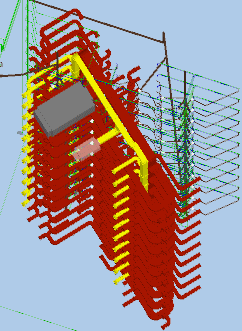
|
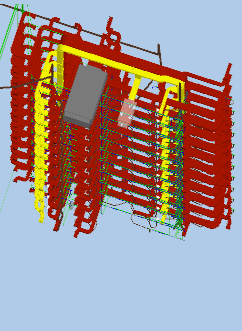
|
One way of aligning the 3D models in an IFC group model is by editing the original files in the source application that was used to create the models and amending their coordinates to ensure that they are consistent. Alternatively, you can align the 3D models in an IFC group model within Asta Powerproject 4D, using either of the methods described below. This saves you from having to go back to the person who provided you with a 3D model and asking them to edit it for you.
Aligning the 3D models in an IFC group model by entering different alignment values
To align the 3D models in an IFC group model by entering different alignment values:
- Display the IFC group model in the IFC Model pane.
- Launch Library Explorer and click IFC Group Model in the left pane.
- Right-click the IFC group model that you want to edit in the right pane of Library Explorer and select Properties from the menu that appears. The IFC Group Model Properties dialog appears.
You can also access the IFC Group Model Properties dialog by selecting an IFC group model on the 4D tab of the Backstage view and clicking Model Properties. - Click the Alignment tab. The Combined models field displays the names of the individual 3D models within the IFC group model.
- Select the 3D model that you want to realign. If more than one 3D model is out of alignment and you want to realign them in the same way, you can CTRL-click the 3D models to select more than one at the same time.
- Click away from the dialog and arrange the Asta Powerproject 4D window so that you can see the IFC group model in the IFC Model pane, before clicking back into the dialog.
- Enter metre values in the Alignment X, Alignment Y and Alignment Z fields, and an angle in the Alignment angle field, to realign the selected 3D model(s). If you display the IFC Model pane behind the dialog, you can see the results of your changes instantly as you enter values into a field and click away from it.
- Click Close when the 3D models in the IFC group model are aligned with each other.
Aligning the 3D models in an IFC group model by dragging them in the IFC Model pane
To align the 3D models in an IFC group model by clicking and dragging them in the IFC Model pane:
- Display the IFC group model in the IFC Model pane.
- Display the IFC group model in orthogonal mode. You can align 3D models manually in perspective mode, but it is easier to do it in orthogonal mode.
- Launch Library Explorer and click IFC Group Model in the left pane.
- Right-click the IFC group model that you want to edit in the right pane of Library Explorer and select Properties from the menu that appears. The IFC Group Model Properties dialog appears.
You can also access the IFC Group Model Properties dialog by selecting an IFC group model on the 4D tab of the Backstage view and clicking Model Properties. - Click the Alignment tab. The Combined models field displays the names of the individual 3D models within the IFC group model.
- Select the 3D model that you want to realign. If more than one 3D model is out of alignment and you want to realign them in the same way, you can CTRL-click the 3D models to select more than one at the same time.
- Click away from the dialog and arrange the Asta Powerproject 4D window so that you can see the IFC group model in the IFC Model pane, before clicking back into the dialog.
- Click the Manual model alignment radio button that reflects the direction in which you want to click and drag the selected 3D model(s). Click Vertical to click and drag up or down vertically; click Horizontal to click and drag around the horizontal plane (essentially, forwards and backwards; left and right); if you want to adjust their rotation, click Rotate.
Depending on your viewpoint, it may appear that you are able to click and drag 3D models in any direction when Horizontal is clicked. If you find this confusing, it may help to view the IFC group model either directly from above, or directly from the side. Viewing a group model in this way will make it easier to see that you are moving the 3D model in one plane only - forwards and backwards; left and right - and that you are not able to move it up and down. - In the IFC Model pane, click and drag the selected 3D model(s) as required to align them. The alignment values on the Alignment tab of the IFC Model Properties dialog are updated as you drag. If you are rotating, the rotation pivots around the point at which you click the mouse.
- Release the mouse button when the 3D model(s) appear in the correct place.
- Click another Manual model alignment radio button and click and drag the 3D model(s) in this direction if required.
- When you have finished aligning the 3D model(s) manually, click the Disabled radio button.
- Click Close when the 3D models in the IFC group model are aligned with each other.
Linking related 3D models using IFC group models