Creating a project schedule automatically from a 3D model
You can create a project schedule automatically from one or more 3D models, or from one or more IFC group models. This provides you with a quick and easy way of constructing a schedule, based on the properties of the 3D models themselves, and is particularly useful if you are starting a new project with one or more 3D models that contain a substantial amount of information from the outset that is relevant to the schedule.
Although it is possible to construct a project schedule from a basic 3D model, the value of the schedule that can be created from a basic model is likely to be relatively low.
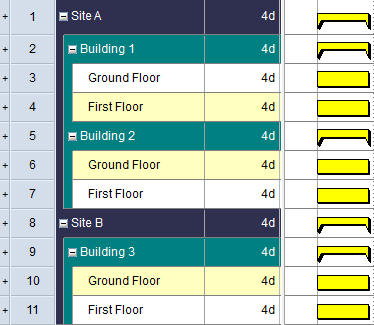
When you create a project schedule automatically from one or more 3D models, you specify the properties within the 3D models on which you want to base the project hierarchy. For example, you could base the hierarchy on the 'Site', 'Building' and 'BuildingStorey' properties. If you did this, the resulting hierarchy would have three levels: one for each of the selected properties. The top two levels would be represented by summary tasks, while the lowest level would be represented by individual tasks, which would be associated with the 3D objects in the 3D models using IFC product searches which are created by the wizard:
At the same time as creating the project hierarchy, you can choose to create one or more code libraries, containing code library entries that correspond to the values contained within specific 3D model properties. If you choose to do this, the code library entries are assigned to the relevant tasks at the lowest level of the hierarchy. The creation of code libraries is optional, but it does provide you with a powerful way of making the most of the data that is contained within your 3D models.
To create a project schedule automatically from a 3D model:
- Create a blank project in Asta Powerproject 4D.
- Associate the 3D models from which you want to create the schedule with the project. You can associate a single 3D model with the project, or multiple models.
- If appropriate, link any related 3D models into an IFC group model.
- Open one of the 3D models or IFC group models so that it is displayed in the IFC Model pane.
- On the 4D tab, in the Project group, click Create Schedule. The first screen of the Create Schedule wizard appears. You use this screen to specify the 3D models or IFC group models from which you want to create a schedule.
- Use the radio buttons on the left side of the wizard to specify which 3D models to display in the right-hand pane:
- Click Show model groups to display all the IFC group models that are associated with the project.
- Click Active model to display the 3D model or IFC group model that is currently displayed in the IFC Model pane.
- Click Show models to display all the 3D models that are associated with the project.
- Click Show all to display all the 3D models and IFC group models that are associated with the project.
- Models of the selected type are displayed in the right-hand pane. Select the check box to the left of the 3D models or IFC group models from which to create a schedule. You can select a single 3D model or IFC group model, or multiple models.
Do not select any 3D models that represent site objects, as these are not suitable for creating project schedules. - Click Next. The second screen of the wizard appears. You use this screen to specify the properties from within the selected models from which to construct the hierarchy of the schedule.
The properties that exist within the selected models are displayed in the left-hand pane. You specify how to construct the hierarchy of the project schedule by copying properties from the left-hand pane to the right-hand pane. For example, if you wanted to structure the hierarchy by 'Site', 'Building' and 'BuildingStorey', you would copy these three properties from the left-hand pane to the right-hand pane, in that order.
The names of the summary tasks, and of the tasks at the lowest level, will be taken from the property that corresponds to that level. For example, if you base the lowest level of the hierarchy on the 'BuildingStorey' property, the tasks at that level will be given the names of the building storeys that exist in the 3D models. - You can examine individual properties to determine whether they are suitable for use in constructing the project hierarchy. To examine a property, select it in the left-hand pane and click
 . A summary of the data contained within the selected property is displayed in the Examine property field. If a property has a large proportion of blank entries, it is not a good choice for use in constructing the project hierarchy.
 - Once you have determined that a property is suitable for use in constructing the project hierarchy, select it in the left-hand pane and click
 to copy it into the right-hand pane. You can select any number of properties; the more properties you select, the more levels the project schedule hierarchy will have.
If you have selected a property by accident, select it in the right-hand pane and click to remove it from that pane.
 - The property at the top of the list will be the top level of the hierarchy; the property at the bottom will be the lowest level - represented by individual tasks. Specify the order in which the selected properties should be used to construct the hierarchy by selecting a property in the right-hand pane and clicking
 and
and  to change its position in the list.
 - In the Property for activity name field, select the property from which to obtain the names of the individual tasks that will be created to represent the lowest level of the project hierarchy. Either select a specific property, or select 'Last property in hierarchy' to name tasks using the property that corresponds to the lowest level of the hierarchy - 'BuildingStory' in the example above.
- In the Text for missing values field, enter a name to apply to any tasks for which no data exists in the selected property, or in which the property does not exist.
- To preview how the hierarchical structure of the project will appear if built with the specified properties, click
 . A preview of the hierarchy is displayed in the Examine property field. You can change the order of the items that will appear in the hierarchy on the next screen of the wizard.
 - When you are happy with the basic hierarchical structure of the project, click Next. The third screen of the wizard, which displays the hierarchical structure of the project, appears. Summaries and tasks are created by default in alphanumerical order at each level of the hierarchy. You can use this screen to change the order of the items that will appear in the hierarchy.
- Navigate through the hierarchical structure. If you want to change the position of an item in the hierarchy, select the item and click or to move it up or down. Note that you can change the order of items within their parent summary task, but you can cannot move items from one summary task to another.
If you make a mistake when changing the hierarchical structure, click to reset the hierarchy back to its original structure.
 - When you are happy with the order of the items in the hierarchy, click Next. The fourth screen of the wizard appears. You use this screen to specify the properties from within the selected models from which to construct a series of code libraries and code library entries.
The properties that exist within the selected models are displayed in the left-hand pane. You specify the properties from which to construct code libraries and code library entries by copying properties from the left-hand pane to the upper right-hand pane. For example, if you wanted to create a code library based on the 'Material' property, containing a code library entry for each unique 'Material' property that exists in the selected models, you would copy the 'Material' property from the left-hand pane to the upper right-hand pane.
If you do this, the individual 'Material' code library entries will be assigned to the tasks at the lowest level of the hierarchy that are associated with one or more 3D objects that have that 'Material' property. For example, a 'Birch' code library entry will be assigned to those tasks that are associated with one or more 3D objects that have 'Birch' specified in the 'Material' property.
Constructing code libraries and code library entries is an optional step. If you do not want to do this, move directly to step 20. - You can examine individual properties to determine whether they are suitable for use in constructing code libraries and code library entries. To examine a property, select it in the left-hand pane and click . A list of the selected property's unique entries is displayed in the lower right-hand pane.
- Once you have determined that a property is suitable for use in constructing a code library, select it in the left-hand pane and click to copy it into the upper right-hand pane. You can select any number of properties; the more properties you select, the more code libraries the project will have.
If you have selected a property by accident, select it in the upper right-hand pane and click to remove it from that pane. - Click Create. The wizard creates:
- The project hierarchy, based on the properties you selected on the second screen of the wizard, with items appearing in the order you specified on the third screen.
- IFC product searches, matching the summary tasks and tasks that have been created by the wizard. If the 3D model you used to create the project schedule is updated with additional 3D objects in the future, these new objects will be picked up automatically by the IFC product searches, provided the updated model retains the same coding structure as the original.
- Code libraries and code library entries, based on the properties you selected on the fourth screen of the wizard, with the appropriate code library entries assigned to the tasks at the lowest level of the hierarchy.
- Click Close to close the wizard.
Once you have created the project schedule using the wizard, it is a good idea to check that all of the 3D objects in the 3D model have been associated with tasks. If you identify any 3D objects in the model that have not been associated with tasks, you can then adjust your schedule to ensure that they are included. You can then develop the schedule - specifying the duration of tasks, linking tasks, etc - as required.
Associating 3D models with projects
Linking related 3D models using IFC group models
Ways of associating 3D objects in a 3D model with tasks
Introduction to IFC product searches
Ensuring that all of the 3D objects in a 3D model are associated with tasks