Using Asta Powerproject with NEC contracts
An NEC contract (New Engineering Contract) is a standard form of contract that is used to manage construction and engineering contracts designed to promote collaboration, flexibility, and proactive project management.
NEC contracts are widely used in the UK and internationally, particularly for infrastructure and public-sector projects.
Core features of an NEC contract are:
- An early warning process - parties must notify risks early to reduce cost/time impacts.
- Compensation events - a structured process for time and cost changes.
- Programme requirements - the contractor must regularly submit and update an accepted programme.
- Mutual trust and cooperation.
With an NEC contract, the programme - or project - is a live, contractual document, which must contain the following elements:
- A start date and completion date for the programme.
- Other key programme dates, including the contractor's planned completion date (which may be earlier than the contractual completion date).
- The order and timing of tasks, which show how the works will be carried out, including:
- Logic-linked tasks, showing dependencies between different tasks.
- The sequence of works.
- Start and finish dates for each task.
- A duration for each task.
- Float.
- Time risk allowances, ie an amount of time that is built into a programme to allow for foreseeable risks that have not yet occurred.
- The critical path.
- Access requirements, where access to parts of a site are needed.
- The dates on which a contractor requires information, drawings and approvals from the project manager or client.
- Procurement tasks, such as the ordering and delivery of materials and plant.
- Method statements, ie a statement of how the contractor plans to carry out the work.
- An accepted programme - ie a baseline - against which compensation events can be assessed.
Creating the key elements of an NEC-compliant programme in Asta Powerproject
NEC-compliant programmes must include the start date and completion date of the programme.
By default, the start date of a project is the day on which it is created, and the finish date
If you specify a different start date, this is known as an 'imposed start' date; if you specify a different finish date, this is known as an 'imposed finish' date. You cannot specify both an imposed start date and an imposed finish date
It is good practice to use a start milestone to represent the start date of the programme, and a finish milestone to represent its completion date.
More information on specifying a start and finish date for a project
Use milestones to represent key dates in a programme, such as delivery dates and deadlines. Use start milestones to represent key dates on which certain activities begin, and finish milestones to represent key dates on which certain activities end.
If key programme dates cannot start before a certain date, or must be completed by a certain date, apply start or finish flags - constraints - to the milestones to constrain them to the required dates.
Once you have created milestones to represent your key dates, it is good practice to create a 'Key Dates' hammock and add your key dates milestones to the hammock. This enables you to view all key dates in a single view, giving you an instant overview of how a programme is progressing.
More information on working with milestones
You must plan an NEC-compliant programme so that it represents all of the tasks - or activities - that must be carried out, with dependencies between different tasks shown using links. Ensure that you do the following when creating the tasks in a programme:
- Use logic links to show dependencies between different tasks. An NEC-compliant schedule should contain no unlinked tasks.
- Ensure that the tasks you create represent the complete sequence of works, from start to finish.
- Apply suitable start and finish dates to each task. Once you reschedule the programme, the start and finish dates of tasks may change, depending on elements of the programme such as logic links, constraints and calendars.
- Apply a realistic duration to each task.
If your projects contain networks of tasks that are similar to each other, you can save time in planning projects by creating 'task pools' - also known as 'fragnets' and 'templates'. Task pools are networks of tasks that you can use as templates for the creation of multiple, similar task networks within a project. You create task pools by planning the tasks that are required in a chart or summary group, then creating a task pool from the chart or summary group - the task pool is a copy of the chart or summary group.
More information on creating bars and tasks
More information on linking tasks
More information on rescheduling
More information on using task pools as templates for networks of tasks
You must display float in NEC-compliant programmes. Float, or 'slack', is calculated during a reschedule. It indicates the amount of time by which a task can be delayed without delaying other tasks or the project finish date. Tasks with float give you some room for manoeuvre because they can act as a buffer, protecting the overall project plan from any errors that were made in the original task duration estimates. It is risky to plan a project without any float.
If you are working with an NEC-compliant project, you must show a project's terminal float. 'Terminal float' refers to the total float available for a project, which is the amount of time that the project can slip without affecting the planned completion date. You can use a buffer task to do this, by inserting a buffer task at the end of a schedule to manage this terminal float. The buffer task absorbs delays and protects the completion date. By managing buffer task effectively, you can ensure that the project stays on track and meets its deadlines.
More information on using a buffer task to manage a project's terminal float
'Time risk allowance' is an amount of time that is built into a programme to allow for foreseeable risks that have not yet occurred. Time risk allowance covers contractor-owned risks, such as lower than expected productivity, minor reworks, weather-related risks and supply chain inefficiencies. It is different to float, and must be shown separately in an NEC-compliant programme.
If a delay occurs that is the contractor's risk, time risk allowance is used up before the completion date of a programme is changed.
If you are working with an NEC-compliant programme, you must specify a time risk allowance for each individual task, and give a justification for the time risk allowance you have specified. You can do this by creating two user-defined fields - one in which you can record the time risk allowance of tasks, and another in which you can record the justification for each time risk allowance - and displaying them in the spreadsheet.
For example, if a task should take 5d, but you think it may take 2d longer if the weather is poor, you would give that task a duration of 7d, and record that 2d of that duration is time risk allowance.
If you have used the 'Construction Template' to create your project, you do not need to create these two user-defined fields, as they will already exist in the project.
If you have not used the 'Construction Template' to create your project, you will need to create these user-defined fields yourself. You must create:
- A bar-level, string-type user-defined field, called 'Time_Risk'. This is the field in which you will record the time risk allowance for each task.
- A bar-level, string-type user-defined field, called 'TRA_Justification'. This is the field in which you will record the justification for the time risk allowance you have specified.
To display the time risk allowance user-defined fields in the spreadsheet:
- Right-click the heading of the spreadsheet column to the left of which you want to insert the 'Time Risk' column, then select Add Column - User Fields - Time_Risk.
The Table Definition Properties dialog may appear automatically once you have selected the field that you want to display. You can use this dialog to configure the new column. If the dialog does appear, click Close to close it. - Right-click the heading of the spreadsheet column to the left of which you want to insert the 'TRA_Justification' column, then select Add Column - User Fields - TRA_Justification.
Again, click Close to close the Table Definition Properties dialog if it appears. The two time risk allowance user-defined fields appear in the spreadsheet: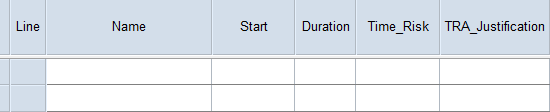
You can now use these spreadsheet columns to record the time risk allowance of each task. This is illustrated below, where three tasks have been given a time risk allowance:
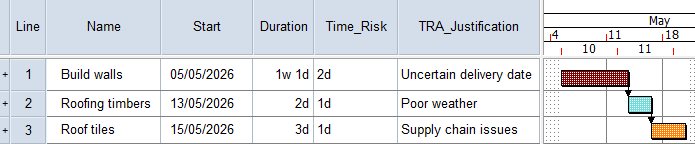
In the above illustration:
- The 'Build Walls' task has a duration of 1w 1d, of which 2d is time risk allowance.
- The 'Roofing timbers' task has a duration of 2d, of which 1d is time risk allowance.
- The 'Roof tiles' task has a duration of 3d, of which 1d is time risk allowance.
It can be useful to view each task's 'non risk duration' - ie its duration with the time risk allowance removed. You can do this by creating a formula that deducts each task's time risk allowance from its duration, and displaying the formula in the spreadsheet.
If you have used the 'Construction Template' to create your project, you do not need to create this formula, as it will already exist in the project.
If you have not used the 'Construction Template' to create your project, you will need to create the following formula, and call it 'Non Risk Duration':
task.duration-(Value(UDF("Time_Risk")))*'1d'
To display the 'Non Risk Duration' formula in the spreadsheet:
- Right-click the heading of the spreadsheet column to the left of which you want to insert the 'Non Risk Duration' column, then select Add Column - Formulae - Non Risk Duration.
The Table Definition Properties dialog may appear automatically once you have selected the field that you want to display. You can use this dialog to configure the new column. If the dialog does appear, click Close to close it. The 'Non Risk Duration' column appears in the spreadsheet, displaying the duration of each task with its time risk allowance removed:
More information on creating user-defined fields for your own use
Tasks without float are critical; if a critical task is delayed, it will delay the project finish date. When a sequence of critical tasks spans the project from start to finish, it is known as the critical path. You must display the critical path in NEC-compliant programmes.
More information on the critical path
More information on rescheduling a project
More information on displaying the critical path in a project
You must include details of access requirements - information on where access to parts of a site are needed - in NEC-compliant programmes. Using Asta Powerproject, you can add such information by:
- Providing links to external documents in which details of access requirements are given.
- Entering notes against tasks.
In an NEC-compliant programme, you must include the dates on which a contractor requires information, drawings and approvals.
Use milestones to represent these dates. Use start milestones to represent dates on which certain activities begin, and finish milestones to represent dates on which certain activities end.
If these dates cannot start before a certain date, or must be completed by a certain date, apply start or finish flags - constraints - to the milestones to constrain them to the required dates.
Once you have created milestones to represent these dates, you can add them to your 'Key Dates' hammock - or to another hammock, if appropriate. This enables you to view all key dates in a single view, giving you an instant overview of how a programme is progressing.
More information on working with milestones
In an NEC-compliant programme, you must include procurement tasks - tasks that represent activities such as the ordering and delivery of materials and plant.
Use milestones to represent these dates. Use start milestones to represent dates on which certain activities begin, and finish milestones to represent dates on which certain activities end.
If these dates cannot start before a certain date, or must be completed by a certain date, apply start or finish flags - constraints - to the milestones to constrain them to the required dates.
Once you have created milestones to represent these dates, you can add them to your 'Key Dates' hammock - or to another hammock, if appropriate. This enables you to view all key dates in a single view, giving you an instant overview of how a programme is progressing.
More information on working with milestones
In an NEC-compliant programme, you must include method statements - a statement of how the contractor plans to carry out the work. Although you do not need to provide a method statement for each individual task, you may want to provide them for some tasks. For example, for an 'Install bridge beams' task, you may want to provide a method statement that describes the lifting method that will be used. Using Asta Powerproject, you can add such information by:
- Providing links to external documents that contain method statements.
- Entering notes against tasks.
Once you have agreed a contract programme, you should create a baseline of it. This baseline of your contract programme can be used on an ongoing basis to show how you are progressing against the agreed contract: if you are asked to add tasks to a programme after the contract has been agreed, you can experiment with 'what if' scenarios to show the effect that this would have on the programme finish date, and then request more time or resources, as appropriate.
A baseline of the agreed contract programme is also essential for assessing 'compensation events' - something that changes the price, completion date, or both, of a programme, because it alters the work that a contractor has to do against what was originally agreed, and which entitles the contractor to compensated in terms of time, money, or both. Compensation events must be assessed against the last accepted programme. In order to be able to assess compensation events accurately, your programme must, of course, have been scheduled and linked correctly.
The following workflow suggests one way of assessing compensation events against the last accepted programme:
- Ensure that your programme is contract-compliant - see the sections above for details of what it must include. If your programme is not compliant, your compensation event assessment may be challenged.
- Create a baseline of the agreed, accepted contract programme. Label the baseline clearly to indicate its purpose. For example, you could give it a description of 'Accepted Programme Rev 3 – 12 Jun 2026'.
- Identify the event that has triggered the compensation event. Common triggers are changes to scope; client delays in providing information; unforeseen physical conditions; and changes to key dates.
- Model the compensation event in your live programme, using tasks, links, resource allocations, calendar exceptions and constraints, etc as appropriate. Ensure that you link the event correctly into other tasks in your programme, with appropriate predecessors and successors. You may choose to create a baseline of your live programme before you do this, to enable you to revert back to this baseline after modelling the compensation event.
- Reschedule the programme.
- Display the baseline of the agreed, accepted contract programme in the bar chart.
- Compare the following elements of the programme to see how they have changed when compared to the baseline:
- The completion date.
- Other key dates.
- The critical path.
- How float has been eroded; if float has been eroded, identify whose responsibility this is.
- Produce evidence to support your claim for compensation. This could be, for example:
- Printouts or PDFs of the Gantt chart before and after the compensation event.
- Tabular reports showing the impact of delays and activity variances against the baseline.
More information on creating baselines
More information on rescheduling a project
More information on displaying baseline information in the bar chart