Printing a border around your output
You can use the options in the Border file group on the Details tab of the Print dialog to select the border file with which you want to print the active view.
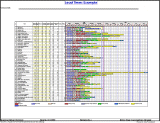
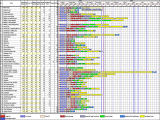
The following illustrations depict a project printed with and without a border:
|
|
|
|
Printed with a border |
Printed without a border |
To select a border, do any of the following:
- Enter a path and file name in the Border file field.
- Drop-down the Border file field to select a border. This field displays the border files that are located in the folder specified in the Border row of the File Locations tab of the Options dialog, and optionally those that are located in the \Borders\ folder within the folder in which Asta Powerproject is installed.
- Click the Browse button
Click the dropdown and select Vision to display the Download From Asta Vision dialog, in which you can download a border that has been uploaded using Asta Vision's Global Files page.
The page sizes of the selected border and of the currently selected printer are displayed. In general, for best results with no distortion from scaling:
- When printing in paginated style, choose a border the same size as the paper on which the output will be printed.
- When printing in tiled style, choose a border the same size as the total number of pages across which the output will be printed.
You can edit the selected border by clicking Edit. Powerdraw is invoked with the selected border open for you to begin your edits. If no border is selected, the Edit button is disabled.
Embedding border files into projects
You can embed border files into a project. Embedding a border file into a project means that the border can always be used during printing even if the original border file itself is not distributed with the project. Note that embedding a border file into a project increases the file size of the project. Once a border has been embedded into a project, it can be deleted subsequently. Embedded borders are listed alphabetically at the top of the Border file field, followed by an alphabetical list of the borders that are available in the default Border files folder.
To embed a border file into a project:
- Access the Details tab of the Print dialog.
- Select a border in the Border file field.
- Click Embed.
To delete an embedded border from a project, select it in the Border file field and click Delete.
Note that you can only embed and delete border files if you have been given the appropriate user access rights.
Printing border file text in a different language
Printing tiled or paginated output