Line of Balance Properties dialog - Drawing Style tab
You use the Drawing Style tab of the Line of Balance Properties dialog to specify appearance settings for Line of Balance graphs. You can specify the way in which the graph is drawn, whether progress is displayed on the graph and the font with which to display text in the graph.
To access the Line of Balance Properties dialog, click Properties in the Line of Balance graph pane.
| Field/Button | Description |
|---|---|
| Join ends |
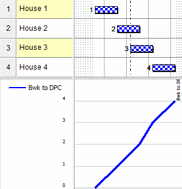
Click this radio button to specify that you want the lines that represent stages in the graph to be displayed as continuous lines, as illustrated below:
|
| One line each task |
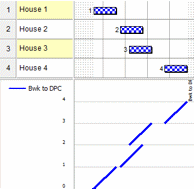
Click this radio button to specify that you want the lines that represent stages in the graph to be displayed as broken lines, with a separate line segment being drawn for each task, as illustrated below:
|
| Solid trapezium |
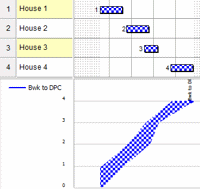
Click this radio button to specify that you want the lines that represent stages in the graph to be displayed as filled trapeziums, with a separate trapezium being drawn for each task, as illustrated below:
|
| Open trapezium |
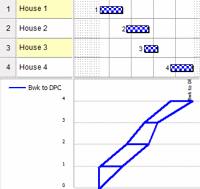
Click this radio button to specify that you want the lines that represent stages in the graph to be displayed as outlined trapeziums, with a separate trapezium being drawn for each task, as illustrated below:
|
| Show progress |
Select this check box to highlight progressed tasks in the Line of Balance graph, or clear the check box to omit progress information from the graph.
The way in which progress is highlighted depends on the line style you choose:
|
| Show discontinuities |
Select this check box to display breaks in the lines that represent stages in the graph where gaps appear for any of the following reasons:
Clear the check box to draw the lines through such gaps as if they did not exist.
The way in which discontinuities are displayed depends on the line style you choose:
|
| Show labels |
Select this check box to display labels that identify stages, gangs or trades in Line of Balance graphs. These labels can help you to differentiate between different build stages, gangs or trades, especially when printing Line of Balance graphs.
If you choose to display labels, they appear at the bottom of each stage in Line of Balance graphs, as illustrated below:
|
| Label |
Select 'From font' to colour labels according to the font settings that you specify on this dialog, or select 'From line' to colour labels according to the fill colour of the corresponding 'stages' code library entries. If you choose to colour labels according to the fill colour of code library entries, the foreground fill colour is used unless this is set to white, in which case the background fill colour is used.
Some colours are more legible than others, so you may need to experiment with the font settings, or with the colours of your 'stages' codes, to make the labels as legible as possible. Darker colours tend to be more legible than lighter colours; it may also help to use a bold font. |
| Line width | Specify the width, in microns, of the lines in the Line of Balance graph. |
| Graph height | Specify the height, in millimetres, of the Line of Balance graph. |
| Use spreadsheet default | Select this check box to display the legend and 'stages' labels in the Line of Balance graph using the default spreadsheet font, or clear the check box to specify a different font. |
| Font | Click this button to select a font other than the default spreadsheet font for use displaying the legend and 'stages' labels in the Line of Balance graph. |
| Background | Specify the colour in which to display the background of the Line of Balance graph. |

How do I...
- Click the Join ends radio button to specify that you want the lines that represent stages in the graph to be displayed as continuous lines.
- Click the One line each task radio button to specify that you want the lines that represent stages in the graph to be displayed as broken lines, with a separate line segment being drawn for each task.
- Click the Solid trapezium radio button to specify that you want the lines that represent stages in the graph to be displayed as filled trapeziums, with a separate trapezium being drawn for each task.
- Click the Open trapezium radio button to specify that you want the lines that represent stages in the graph to be displayed as filled trapeziums, with a separate trapezium being drawn for each task.
Select the Show progress check box to highlight progressed tasks in the Line of Balance graph, or clear the check box to omit progress information from the graph. The way in which progress is highlighted depends on the line style you choose.
Select the Show discontinuities check box to display breaks in the lines that represent stages in the graph where gaps appear for any of the following reasons, or clear the check box to draw the lines through such gaps as if they did not exist:
- Where a 'location' code has not been assigned to a bar or summary task that represents the corresponding unit network.
- Where a 'stages' code has not been assigned to an activity that represents the corresponding stage.
- Where a unit network does not include a particular stage.
- Where a stage in one unit network does not start immediately after the finish of the same stage in the previous unit network.
The way in which discontinuities are displayed depends on the line style you choose.
- Select the Show labels check box to display labels that identify stages, gangs or trades in Line of Balance graphs. These labels can help you to differentiate between different build stages, gangs or trades, especially when printing Line of Balance graphs.
- In the Label field, select 'From font' to colour labels according to the font settings that you specify on this dialog, or select 'From line' to colour labels according to the fill colour of the corresponding 'stages' code library entries. If you choose to colour labels according to the fill colour of code library entries, the foreground fill colour is used unless this is set to white, in which case the background fill colour is used.
Some colours are more legible than others, so you may need to experiment with the font settings, or with the colours of your 'stages' codes, to make the labels as legible as possible. Darker colours tend to be more legible than lighter colours; it may also help to use a bold font.
Specify the width, in microns, of the lines in the Line width field.
Specify the height, in millimetres, of the graph in the Graph height field.
Select the Use spreadsheet default check box to display the legend in the graph using the default spreadsheet font, or clear the check box and click Font to specify a different font and to specify the colour in which to display the text. If you are displaying 'stages' labels in the graph and have selected 'From font' in the Label colour field, these settings apply to the labels as well as to the legend.
Specify the colour in which to display the background of the graph in the Background field.