Specifying that tasks on a bar can overlap
By default, the tasks on each bar are kept distinct from one another: tasks are constrained to start after the finish of any previous tasks on the same bar. However, you can specify that the tasks on a bar can overlap each other - in other words, that they may be coincident in time. You may want to do this in order to plan groups of tasks that are repeated, in which repeated work items are drawn with a series of linked steps to plan a single deliverable, where some tasks can start before their predecessors have finished. A group of such tasks is sometimes referred to as a 'unit network'. For example, if you are planning the construction of a number of house plots, you may plan a unit network for each individual plot.
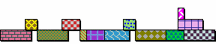
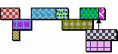
The following diagram illustrates a small unit network representing the tasks involved in the construction of a single house plot, in which no tasks overlap:

In some cases, you will not want the tasks in a unit network to overlap. However, there may be some instances - where tasks can start before their predecessors have finished - where you will want to allow an overlap between tasks. You can represent this in a project by drawing each task on its own bar. However, if you want to save space in your plans - which can be useful if a project contains many unit networks - you can achieve the same result by drawing all of the tasks in a unit network on the same bar and configuring the bar to allow its tasks to overlap.
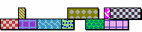
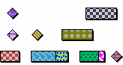
The following diagram illustrates the same unit network as above, but with some overlapping tasks, and drawn onto a bar that has been configured to allow tasks to overlap:
To specify that the tasks on a bar can overlap, either:
- Select the Tasks may overlap check box on the Bar tab of the Bar and Task Properties dialog, or on the Bar tab of the properties view.
- Display the Tasks may overlap field in the spreadsheet and select the check box that the field displays.
- Right-click a bar and select Tasks may Overlap.
Once you have specified that the tasks on a bar may overlap, you can move tasks on the bar to any date, even if their start and finish dates of the task make it coincident with one or more other tasks on the bar. Rescheduling moves tasks on such a bar according to any incoming links and constraint flags, but the tasks are not constrained by any implicit links to predecessor tasks on the same bar as they would be on a standard bar on which task overlaps are not allowed. Once you have drawn a series of overlapping tasks, you can use links to maintain the offsets between them and prevent the tasks from being moved when the project is rescheduled.
Altering the vertical separation between overlapping tasks
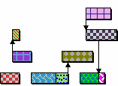
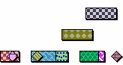
Overlapping tasks are drawn within a bar using as few rows as possible. The number of rows is determined by the largest number of overlapping tasks at any one time, as illustrated below:
|
|
|
|
At most, two tasks overlap, so tasks appear in two lanes |
At most, four tasks overlap, so tasks appear in four lanes |
You can alter the vertical separation between overlapping tasks, making them appear closer to or further away from each other vertically. To do this:
- On the Format tab, in the Format group, click Format Bar Chart. The Format Bar Chart dialog appears.
- On the Tasks tab, click Settings. The Overlapping Tasks and Milestone Rows Settings dialog appears.
- Enter a percentage in the Separation % field and click OK.
- Click Apply or Close in the Format Bar Chart dialog.
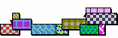
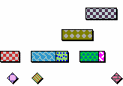
The default percentage is 100%, which results in tasks appearing immediately next to each other:

Entering a percentage above 100% results in the tasks appearing further apart. Entering such a separation percentage makes it easier to see any links between the tasks in separate rows. Below, the separation percentage is set to 200%:
Entering a percentage below 100% results in the tasks overlapping each other vertically. Below, the separation percentage is set to 50%:
Note that this field also sets the vertical separation between tasks and milestones on bars on which tasks cannot overlap, if you have clicked the Show in their own row radio button.
Specifying whether overlapping tasks are drawn above or below the main row of tasks
In the examples above, tasks that overlap another task on the same bar are drawn above the main row of tasks. This is the default behaviour. You can specify that overlapping tasks should be drawn:
- Above the main row of tasks.
- Below the main row of tasks.
To specify whether overlapping tasks are drawn above or below the main row of tasks:
- Access the Overlapping Tasks and Milestone Rows Settings dialog, as described above.
- Select the Show descending (top to bottom) check box if you want overlapping tasks to be drawn below the main row of tasks, or clear the check box if you want them to be drawn above the main row.
- Click OK, then click Apply or Close in the Format Bar Chart dialog.
Specifying where to display milestones in bars with overlapping tasks
You can display milestones in bars with overlapping tasks in the following ways:
- Place with tasks - placed in the same way as other tasks, with coincident milestones separated from each other and from other coincident tasks using the specified separation percentage.
- Show in the top/bottom row - in the main row of tasks (the bottom row if overlapping tasks are drawn above the main row, or the top row if they are drawn below the main row), where coincident milestones and tasks will overlap each other.
- Show in their own row - where coincident milestones will overlap each other, but tasks and milestones will always be separated.
To specify the way in which to display milestones in bars with overlapping tasks:
- Access the Overlapping Tasks and Milestone Rows Settings dialog, as described above.
- Click the appropriate radio button in the Milestones group to specify the way in which you want milestones to be drawn.
- Click OK, then click Apply or Close in the Format Bar Chart dialog.
Note that if you click the Show in their own row radio button, this setting applies also to bars on which tasks cannot overlap. Selecting this option is a useful way of ensuring that milestones are not partially obscured when they appear directly before other tasks on a bar, even if you do not want to allow tasks to overlap on a bar, as illustrated below:

- Overlapping tasks are ordered on bars according to their start date, so if you display a bar that contains overlapping tasks in one-task-per-line mode, the tasks appear in start date order. If tasks have the same start date, they are ordered by duration; if tasks also share the same duration, their ordering is indeterminate.
- Resource and cost allocations are never drawn overlapped, even if the tasks to which they relate are.
- Baseline tasks are not drawn overlapped, unless the Show baselines on their own lines check box is selected on the Baselines tab of the Format Bar Chart dialog.
- It can be difficult to edit overlapping tasks using the mouse. You may find it easier to switch bars that contain overlapping tasks to one-task-per-line mode before editing the tasks using the mouse.
- It is not advisable to allow tasks whose height varies to represent information to overlap on a bar, as the results of this may not be what you would expect.
- You can specify that tasks on the same bar are able to overlap by default, using the Tasks may overlap check box on the Bar tab of the Bar Chart Defaults Properties dialog.
Using links to maintain offsets between tasks
Drawing tasks in one-task-per-line mode