Displaying bar and task information in the bar chart
In addition to displaying fields in spreadsheet columns, you can display the same fields
You can display fields in three locations in the bar chart:
- To the left of the first task on each bar:
 .
. - To the right of the last task on each bar:
 .
. - On top of each task:
 .
.
You can display fields in more than one location at the same time. For example, you could display the bar name to the right of the last task on each bar and the task WBS code on top of each task.
You specify the fields that you want to display in the bar chart, the location in which to display them and the font in which to display the information, using the Task data display group on the Tasks tab of the Format Bar Chart dialog.
If you display a duration field in the bar chart, you can choose to display the date of each milestone instead of its duration, using the Show dates instead of durations check box. If you select this check box, the date, rather than the duration, of each milestone is displayed when a duration field is displayed in the bar chart:
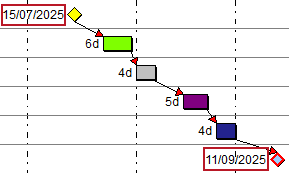
If you clear the check box, the duration of each milestone is displayed. As every milestone has a duration of zero, you may find it useful to select this check box, as the date of a milestone is a more useful piece of information than its duration.
If you display a date field in the bar chart, you can use the Annotations check box, on the Format tab of the Options dialog, to specify whether times are displayed in the field as well as dates.
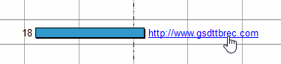
If you display a 'URL'-type user-defined field that displays a link to an external document to the left or right of tasks in the bar chart, the contents of the field appears as a clickable hyperlink. Note that 'URL'-type fields are not clickable if you display them on top of tasks.
You can configure the information that some fields display by specifying parameters. For example, if you choose to display certain cost-related fields, you can select a specific cost centre and a specific range of dates. If the field that you select supports parameters, the  button to the right becomes enabled. Click this button to access the Attributes dialog, in which you can specify the parameters.
Select the Opaque background check box to display the information with a white background, or clear the check box to display the information with a transparent background.
Specifying whether times are displayed with dates
Linking objects to external documents