Editing resource usage views
You edit resource usage views to specify the types of resource or cost centre that are analysed and to configure the way in which the view appears.
To specify which types of allocation to analyse in the resource usage view:
- Click Properties in the left section of the resource usage view pane. The Resource Usage Properties dialog appears.
- Click the Allocations tab.
- Click the appropriate Type of allocation radio button to specify whether to analyse permanent resource, consumable resource, cost or income allocations.
- If analysing permanent resource or consumable resource allocations, click the appropriate Kind of allocation radio button to specify whether to analyse only demand or scheduled allocations, or both.
- Click Close.
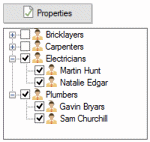
The Type of allocation radio buttons determine whether the permanent resource, consumable resource or cost centre hierarchy appears in the leftmost section of the resource usage view pane - you use this section of the resource usage view pane to specify precisely which resources or cost centres are analysed. In the illustration below, the permanent resource hierarchy is displayed:
To specify whether to analyse actual or planned amounts in the resource usage view:
- Click Properties in the left section of the resource usage view pane. The Resource Usage Properties dialog appears.
- Click the Allocations tab.
- Select one or more Detail styles check boxes to specify whether to analyse actual (completed) values, remaining (planned) values, or the sum of both actual and remaining values. If you analyse more than one type of value, it is useful to select the Show detail labels check box on the Appearance tab of the Resource Usage Properties dialog, to display an additional column to indicate the type of value that is displayed in each row.
- Click Close.
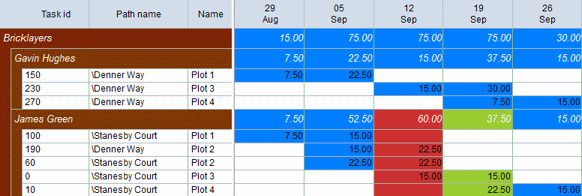
The following illustration shows the resource usage view configured to display the sum of actual and remaining values:
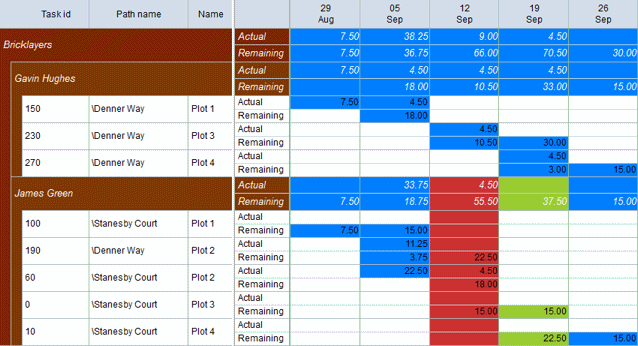
The following illustration shows the resource usage view configured to display both actual and remaining values. This doubles the number of rows that are displayed in the resource usage view. In this instance, the Show detail labels check box has been selected to display a column that indicates the type of value that is displayed in each row:
To specify whether to analyse the average allocation of permanent resources in the resource usage view:
- Click Properties in the left section of the resource usage view pane. The Resource Usage Properties dialog appears.
- Click the Allocations tab.
- Click the Permanent radio button.
- Select the Avg. allocation check box to specify that the resource usage view should analyse the average allocation of permanent resources. If you analyse more than one type of value, it is useful to select the Show detail labels check box on the Appearance tab of the Resource Usage Properties dialog, to display an additional column to indicate the type of value that is displayed in each row.
- Click Close.
To specify whether to include standard work assignments in the resource usage view:
- Click Properties in the left section of the resource usage view pane. The Resource Usage Properties dialog appears.
- Click the Allocations tab.
- Click the Permanent radio button.
- Use the fields in the Standard work assignments group to specify whether standard work is included in the analysis - and if so, which types of standard work should be included:
- Click the All standard work radio button to include details of all types of standard work assignments.
- Click the No standard work radio button to exclude standard work from the analysis.
- Click the Selected items radio button, then select the types of standard work to include in the field to the right, to include details of certain types of standard work assignments.
- Click Close.
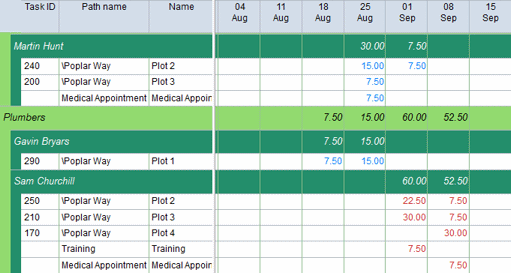
If you configure the resource usage view to display details of standard work, extra rows appear for each resource - one row for each type of standard work that they have assigned. This is illustrated below, where the Martin Hunt permanent resource has one standard work assignment - a medical appointment - and the Sam Churchill permanent resource has two standard work assignments - a medical appointment and training:
To specify which columns of information to display in the resource usage view:
- Click Properties in the left section of the resource usage view pane. The Resource Usage Properties dialog appears.
- Click the Fields tab.
- Use the Display columns grid to specify which columns of information to display in the resource usage view, beneath the spreadsheet. These columns display information about the bars or tasks to which the resources or cost centres have been assigned, or about the resources or cost centres, or allocations, themselves.
- Click Close.
To sort/group the columns of information in the resource usage view:
- Click Properties in the left section of the resource usage view pane. The Resource Usage Properties dialog appears.
- Click the Fields tab.
- Use the Group/Sort grid to specify the way in which the rows in the resource usage view are sorted/grouped. You can apply as many levels of sorting/grouping as you like, with rows in the resource usage view being sorted by the topmost level first, then by the next level, and so on:
- Click in the Field column and select the field by which you want to sort/group the rows in the resource usage view.
- Use the Source column to specify whether to sort/group the rows in the resource usage view according to information relating to the bar, task, allocation or resource/cost centre.
- Select the Group check box to display a hierarchical band at this level, grouping together the resource usage view rows that are sorted at this level, or clear the check box to omit hierarchical banding at this level.
- Select the Ascending check box to sort/group this level of rows in the resource usage grid in ascending alphanumeric order, or clear the check box to sort/group this level of rows in descending alphanumeric order.
- Use the Up and Down buttons to configure the precedence of sorting/grouping levels.
- Click the Appearance tab.
- Click in each column of the appropriate row in the Grouping and display rows grid to specify the text colour, background colour and font settings to apply to the rows in the resource usage view that indicate the way in which resources or cost centres are grouped/sorted. You can specify a different appearance for each level of grouping/sorting that you specify on the Fields tab.
- Click Close.
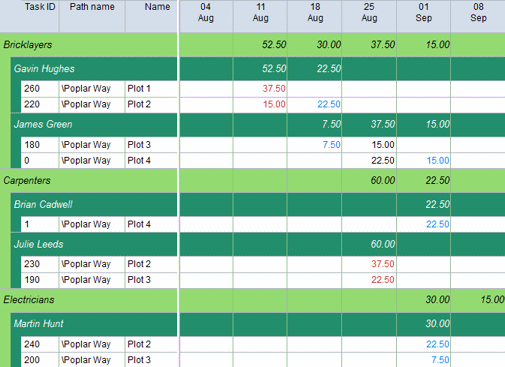
In the first illustration below, the resources are sorted/grouped first by the path name of the resources in the resource hierarchy, then by the resource name, and a hierarchical band is displayed at each level:
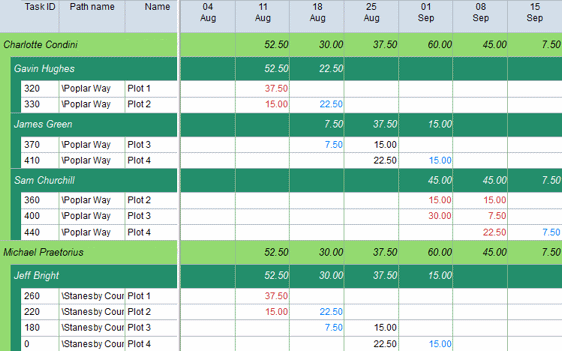
In the second illustration, the resources are sorted/grouped first by the project manager of the projects in the portfolio, then by the resource name, and a hierarchical band is displayed at each level:
To specify the scope of the data that should be included in the resource usage view:
- Click Properties in the left section of the resource usage view pane. The Resource Usage Properties dialog appears.
- Click the Scope tab.
- Click the appropriate Assignment scope radio button to specify whether to analyse data throughout the entire programme of projects, the current view or branch, or in specific charts or branches of the programme. If you choose to analyse data in specific charts or branches, select the charts or branches in the field to the right.
- Select a filter in the Activity filter field if you want to apply a filter to the resource usage view.
- Enter one or more dates in the Date range fields if you want to limit the resource usage view to a particular range of dates.
- Click Close.
To specify the appearance of the rows in the resource usage view that display usage information about resources or cost centres:
- Click Properties in the left section of the resource usage view pane. The Resource Usage Properties dialog appears.
- Click the Appearance tab.
- In the initial row of the Grouping and display rows grid, click in each column to specify the text colour, background colour and font settings to apply to the rows in the resource usage view that display usage values for resources or cost centres.
- Click Close.
If the resource usage view is configured to display information about permanent resource allocations, you can choose to highlight whether the resources are under-allocated, fully-allocated or over-allocated during each day, week, month or quarter. A resource usage view that highlights the allocation status of resources in this way is known as a "heat map". Heat maps give you an instant visual indication of resources' allocation status.
To specify the way in which to measure and highlight the allocation status of permanent resources:
- Click Properties in the left section of the resource usage view pane. The Resource Usage Properties dialog appears.
- Click the Appearance tab.
- Use the Based on radio buttons to specify the way in which you want to measure the allocation status of permanent resources:
- Click the Effort radio button to determine whether resources are over or under-allocated according to the total number of hours for which they are assigned and for which they are available in each period. This type of allocation check works by totalling the assigned hours for the resource (or skill) for each day, week, month or quarter and comparing this to the number of hours for which the resource is available. For example, if the resource usage view is configured to display a column for each month and a resource has 165 hours of availability in a particular month, the resource will appear as follows in the resource usage view: under-allocated if they are assigned for fewer than 165 hours in the month; fully-allocated if they are assigned for exactly 165 hours in the month; over-allocated if they are assigned for more than 165 hours in the month.
- Click the Allocation radio button to determine whether resources are over or under-allocated according to their allocation amounts in each period. This type of allocation check works by examining the resource's (or skill's) allocation amounts for each day, week, month or quarter and comparing this to the number of the resource that is available to be assigned. For example, if the resource usage view is configured to display a column for each week and a resource has an available allocation of 1.00, the resource will appear as follows in the resource usage view: under-allocated if at some point during the week the sum of the allocation values on their permanent resource allocations is less than 1.00; fully-allocated if the sum of the allocation values on their permanent resource allocations is exactly 1.00 for the whole week; over-allocated if they are assigned for more than 165 hours in the month.
- Click the None radio button to display information about permanent resources in the resource usage view without colour-coding to indicate their allocation status.
- Use the Highlight radio buttons to specify whether you want to indicate allocation status by highlighting the text in each cell of the resource usage view or by highlighting the background of each cell.
- Use the Colours fields to specify the colours with which to indicate the allocation status of resources.
- Click Close.
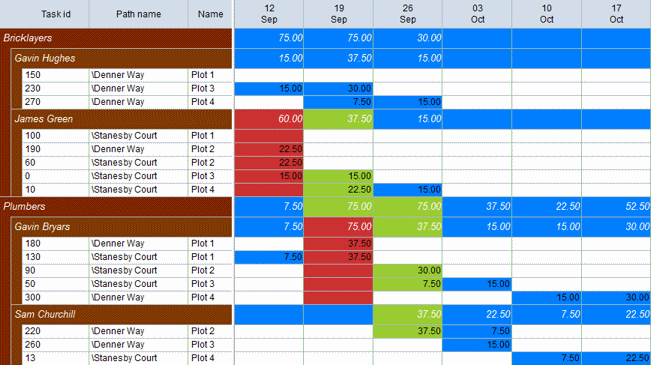
The following illustrations show resource usage views that indicate the allocation status of permanent resources. In the first illustration, the resource usage view indicates the allocation status by highlighting the background of each cell (blue indicates under-allocation, green indicates full allocation and red indicates over-allocation):
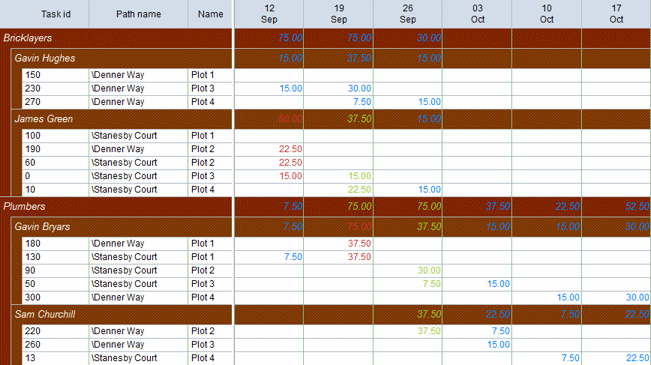
In the second illustration, the resource usage view indicates the allocation status by highlighting the text in each cell:
To specify whether to display values in the resource usage view on a daily, weekly, monthly or quarterly basis:
- Click Properties in the left section of the resource usage view pane. The Resource Usage Properties dialog appears.
- Click the Appearance tab.
- Click the appropriate radio button in the Display units group to specify whether to display values on a daily, weekly, monthly or quarterly basis. Click the Auto radio button to specify that the columns in the resource usage view should be set automatically, according to the scale at which the bar chart is set at any one time.
- Click Close.
To specify how to display zero values in the resource usage view:
- Click Properties in the left section of the resource usage view pane. The Resource Usage Properties dialog appears.
- Click the Appearance tab.
- Select the Zero as blank check box to configure the resource usage view to display nothing in the case of a zero value, or clear the check box to configure the resource usage view to display a zero ('0').
- Click Close.
To specify whether to display a column to indicate the type of values that are displayed in the resource usage view:
- Click Properties in the left section of the resource usage view pane. The Resource Usage Properties dialog appears.
- Click the Appearance tab.
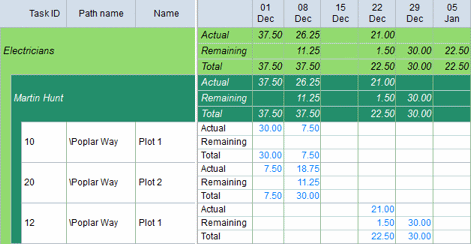
- Select the Show detail labels check box to specify that an additional column should be displayed in the resource usage view, indicating the type of value that is displayed in each row (Actual, Remaining, Total or Avg. allocation), or clear the check box to omit this column. It is useful to display this column when you select more than one of the Detail styles check boxes on the Allocations tab of the Resource Usage Properties dialog.
- Click Close.
The additional column is displayed below:
To specify whether to display a tooltip that shows further details of resource or cost centre usage for each cell of the resource usage view:
- Click Properties in the left section of the resource usage view pane. The Resource Usage Properties dialog appears.
- Click the Appearance tab.
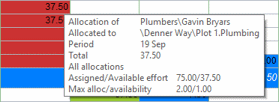
- Select the Show tool-tip check box to specify that a tooltip should be displayed when you hover the mouse pointer over cells in the resource usage view, displaying further details of the resource or cost centre usage for the period in question, or clear the check box to omit these tooltips.
- Click Close.
If you choose to display tooltips, they appear as illustrated below when you hover the mouse pointer over a cell in the resource usage view:
Generating a resource usage view
Formatting the columns, heading and cells of the resource usage view