Entering notes against tasks
You can enter textual notes against the tasks in your projects. This can be useful if you want to record information about a task in addition to its name.
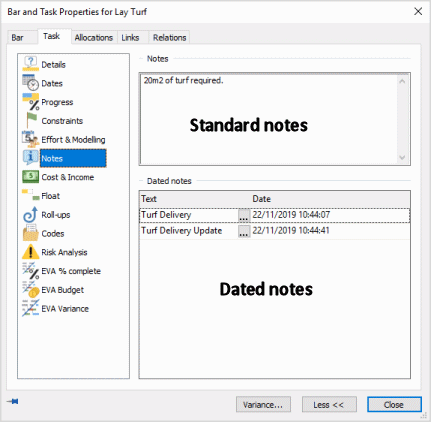
There are two types of task notes: standard notes and dated notes, which are both accessible on the Task tab of the Bar and Task Properties dialog:
To enter standard notes against a task:
- Right-click the task in the bar chart and select Properties from the menu that appears. The Bar and Task Properties dialog appears.
- On the Task tab, click Notes in the left pane and enter the information you want to save against the task in the Notes field.
- Click Close.
You can enter three types of dated note against tasks. These are notes against which the date and time of each note are recorded. The following types of dated note are available:
- Dated text notes - click
 to view the note in full.
 - Dated file notes - these are hyperlinks which can be clicked to open a particular file. Use these notes to attach relevant documents or photographs to tasks.
- Dated URL notes - these are hyperlinks which can be clicked to open a particular webpage. Use these notes to link relevant webpages to tasks.
If you use Asta Siteprogress Mobile to record progress against tasks and build stages in Asta Powerproject projects using a mobile device, any notes that have been recorded against tasks by mobile users, as well as any photographs they have taken, appear against tasks as dated notes.
To enter dated notes against a task:
- Right-click the task in the bar chart and select Properties from the menu that appears. The Bar and Task Properties dialog appears.
- On the Task tab, click Notes in the left pane.
- Right-click the Dated notes field and select the appropriate New... command from the menu that appears. A dialog appears. The dialog differs depending on the type of dated note you are entering.
- Enter the text note, select the file you want to associate with the task or enter the URL you want to associate with the task.
- Click Close.
Right-click the Dated notes field and select Copy to Clipboard to copy the dated notes to the Windows® Clipboard, from where you can paste them into another application. Right-click a note and select Delete Note to remove it from the task.
You can also enter standard notes and dated notes against a task using the Notes tab of the properties view.
Viewing the notes that have been entered against tasks
You can view the notes that have been entered against tasks in the following ways:
- By clicking Status in the left pane of the Task tab of the Bar and Task Properties dialog.
- By viewing the Notes tab of the properties view.
- By displaying task notes in the bar chart (provided a task has no standard notes recorded against it, any dated text notes that have been recorded against a task appear in popups in the bar chart when you hover over the task notes indicator; if a task has standard notes recorded against it, these notes appear in the popup and any dated text notes do not).
- By displaying the 'Notes' field in a spreadsheet column (standard notes only).
- By displaying the 'Text notes' field in a spreadsheet column (dated text notes only).
- By displaying the 'Attachments' field in a spreadsheet column (dated file or URL notes only). The 'Attachments' field displays ALT-clickable links to any dated file or URL notes that have been entered against tasks. ALT-click a file or URL note to display the Notes section of the Task tab of the Bar and Task Properties dialog, from where you can view the file or URL by clicking it.
- By displaying the 'Photo, file notes' field in a spreadsheet column (dated file or URL notes only). The 'Photo, file notes' field displays any dated file or URL notes that have been entered against tasks, along with the date and time. This field is not clickable.
Viewing dated notes that have been entered within a specific date range
You can specify 'from' and 'to' dates for spreadsheet columns that display dated notes in the following fields:
- Text notes.
- Photo, file notes.
- Attachments.
If you specify 'from' and 'to' dates, only notes from within the specified date range are displayed. As well as being able to enter specific 'from' and 'to' dates, you can specify variable dates.
To configure a spreadsheet column to display dated notes from within a specific date range:
- Right-click the heading of a column in the spreadsheet and select Table Definition from the menu that appears. The Table Definition Properties dialog appears.
- Click Add. A column is added to the Field field.
- Click the new entry in the Field field and select the field that you want to display in the column from the list of fields that is displayed. Select either Identification - Text notes; Identification - Photo, file notes; or Miscellaneous - Attachments.
- Select the new column by clicking its field in the Field field.
- Enter an appropriate title for the column in the Title field. For example, if you were setting up a column to display last week's notes, you could enter 'Last week's notes'.
- Specify the dates in which you are interested in the Dates fields. Specify two dates to display notes from a specific period, specify a 'from' date only to display notes from that date to the finish of the project, or specify a 'finish' date only to display notes from the start of the project to that date.
Click Click to select a variable date in the 'from' or 'to' date selector if you want to specify a variable date as the 'from' or 'to' date. You can then select a variable date from the menu that appears. For example, select 'Last week start (lws)' as the 'from' date and 'Last week end (lwe)' as the 'to' date if you want to display notes that were entered in the previous week.
If you want to restrict the display of notes to weeks earlier than the previous week, you can apply an offset to the variable dates that you select. - Click Close.
Displaying task notes in the bar chart
Editing bars and tasks using the properties view