Example formulae
This topic lists a number of example formulae that you may find useful - not just useful in themselves, but useful in helping you build up your own formulae, based on the examples given here. Instructions on how to create each formula are provided.
The instructions in this topic on how to create each example formula assume that you have already accessed the Formula Properties dialog. To access this dialog, right-click a formula in Library Explorer and select Properties, or select a formula in the Table Definition Properties dialog and click Edit Formula. They also assume that you have used the Formula Properties dialog to enter an appropriate name and description for the formula.
This simple example formula - actually one of the simplest formulae that can be constructed - displays a Name column that cannot be edited. One example of a situation in which this might be useful is if you want to set up a progress entry view in which users can edit the % complete column in the spreadsheet for each task, but not the Name column. If you were to simply include the standard Name column in the spreadsheet, it would be editable; creating a formula to display the name of each task results in a read-only Name column.
- On the Formula Properties dialog, click the Field button. A menu appears, from which you can choose the field that you want to insert into the formula.
- Click the Identification submenu, then click the Name field. The Select Object dialog appears. You use this dialog to specify the object about which you want the field to display information.
- For this simple formula, click OK without editing the dialog's default settings. The Formula field on the Formula Properties dialog displays the simple formula that has resulted from selecting the Name field:

Note that the Status field displays 'OK', indicating that the formula is valid. - Click OK to close the Formula Properties dialog.
You can follow the instructions above to create a formula that displays a read-only version of any field. For example, to create a formula that displays a read-only Start column, follow the instructions above, but instead of selecting Name from the Identification submenu in step 2, select Start from the Date submenu.
This formula illustrates how to refer to data from specific tasks on bars that contain more than one task. It displays the duration between the first and second tasks on each bar. In order to do this, you need to construct a formula that subtracts the start date of the first task on each bar from the start date of the second task.
- Firstly, you need to insert the start date of the second task on each bar into the formula. On the Formula Properties dialog, click the Field button. A menu appears.
- Click the Date submenu, then click the Start field. The Select Object dialog appears.
- Select Task in the Object to evaluate for field, click the Use by order radio button and select 2nd in the field to the right of the radio button to indicate that you want to refer to the start date of the second task on each bar, then click OK. The Formula field on the Formula Properties dialog displays the formula as it stands so far:
![Task[>2].Start](../../../../Graphics/Spreadsheet/exampleformula2.gif)
Task[>2].Start indicates that the formula will evaluate the start date of the second task on each bar. - You now need to insert a minus symbol into the formula. Click the Symbol button. A menu appears, from which you can choose the symbol that you want to insert into the formula.
- Within the Arithmetic section of the menu, click -. A minus sign appears in the formula:
![Task[>2].Start-](../../../../Graphics/Spreadsheet/exampleformula3.gif)
Note that the Status field now displays an error and that the location of the error in the formula itself is highlighted with red underlining. The error is caused by the formula being incomplete.
Note also that as an alternative to selecting the minus sign from the Symbol menu, you can type it directly into the Formula field; once you are comfortable with constructing formulae, you can type any element of a formula directly into the Formula field. - Finally, you need to insert the start date of the first task on each bar into the formula. Click the Field button, click the Date submenu, then click the Start field. The Select Object dialog appears.
- Select Task in the Object to evaluate for field, click the Use by order radio button and select 1st in the field to the right of the radio button to indicate that you want to refer to the start date of the first task on each bar, then click OK. The Formula field on the Formula Properties dialog now displays the complete formula, which - as the Status field confirms - is now valid:
![Task[>2].Start-Task[>1].Start](../../../../Graphics/Spreadsheet/exampleformula4.gif)
- Click OK to close the Formula Properties dialog.
Note that in order to make formulae easier to read, you can insert space characters - using the SPACE bar on your keyboard - between the various elements. In this example formula, it would be good practice to insert space characters on either side of the minus sign, as illustrated below:
![Task[>2].Start - Task[>1].Start](../../../../Graphics/Spreadsheet/exampleformula5.gif)
All illustrations of the following example formulae in this topic will include such space characters in suitable places.
This formula illustrates how to refer to data from the summary task in which each task is located. It displays the duration of each task as a percentage of the duration of its parent summary. In order to do this, you need to construct a formula that divides the duration of each task by the duration of its summary task, then multiplies the result by 100 to present it as a percentage.
- Firstly, you need to insert the Duration field into the formula. On the Formula Properties dialog, click the Field button. A menu appears.
- Click the Date submenu, then click the Duration field. The Select Object dialog appears. Click OK to close it.
- Insert a division symbol into the formula, either by selecting it from the Arithmetic section of the Symbol menu or by typing it directly into the formula. The formula should now look as follows:

- You now need to insert the duration of each task's summary into the formula. Click the Field button, click the Date submenu, then click the Duration field. The Select Object dialog appears.
- Select Summary in the Object to evaluate for field, then click OK. The Formula field on the Formula Properties dialog displays the formula as it stands so far:

Summary.Duration indicates that the formula will evaluate the duration of each task's parent summary. - As it stands, the formula will return a fraction. In order to display the duration of each task as a percentage of the duration of its parent summary, add opening and closing parentheses around the formula - either by selecting them from the Miscellaneous section of the Symbol menu or by typing them directly into the formula - and type * 100 after the closing parenthesis:

- Click OK to close the Formula Properties dialog.
Making a small change to the formula - selecting Project rather than Summary in step 5 above - would display the duration of each task as a percentage of its parent project:

Selecting Programme rather than Summary in step 5 above would display the duration of each task as a percentage of the overall programme of projects:

This formula is similar to the example above, but rather than displaying the duration of each task as a percentage of the duration of its parent summary in the live data, it displays it as a percentage of the duration of its parent summary in the current baseline. In order for this formula to work, you must have a baseline that has been set to 'Current'.
- On the Formula Properties dialog, insert the Duration field into the formula, followed by a division symbol:
- You now need to insert the duration of each task's summary in the current baseline into the formula. Click the Field button, click the Date submenu, then click the Duration field. The Select Object dialog appears.
- Select Summary in the Object to evaluate for field, select CB Current Baseline in the Project or baseline field, then click OK. The Formula field on the Formula Properties dialog displays the formula as it stands so far:
![Duration / Summary[~CB].Duration](../../../../Graphics/Spreadsheet/exampleformula11.gif)
Summary[~CB].Duration indicates that the formula will evaluate the duration of each task's parent summary in the current baseline, rather than in the live data. - As in the above example, complete the formula by adding opening and closing parentheses around the formula and typing * 100 after the closing parenthesis:
![(Duration / Summary[~CB].Duration) * 100](../../../../Graphics/Spreadsheet/exampleformula12.gif)
- Click OK to close the Formula Properties dialog.
This formula illustrates one way of using variable dates within formulae. It displays the duration between today's date - a variable date - and the start date of each task. One example of a situation in which this might be useful is if you want to enable resources to see how long they have before they need to start work on a task.
- On the Formula Properties dialog, insert the Start field into the formula, followed by a minus symbol:

- You now need to insert the variable date of today's date into the formula. Click the Symbol button, click the Variable Date submenu, then click the Today variable date. The completed formula should now look as follows:

- Click OK to close the Formula Properties dialog.
This formula is similar to the example above, but it displays the duration in hours without a time unit being displayed. You might find it useful to omit the time unit from the results of such a formula if you need to export the data to an external application - for example Microsoft Excel® - via a tabular report.
- As in the example above, on the Formula Properties dialog, insert the Start field, followed by a minus symbol, followed by the variable date of Today into a formula:
- Add opening and closing parentheses around the formula - either by selecting them from the Miscellaneous section of the Symbol menu or by typing them directly into the formula - and type / '1h' after the closing parenthesis:

/ '1h' converts the resulting duration into hours, according to whichever calendar is applied to each task. If you wanted to convert the duration into days, you could enter / '1d' instead. - Click OK to close the Formula Properties dialog.
The formula in the above example would probably return many results that are not whole numbers (integers), for example 96.34 or 15.89. To prevent this, and to simplify the information that is returned by the above formula, you could round the results to whole numbers as follows.
- On the Formula Properties dialog, enter the formula given in the example above:
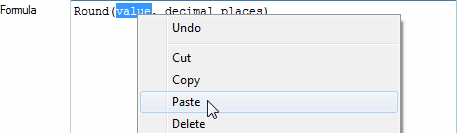
- Click in the Formula field at the start of the formula.
- Click the Function button, click the Mathematical submenu, then click the Round(value, decimal_places) function. The formula should now look as follows:

You now need to replace the value parameter of the Round function with the formula as it stood previously. - Click and drag the cursor over the (Start - Today) / '1h' section of the formula to select it, then right-click the selected text and select Cut from the menu that appears:

- Click and drag the cursor over the value section of the formula to select it, then right-click the selected text and select Paste from the menu that appears:
- Finally, specify the number of decimal places to which to round the formula results by selecting the decimal_places section of the formula and overtyping it with 0. The completed formula should now look as follows:

- Click OK to close the Formula Properties dialog.
This formula illustrates one way of manipulating dates. It displays the date one week prior to the start date of each task. One example of a situation in which this might be useful is if you need to order materials one week before the task for which they are required starts. This formula would return the date on which the materials need to be ordered.
- On the Formula Properties dialog, insert the Start field into the formula, followed by a minus symbol:
- To complete the formula, you need to subtract a week from the start date. Type - '1w' at the end of the formula:

- Click OK to close the Formula Properties dialog.
This formula illustrates one way of manipulating cost data. It calculates and displays the VAT element of costs - assuming a VAT rate of 20%.
- On the Formula Properties dialog, click the Field button, click the Cost or Income submenu, then click the Cost field. The Select Object dialog appears.
- Click OK without editing the dialog's default settings. The Formula field on the Formula Properties dialog displays the formula as it stands at the moment:

- To display the VAT element of costs, we need to divide the cost by 100, then multiply by the current rate of VAT - 20 in this case. Add opening and closing parentheses around the Cost field - either by selecting them from the Miscellaneous section of the Symbol menu or by typing them directly into the formula - type / 100 before the closing parenthesis, then type * 20 after the closing parenthesis:

- Click OK to close the Formula Properties dialog.
This formula illustrates another way of manipulating cost data. It calculates and displays the cost of each task as a percentage of the cost of the programme.
- On the Formula Properties dialog, insert the Cost field into the formula, followed by a division symbol:

- You now need to insert the cost of the programme into the formula. Click the Field button, click the Cost or Income submenu, then click the Cost field. The Select Object dialog appears.
- Select Programme in the Object to evaluate for field, then click OK. The Formula field on the Formula Properties dialog displays the formula as it stands so far:

Programme.Cost indicates that the formula will evaluate the cost of the programme of projects, rather than the cost of each task. - Add opening and closing parentheses around the formula, then and type * 100 after the closing parenthesis:

- Now complete the formula by typing & "%" at the end. This will display a percentage sign at the end of the formula results:

- Click OK to close the Formula Properties dialog.
This formula illustrates another way of manipulating cost data. It displays the cost of each task from a specific task centre only, which can be useful if you have more than one cost centre assigned to each task.
- On the Formula Properties dialog, click the Field button, click the Cost or Income submenu, then click the Cost field. The Select Object dialog appears.
- Select the cost centre for which you want to display costs in the Cost centre field, then click OK. The completed formula should now look as follows:

The parameters that have been added to the Cost field indicate that the formula will evaluate the cost of the cost centre with an internal ID of 2552, rather than the cost of all cost centres. Note that in your project, the internal ID of the selected cost centre will probably be different. - Click OK to close the Formula Properties dialog.
This formula illustrates one way of manipulating resource data. It calculates and displays the percentage by which effort on each task has increased or reduced in comparison with the tasks' effort in the current baseline. Expressed as a calculation, this is the difference between planned effort and actual effort, divided by planned effort and expressed as a percentage.
- On the Formula Properties dialog, click in the Formula field and add an opening parenthesis to the formula.
- Click the Field button, click the Resource submenu, then click the Effort variance field. The Select Object dialog appears. Click OK. The formula should now look as follows:

- Add a division symbol after the formula.
- Click the Field button, click the Resource submenu, then click the Effort field. The Select Object dialog appears.
- Select CB Current Baseline in the Project or baseline field, then click OK. The formula should now look as follows:
![(EffortVariance(na, 0, 0, 0, CB) / [~CB].Effort](../../../../Graphics/Spreadsheet/exampleformula29.gif)
- Complete the formula by adding a closing parenthesis, then typing * 100 & "%" to indicate that you want to multiply the result by 100 and display a percentage sign at the end of the formula results:
![(EffortVariance(na, 0, 0, 0, CB) / [~CB].Effort) * 100 & "%"](../../../../Graphics/Spreadsheet/exampleformula30.gif)
- Click OK to close the Formula Properties dialog.
This formula illustrates one way of using conditions in formulae. It scans the contents of each task's Notes field to ascertain whether it contains the word "delay". If the word is found for a task, the formula displays it; if the word is not found, the formula displays the word "OK". This formula uses an If function, which enables you to construct formulae that do one thing if a condition is met, and another thing if the condition is not met.
- On the Formula Properties dialog, click the Function button, click the Conditional submenu, then click the If(expression1, expression2, expression3) function. The formula should now look as follows:

You need to replace the expression1 parameter of the function with the condition, the expression2 parameter with the action to take if the condition is met and the expression3 parameter with the action to take if it is not met. - Click and drag the cursor over the expression1 parameter to select it, then press DELETE on the keyboard.
- Click the Function button, click the Text submenu, then click the Search(find_text, within_text) function. The formula should now look as follows:

- Select the find_text parameter and overwrite it with the text that you want to search for, enclosed within double quotation marks - "delay":

- Select the within_text parameter, then click the Field button, click the Identification submenu and click Notes. Click OK to close the Select Object dialog when it appears. The formula should now look as follows:

- Select the expression2 parameter and overwrite it with "Delay", to indicate that this word should be displayed if the word "delay" is present in a task's Notes field.
- Select the expression3 parameter and overwrite it with "OK", to indicate that this word should be displayed if the word "delay" is not present in a task's Notes field. The completed formula should look like this:

- Click OK to close the Formula Properties dialog.
This formula illustrates an alternative way of using conditions in formulae. It scans the contents of each task's Notes field to ascertain whether it contains the word "delay". If the word is found for a task, the formula displays a red traffic light indicator; if the word is not found, a green traffic light indicator is displayed.
- On the Formula Properties dialog, click the Function button, click the Conditional submenu, then click the If(expression1, expression2, expression3) function. The formula should now look as follows:
You need to replace the expression1 parameter of the function with the condition, the expression2 parameter with the action to take if the condition is met and the expression3 parameter with the action to take if it is not met. - Click and drag the cursor over the expression1 parameter to select it, then press DELETE on the keyboard.
- Click the Function button, click the Text submenu, then click the Search(find_text, within_text) function. The formula should now look as follows:
- Select the find_text parameter and overwrite it with the text that you want to search for, enclosed within double quotation marks - "delay":
- Select the within_text parameter, then click the Field button, click the Identification submenu and click Notes. Click OK to close the Select Object dialog when it appears. The formula should now look as follows:
You now need to overwrite the expression2 and expression3 parameters with the traffic light indicators that should be displayed in each case. These are reserved words within each formula: High displays a red traffic light, Medium displays amber, Low displays green and None displays grey. - Select the expression2 parameter and overwrite it with High, to indicate that a red traffic light should be displayed if the word "delay" is present in a task's Notes field.
- Select the expression3 parameter and overwrite it with Low, to indicate that a green traffic light should be displayed if the word "delay" is not present in a task's Notes field. The completed formula should look like this:

- Click OK to close the Formula Properties dialog.
This formula illustrates an a way of using conditions in formulae using the Switch function, which - unlike the If function - can handle more than two alternative outcomes. This formula displays a red traffic light indicator if a task's cost is between 200 and 300, an amber traffic light if it is between 100 and 200 and a green traffic light if it is less than 100.
- On the Formula Properties dialog, click the Function button, click the Conditional submenu, then click the Switch(test1, expression1, test2, expression2, ...) function. The formula should now look as follows:

You need to replace the test1 parameter of the function with the first condition, the expression1 parameter with the action to take if that condition is met, the test2 parameter with the second condition, the expression2 parameter with the action to take if that condition is met, and so on. - Click and drag the cursor over the test1 parameter to select it, then press DELETE on the keyboard.
- Click the Field button, click the Cost or Income submenu, then click the Cost field. Click OK to close the Select Object dialog when it appears. The formula should now look as follows:

- As the cost field is displayed as a string, you need to translate it into a numerical value. You can do this by dividing it by £1: type / '£1' after the Cost field in the formula:

- To complete the first condition, type < 100 after / '£1'. The complete condition should now be Cost / '£1' <100:

- You now need to overwrite the expression1 parameter with the traffic light indicator that should be displayed if the first condition is met. You want a green traffic light to be displayed in this case, so select the expression1 parameter and overwrite it with Low:

- You now need to overwrite the test2 parameter with the second condition: one that tests whether the cost is between 100 and 200. Select the test2 parameter and overwrite it with Cost / '£1' >= 100 and Cost / '£1' < 200:

- Overwrite the expression2 parameter with the traffic light indicator that should be displayed if the second condition is met. You want an amber traffic light to be displayed in this case, so select the expression2 parameter and overwrite it with Medium:

- You now need to complete the formula by adding your own third test and expression, which will display a red traffic light if the cost is between 200 and 300. Overwrite the ... with Cost / '£1' >= 200 and Cost / '£1' < 300, High. The completed formula should look as follows:

- Click OK to close the Formula Properties dialog.
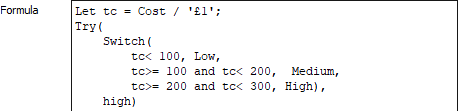
You could simplify this formula by using Let to define a local variable and reusing the local variable in the formula. An alternative, using Let, is illustrated below:

Note also in the example above how using line breaks and spaces at the start of lines in a formula makes it easier to read. You can add line breaks to formulae wherever you like by pressing ENTER.
The example formula above, which uses the Switch function to display a red traffic light indicator if a task's cost is between 200 and 300, an amber traffic light if it is between 100 and 200 and a green traffic light if it is less than 100, displays nothing if a task has a cost that is greater than or equal to 300. This can be seen as an error in the formula itself, as it fails to cater for all possible situations. Other formulae may generate errors. For example, you could construct a formula that referred to a user-defined field that did not exist, one that referred to a cost centre that was not allocated to a task, or one that divided cost by planned cost in circumstances where the planned cost may be zero (attempting to divide anything by zero returns an error).
It is possible to construct formulae in such a way that something - rather than nothing - is displayed if an error such as this occurs. You do this using the Try function, which enables you to specify what should be displayed if the formula returns nothing. In its simplest form, the Try function takes two parameters: the formula itself, and the action that should be taken if an error occurs.
This example formula illustrates the use of the Try function by taking the example above and enclosing it within the Try function, indicating that a red traffic light indicator should be displayed if the cost of a task is outside the parameters of the formula.
- On the Formula Properties dialog, enter the formula given in the example above:
- Click in the Formula field at the start of the formula.
- Click the Function button, click the Error Handling submenu, then click the Try(expression, <alternative>) function. The formula should now look as follows:

You now need to replace the expression parameter of the Try function with the formula as it stood previously. - Click and drag the cursor over the entire formula from Switch(Cost onwards to select it, then right-click the selected text and select Cut from the menu that appears.
- Click and drag the cursor over the expression section of the formula to select it, then right-click the selected text and select Paste from the menu that appears. The section of the formula that you cut is pasted over the expression parameter as follows:

- Now overwrite the <alternative> parameter with High, to indicate that a red traffic light should be displayed if the cost of a task is outside the parameters of the formula. The completed formula should now look as follows:

- Click OK to close the Formula Properties dialog.
You could simplify this formula by using Let to define a local variable and reusing the local variable in the formula. An alternative, using Let, is illustrated below:
Note also in the example above how using line breaks and spaces at the start of lines in a formula makes it easier to read. You can add line breaks to formulae wherever you like by pressing ENTER.
This formula displays the cost of each task from the cost centre with an object ID of 30, minus the income of each task from the same cost centre.

This formula displays the income in the live data minus the income that is recorded in the that current baseline for each task. In order for this formula to work, you must have a baseline that has been set to 'Current'.
![Income - [~CB].Income](../../../../Graphics/Spreadsheet/exampleformula49.gif)
This formula uses the Value function to modify the work character strings for the permanent resources with IDs of 1074 and 1075 into numeric values, adds them together and displays the result.

This formula displays the combined costs from two specific cost centres once a 5% discount has been applied to them for each task.

This formula displays the cost of each task, divided by the number of days in the tasks' duration.

In order for this formula to work, you must have set up a permanent scheduled allocation-level user-defined field called CostPerDayFactor, an integer-type field that is used to store the cost per day of each allocation, expressed in £ per day.

This formula displays a red traffic light indicator if a task's cost is greater than its income and a green traffic light if the cost is less than or equal to the income.

The following formula produces an identical result:

In order for this formula to work, you must have set up the following bar-level user-defined fields:
- OrderPlaced, a boolean-type field that is used to record whether or not an order has been placed.
- DelTime, a duration-type field that is used to store the delivery time in days.
This formula displays a red traffic light indicator if a task's delivery date falls on or earlier than yesterday, an amber traffic light indicator if it falls today, a green traffic light indicator if it falls on or later than tomorrow, and a grey traffic light indicator if an order has actually been placed.
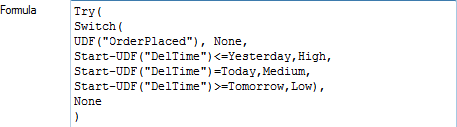
You could simplify this formula by using Let to define a local variable and reusing the local variable in the formula. An alternative, using Let, is illustrated below:
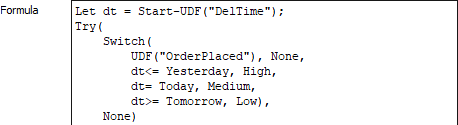
Note also in the example above how using line breaks and spaces at the start of lines in a formula makes it easier to read. You can add line breaks to formulae wherever you like by pressing ENTER.
This formula displays the cost of each task from either the cost centre with an object ID of 30 or the cost centre with an object ID of 1080, whichever is the highest.

This formula displays the cost of each task from either the cost centre with an object ID of 30 or the cost centre with an object ID of 1080, whichever is the lowest.

This formula displays the duration between the finish date of each task and the finish date of the project.

This formula displays the number of days between the finish date of each task and the finish date of the project.

This formula displays the percentage of the total cost of each task that relates to the cost centre with an object ID of 1080.

This formula displays the quantity of a resource that has been used, based on the percentage complete of the corresponding task. Note that the PercentComplete field needs to be divided by 100 in order to be used in this way, as it is treated as an integer in formulae. For example, a value of 50% complete would be translated into an integer of 50, so we need to divide that by 100 before multiplying it by the Quantity field in order to end up with a the correct figure. If a task was 50% complete and the Quantity field had a value of 1,000, this formula would return a value of 500.
