Setting vertical scale display options
You use the Vertical Scale tab of the Format Bar Chart dialog to adjust the height of the view by changing the height of bars and specifying the amount of space between bars.
You can set the height and spacing of normal bars and allocations
Specify the height of bars and allocations by entering dimensions in the Bar Height, Bar Gap, Allocation Bar Height and Allocation Bar Gap boxes.
The different dimensions are shown below:

Key:
1 - 1/2 bar gap.
2 - Bar height.
3 - Task to baseline gap.
4 - Allocation bar height.
5 - 1/2 allocation bar gap.
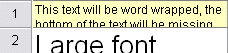
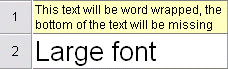
If you choose to word-wrap text in one or more spreadsheet cells, use the Auto-size rows when word-wrapping check box to specify whether you want the height of spreadsheet rows to be adjusted automatically so that all of the text in a cell is visible. The effects of this are illustrated below:
|
|
|
|
Spreadsheet rows not set to auto-size: some text is obscured |
Spreadsheet rows set to auto-size: all text is visible |
If you choose to auto-size rows when word wrapping, you may not need to use the Fit columns to text printing option in order to display all of the text in the spreadsheet in a printout.
Note that if you are currently displaying a 'jagged progress' view, The Live and Baseline groups on this tab are swapped around and the options relating to allocations are unavailable.
Auto height definitions can override the bar and allocation heights that you set on this tab.