Setting reschedule options
There are a number of options that you can select to control the way in which Asta Powerproject reschedules tasks. You can set up default reschedule options and you can specify reschedule options at the time of rescheduling.
You set your default reschedule options using the Reschedule tab of the Options dialog. To access the Options dialog, click the File tab, then click Options.
You specify options at the time of rescheduling using the Reschedule dialog. To access the Reschedule dialog, on the Home tab, in the Schedule group, click the Reschedule Branch dropdown and select Options.
Use the options in the Tasks with no links group to determine how unlinked tasks are rescheduled.
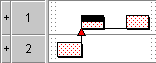
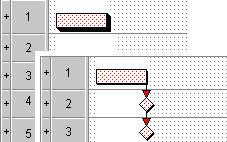
In the illustration below, the task on bar 4 is unlinked and is currently setting the project finish date:
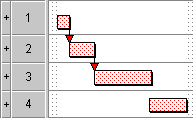
Select the Leave as drawn within constraints radio button to specify that unlinked tasks are not moved. In this example, this would result in float on bars 1-3:
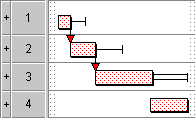
Select the Move if at project or chart bounds radio button to specify that unlinked tasks are moved by the minimum amount necessary if they are setting the start date or finish date of the chart or project. In this example, this would result in the task on bar 4 moving backwards so that it no longer sets the finish date:
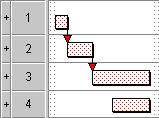
Select the Move to ASAP/ALAP position radio button to specify that unlinked tasks are moved to their ASAP/ALAP position. In this example, this would result in the task on bar 4 moving to its earliest possible position:
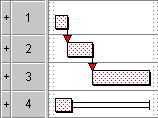
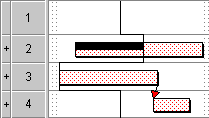
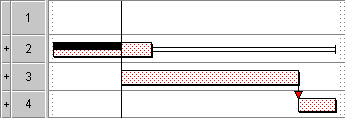
Use the options in the Tasks with only outgoing links group to determine how tasks with outgoing links but no incoming links are rescheduled.
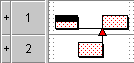
In the illustration below, the task on bar 3 has an outgoing link but no incoming link:
Select the Leave as drawn within constraints radio button to specify that tasks with only outgoing links are not moved. In this example, the task on bar 3 would affect the project finish date:
Select the Move to ASAP/ALAP position radio button to specify that tasks with only outgoing links are moved to their ASAP/ALAP position. In this example, this would result in the task on bar 3 moving to its earliest possible position:

Use the options in the Compatibility group to make Asta Powerproject reschedule ALAP tasks, tasks with finish flags and summary tasks in the way that earlier versions of Asta Powerproject rescheduled them. You may prefer to enable these options if you are used to working with a previous version of Asta Powerproject.
Use the ALAP tasks have no free float option to choose whether you want to suppress the display of free float to the left of ALAP tasks. When this option is selected, no free float is displayed to the left of ALAP tasks. When this option is cleared, free float is displayed to the left of ALAP tasks.
Use the Finish on or before flags are soft option to choose whether you want to allow tasks with finish flags to slip beyond their finish flag date. When this option is selected, tasks are allowed to slip beyond their finish flag date. When this option is cleared, the reschedule will not position tasks later than their finish flag date, which might result in negative float, and super-critical tasks, on the critical path.
If you apply a Deadline flag to a task, the task is always able to slip beyond the flag date, in the same way that tasks can slip beyond finish flags if you select the Finish on or before flags are soft option, regardless of your selection on this dialog. Deadline flags point in the opposite direction to other finish flags. They appear as blue, unless the task slips beyond them, in which case they appear as red.
Use the Summaries critical where content is option to choose whether you want summary tasks to be displayed as critical when some - but not all - of the tasks within their summary group are on the critical path. When this option is selected, such summary tasks are shown as critical. When this option is cleared, such summary tasks are not shown as critical.
Use the Negative float applies to chain check box to choose the way in which you want negative float to be applied to chains of tasks following a reschedule. When this option is selected, chains of tasks that include negative float exceed the constraint at the end of the chain, resulting in negative float being applied to all of the tasks in the chain. When this option is cleared, the constraint at the end of the chain is respected, resulting in negative float only being applied to the task at the start of the chain.
This is illustrated below:
|
|
|
|
Negative float... check box cleared |
Negative float... check box selected |
Select the Move part completed links check box to maintain link logic when progress occurs out of sequence. When a link starts on an uncompleted task and ends on the a completed portion of a part-completed task (hence 'part completed links'), then you may wish to carry the link from the completed portion of the task to the next uncompleted portion.
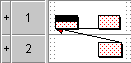
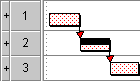
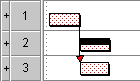
In the illustration below, there is a link from the uncompleted task on bar 2 to the completed portion of the task on bar 1:
Select the Move part completed links check box to specify that part completed links move to the next uncompleted portion of the task. In this example, the link would move to the second portion of the task on bar 1:
Clear the Move part completed links check box to specify that part completed links do not move. In this example, the link remains on the first portion of the task on bar 1:
Select the Truncate float within chart boundaries check box to choose whether the float in a subchart is displayed up to the project finish date, or truncated to the parent task's finish date.
When this check box is cleared, float in subcharts is displayed in relation to the project finish date, as in the illustration below, where the project finish date is later than the last task in the displayed subchart (the tasks in the inset represent the subchart of the expanded task that appears to the top left):
You might find this float display distracting and prefer to truncate float to the parent task's finish date, which you can do by selecting the check box, as illustrated below:
Select the Use delivery date as deadline check box to use the delivery date that has been specified against the project as a deadline when rescheduling, or clear the check box to use the finish date of the last task in the project to set late and free finish dates and calculate float.
A delivery date provides a deadline for all tasks in the project, so if this check box is selected, any tasks that exceed the delivery date have negative float (ie they become super-critical) following a reschedule.
A project's delivery date is disregarded during rescheduling if any constraint other than a Start On or After flag has been applied to the expanded or summary task that represents the project.
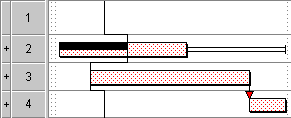
Select the Relink around completed tasks check box to redraw links around completed tasks when progress occurs out of sequence. When a series of linked tasks has a completed task in the middle, the links around the task will 'bypass' it, and the surrounding uncompleted tasks will be linked together.
If you clear the check box, completed tasks in the midst of uncompleted tasks will remain within the link logic.
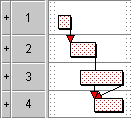
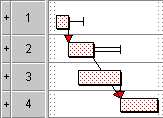
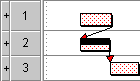
In the illustration below, the three tasks are linked, but only the middle task is complete:
Select the Relink around completed tasks check box to specify that completed tasks are removed from the link logic. In this example, the links to and from the task on bar 2 would be deleted and the tasks on bars 1 and 3 would be linked directly:
Clear the Relink around completed tasks check box to specify that completed tasks maintain their position in the link logic. In this example, the links to and from the task on bar 2 remain and the task on bar 1 is moved to its ALAP position:
Select a progress period in the Straighten progress line to period field if you want to straighten the progress line to the report date of the selected progress period when you perform a reschedule. If you choose to straighten the progress line, any uncompleted tasks that fall before the report date are moved forward in line with the report date so that they lie in the future (indicating that they are still to be carried out).
If you straighten the progress line, you can choose whether you also want to move any completed tasks that lie after the report date backwards to before the report date (indicating that they have been carried out and are in the past). If you choose to move completed tasks that fall beyond the report date, the progress line will be completely straight following the reschedule, but the dates of some completed tasks will have changed. If you choose not to move completed tasks that fall beyond the report date, the progress line will not be completely straight - the reschedule will only push uncompleted tasks forward.
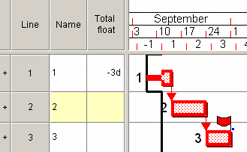
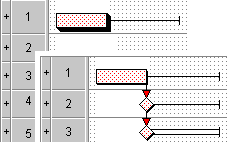
In the illustration below, the jagged progress line shows that the task on bar 2 is ahead of schedule and the task on bar 3 is behind schedule:
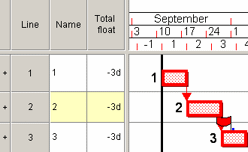
With the progress period selected in the Straighten progress line to period field, the progress line is straightened during the reschedule. The completed part of task 2 has moved behind the progress line and task 3 has moved in front of it:
With no progress period selected, completed tasks are not moved behind the progress line and uncompleted tasks are only moved if they are affected by links and constraint flags. This can result in uncompleted tasks lying behind the progress line, as illustrated below:
If you select a progress period in the Straighten progress line to period field and select the Only move forward to make straight check box, uncompleted tasks are moved beyond the report date, but completed tasks are not moved before the report date. This is illustrated below, where task 3 has moved in front of the report date, but the completed part of task 2 has not moved, resulting in a partially-straightened progress line:

Rather than selecting a specific progress period in the Straighten progress line to period field, you can specify that the progress line should be straightened to the report date of whichever progress period is currently being used to report progress - the progress entry period. To do this, select Progress entry period in the field.
Select one or more link categories in the Ignore link categories field to ignore links of that category during a reschedule. For example, if you have High Priority, Medium Priority and Low Priority link categories, you might want to reschedule the project while temporarily ignoring links with the Low Priority link category. You could do this by selecting the Low Priority link category.
Each time you reschedule a project you can produce a reschedule report that details the results of the reschedule and any errors and anomalies that have come about as a result of it. You may find it useful to produce reschedule reports for a number of reasons - for example, to locate and resolve link loops, to locate inconsistencies regarding constraints, and to identify the tasks that are on the longest path - ie the critical path - through the project network. The reschedule report is extremely useful for critical path analysis, and provides you with metrics on the quality of planned projects. For example, critical path analysis demands that a project network should have just one start task and just one finish task and that there should be no link loops or out of sequence progress; you can use the reschedule report to identify whether or not this is the case in a project.
Calculating the drag of critical tasks when rescheduling
Calculating the cascade activity number of tasks when rescheduling
Checking the integrity of the critical path when rescheduling
Producing and viewing reschedule reports